Full CDC semantics land in the Iceberg output for Redpanda Connect
Your lakehouse mirrors the database, instantly.
Get an overview of ETL pipelines, where to use them, and how to build an ETL pipeline for streaming data with Apache Beam and Redpanda.


To build a streaming ETL pipeline with Apache Beam and Redpanda, you need to create a data processing pipeline that reads data from an input topic in Redpanda, filters data based on a specific region, enriches the data through a lookup operation, adds the retrieved state description information to the data stream, and writes the filtered and enriched data to an output topic in Redpanda. You can follow the tutorial in this blog to understand the process in detail.
To create an Apache Beam data streaming pipeline application in Java, first, create a Maven project. Then, add the necessary project dependencies and plugins to the pom.xml file. This includes Beam JAR files and Kafka client JARs. Finally, define the main application class and implement the functionality for your use case. This blog provides a detailed guide and code snippets for each step.
To build a streaming ETL pipeline with Apache Beam and Redpanda, you'll need Docker installed on your machine, Java JDK 17, Apache Maven 3.8.7, an IDE of your choice for Java project development, and a running Redpanda instance on Docker.
Apache Beam is a versatile open-source framework for designing and executing data processing pipelines. It can handle both batch and streaming data, allowing you to create a seamless data processing workflow. Apache Beam's notable features include language-specific SDKs, such as Python, Java, and Go, and strong portability, meaning the same pipeline code can be executed on various execution engines like Apache Flink™, Apache Spark™, and Google Cloud Dataflow. Apache Beam also offers a Direct Runner feature to execute pipelines on a single node or machine.
In Apache Beam, PipelineOptions plays a crucial role in configuring and parameterizing a Beam pipeline. The `withValidation()` method applies validation to the options to ensure they conform to the expected properties, and `as(Options.class)` casts the options to the custom Options interface defined as part of the App class. The Options interface specifies the configuration options for the pipeline, allowing it to be configured with different options at runtime, like Kafka topics, Kafka brokers, and other pipeline-specific options.
Apache Beam® is a versatile open-source framework for designing and executing data processing pipelines. It can handle both batch and streaming data, and allows you to create a seamless data processing workflow, encompassing everything from reading data from source systems to applying transformations and writing the output to target systems.
One of Apache Beam's most notable features is its language-specific SDKs, which include Python, Java, and Go SDKs. These allow developers to write pipeline code in their preferred programming language. Beam also boasts strong portability; the same pipeline code can be executed on various execution engines such as Apache Flink™, Apache Spark™, and Google Cloud Dataflow. In addition, Apache Beam offers a Direct Runner feature to execute pipelines on a single node or machine.
Beam's flexibility enhances collaboration and allows you to maximize the use of existing skill sets within your team. Its unified programming model simplifies the development of data processing pipelines, saving time and reducing complexity.
In this tutorial, you'll learn how to build a streaming ETL pipeline using Apache Beam and Redpanda. Through this practical example, you'll become more comfortable with Beam and develop the skills needed for your own data processing pipelines.
Imagine you’re building an e-commerce application that captures product orders and customer geolocation information. Your objective is to analyze real-time data on product orders from specific regions based on a predefined mapping of state codes to regions.
To filter and analyze the data, you use the corresponding state codes to enrich the incoming data with descriptive information about the states. The demo data set used in this tutorial only consists of two regions, North and South, each comprising five states. The mapping between state codes and regions is provided later through a class calledStateAndRegion.java.
The tutorial example uses the following data processing pipeline structure:
The following diagram illustrates how Beam and Redpanda work together for this solution:
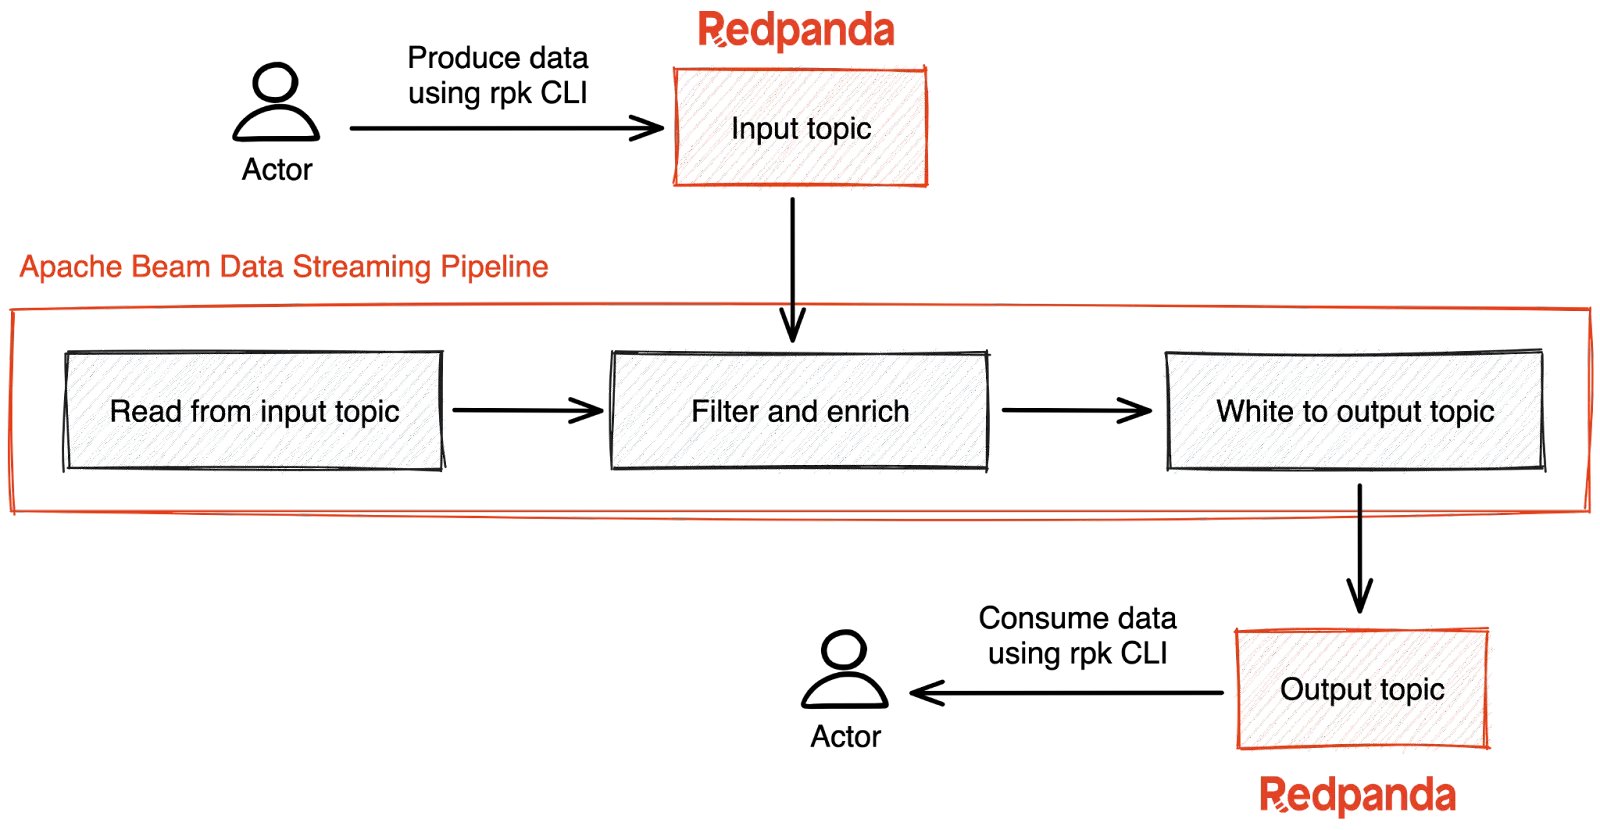
Architecture diagram
To complete this tutorial, you'll need the following:
To start, check that you have a running Redpanda container using the following command:
docker ps
docker ps
If you’re running a single-node Redpanda cluster per the quick start instructions, then you should see an output similar to this:
CONTAINER ID   IMAGE                                                COMMAND                   CREATED         STATUS         PORTS                                                                                                              NAMES
cec1bdff492c   docker.redpanda.com/redpandadata/console:v2.2.4      "/bin/sh -c 'echo \"$…"   6 minutes ago   Up 6 minutes   0.0.0.0:8080->8080/tcp                                                                                             redpanda-console
ebccfc877212   docker.redpanda.com/redpandadata/redpanda:v23.1.11   "/entrypoint.sh redp…"    6 minutes ago   Up 6 minutes   8081-8082/tcp, 0.0.0.0:18081-18082->18081-18082/tcp, 9092/tcp, 0.0.0.0:19092->19092/tcp, 0.0.0.0:19644->9644/tcp   redpanda-0
You can execute the following command and check the status of the Redpanda cluster:
docker exec -it redpanda-0 rpk cluster infoYou should see an output similar to the one below:
CLUSTER
=======
redpanda.25f35248-fddb-4316-89bb-88a7cfba6242

BROKERS
=======
ID    HOST        PORT
0*    redpanda-0  9092

TOPICS
======
NAME      PARTITIONS  REPLICAS
_schemas  1           1
Execute the following command to connect to the Redpanda container's terminal session:
docker exec -it redpanda-0 bash
Then, execute the following CLI command inside the Redpanda container's terminal session to list the topics:
rpk topic listBy default, there won't be any topics listed in response to the rpk topic list command. Execute the following commands inside the Redpanda container's terminal session to create some topics for the tutorial:
rpk topic create user_activityrpk topic create events_from_southuser_activity is the source topic where the e-commerce application's user activities and IDs and state information are published. The events_from_south topic serves as the destination topic to hold filtered and enriched data.
Execute the rpk topic list command again to check the created topics. You should see an output as shown below:
NAME               	PARTITIONS  REPLICAS
events_from_south  	1          	1
user_activity      	1         		1
Alternatively, you can use the Redpanda console UI to check the Redpanda cluster status and to explore or interact with your topics.
Keep this Redpanda container's terminal session open, as you'll use it again after creating the Apache Beam application.
Now that the Redpanda container instance is up and running and the topics are ready, you can start building the Beam data streaming pipeline application in Java.
Create a project directory called streaming-pipeline-with-redpanda-and-apache-beam on your machine. Use an IDE of your choice to create a Java Maven project with the following structure:
streaming-pipeline-with-redpanda-and-apache-beam
|-- pom.xml
|-- src
    |-- main
    |   |-- java
    |       |-- org
    |           |-- example
    |               |-- App.java
    |-- test
    |   |-- java
    |       |-- org
    |           |-- example
    |               |-- AppTest.java
The final project structure and tutorial code can be seen in this GitHub repository.
Edit the pom.xml file and include the following code to add the necessary dependencies:
 <dependencies>
    <!-- Apache Beam -->
    <dependency>
      <groupId>org.apache.beam</groupId>
      <artifactId>beam-sdks-java-core</artifactId>
      <version>${beam.version}</version>
    </dependency>
    <dependency>
      <groupId>org.apache.beam</groupId>
      <artifactId>beam-runners-direct-java</artifactId>
      <version>${beam.version}</version>
    </dependency>
    <dependency>
      <groupId>org.apache.beam</groupId>
      <artifactId>beam-sdks-java-io-kafka</artifactId>
      <version>${beam.version}</version>
    </dependency>
    <dependency>
      <groupId>org.projectlombok</groupId>
      <artifactId>lombok</artifactId>
    </dependency>

    <!-- Kafka -->
    <dependency>
      <groupId>org.apache.kafka</groupId>
      <artifactId>kafka-clients</artifactId>
      <version>${kafka.version}</version>
    </dependency>

    <!-- SLF4J for logging -->
    <dependency>
      <groupId>org.slf4j</groupId>
      <artifactId>slf4j-simple</artifactId>
      <version>${slf4j.version}</version>
    </dependency>
    <dependency>
      <groupId>junit</groupId>
      <artifactId>junit</artifactId>
      <version>3.8.1</version>
      <scope>test</scope>
    </dependency>
    <dependency>
      <groupId>org.projectlombok</groupId>
      <artifactId>lombok</artifactId>
      <version>1.18.26</version>
      <scope>compile</scope>
    </dependency>
  </dependencies>
Then, add the following plugins:
<build>
    <plugins>
      <plugin>
        <groupId>org.apache.maven.plugins</groupId>
        <artifactId>maven-jar-plugin</artifactId>
        <version>3.2.0</version>
        <configuration>
          <archive>
            <manifest>
              <mainClass>org.example.App</mainClass>
            </manifest>
          </archive>
        </configuration>
      </plugin>
      <plugin>
        <artifactId>maven-assembly-plugin</artifactId>
        <version>3.3.0</version>
        <configuration>
          <archive>
            <manifest>
              <mainClass>org.example.App</mainClass>
            </manifest>
          </archive>
          <descriptorRefs>
            <descriptorRef>jar-with-dependencies</descriptorRef>
          </descriptorRefs>
        </configuration>
        <executions>
          <execution>
            <id>make-assembly</id>
            <phase>package</phase>
            <goals>
              <goal>single</goal>
            </goals>
          </execution>
        </executions>
      </plugin>
    </plugins>
  </build>
The Beam JAR files are included as dependencies in this XML file. This file also includes Kafka client JARs that allow the file to interact with the Redpanda cluster. Additionally, the full code includes a <properties> section, which incorporates the version details of the libraries and build plugins required for the project. This information helps the build tool construct the application JAR, ensuring that the application is built with the correct versions of each component.
Override the contents of the autogenerated App.java file with the following code to implement the main application class functionality for this tutorial's use case:
package org.example;

import com.fasterxml.jackson.core.JsonProcessingException;
import com.fasterxml.jackson.databind.ObjectMapper;
import org.apache.beam.sdk.Pipeline;
import org.apache.beam.sdk.PipelineResult;
import org.apache.beam.sdk.io.kafka.KafkaIO;
import org.apache.beam.sdk.options.Default;
import org.apache.beam.sdk.options.Description;
import org.apache.beam.sdk.options.PipelineOptions;
import org.apache.beam.sdk.options.PipelineOptionsFactory;
import org.apache.beam.sdk.transforms.DoFn;
import org.apache.beam.sdk.transforms.ParDo;
import org.apache.beam.sdk.transforms.Values;
import org.apache.beam.sdk.values.KV;
import org.apache.beam.sdk.values.PCollection;
import org.apache.kafka.common.serialization.StringDeserializer;
import org.joda.time.Duration;
import org.slf4j.Logger;
import org.slf4j.LoggerFactory;

import java.util.Collections;

public class App {

    private static final Logger LOG = LoggerFactory
            .getLogger(App.class);

    /**
     * Specific pipeline options
     */
    public interface Options extends PipelineOptions {
        @Description("Kafka Bootstrap Servers")
        @Default.String("localhost:9092")
        String getKafkaServer();

        void setKafkaServer(String value);

        @Description("Kafka Input Topic Name")
        @Default.String("user_activity")
        String getInputTopic();

        void setInputTopic(String value);

        @Description("Kafka Output Topic Name")
        @Default.String("events_from_south")
        String getOutputTopic();

        void setOutputTopic(String value);

        @Description("Duration to wait in seconds")
        @Default.Long(-1)
        Long getDuration();

        void setDuration(Long duration);

    }

    /**
     * Filter only the events from the southern region and enrich the data with the state description
     */
    private static EnrichedUserActivity filterAndEnrichEvents(String row) throws JsonProcessingException {
        StateAndRegion stateAndRegion = new StateAndRegion();
        EnrichedUserActivity enrichedUserActivity = new EnrichedUserActivity();
        ObjectMapper objectMapper = new ObjectMapper();
        UserActivity userActivity = objectMapper.readValue(row, UserActivity.class);
        if (stateAndRegion.getRegionByStateCode(userActivity.getStateCode()).equals("South")) {
            System.out.println("South");
            enrichedUserActivity.setUserId(userActivity.getUserId());
            enrichedUserActivity.setProductId(userActivity.getProductId());
            enrichedUserActivity.setStateDescription(stateAndRegion.getStateDescriptionByStateCode(
                    userActivity.getStateCode()));
            enrichedUserActivity.setRegion("South");
        }
        System.out.println("enrichedUserActivity is : " + enrichedUserActivity);
        return enrichedUserActivity;
    }

    public static void main(String[] args) throws Exception {
        // PipelineOptionsFactory.fromArgs(args) creates an instance of PipelineOptions from the
        // command line arguments passed to the application.
        // PipelineOptions is a configuration interface that provides a way to set options for a pipeline,
        // such as the runner to use, the number of workers, and any pipeline-specific options.
        Options options = PipelineOptionsFactory.fromArgs(args)
                .withValidation().as(Options.class);
        LOG.info("Pipeline options are: ");
        LOG.info(options.toString());
        LOG.info("Printed Pipeline options");
        Pipeline pipeline = Pipeline.create(options);

        // It now connects to the queue and processes every event.
        // The pipeline.apply() method reads data from the Redpanda topic using the KafkaIO.read() method.
        PCollection<String> data = pipeline.apply(
                "ReadFromKafka",
                KafkaIO.<String, String> read()
                        .withBootstrapServers(options.getKafkaServer())
                        .withTopics(
                                Collections.singletonList(options
                                        .getInputTopic()))
                        .withKeyDeserializer(StringDeserializer.class)
                        .withValueDeserializer(StringDeserializer.class)
                        .withoutMetadata()).apply("ExtractPayload",
                // The Values.create() method extracts the values from the Kafka records read from the topic.
                Values.<String> create());

        data.apply(ParDo.of(new DoFn<String, String>() {
            @ProcessElement
            public void processElement(ProcessContext c) {
                System.out.println(String.format("** element |%s| **",
                        c.element()));
            }
        }));

        // The code below filters the events coming from the states that belong to the southern region, then
        // enriches the event information by transforming the state code into the state description.
        // Finally, it writes the southern region's events to their own topic.
        PCollection<String> enrichedAndSegregatedEvents = data.apply("Filter and Enrich Event Information",
                ParDo.of(new DoFn<String, String>() {
                    @ProcessElement
                    public void processElement(ProcessContext c) throws JsonProcessingException {
                        EnrichedUserActivity enrichedUserActivity = filterAndEnrichEvents(c.element());
                        if (enrichedUserActivity.getUserId() != null) {
                            c.output(enrichedUserActivity.toString());
                        }
                    }
                }));

        // The following transformation snippet processes each element in enrichedAndSegregatedEvents by creating a
        // new KV element where the key is the string "South" and the value is the original element from the
        // earlier computed enrichedAndSegregatedEvents variable.
        PCollection<KV<String, String>> eventsKV = enrichedAndSegregatedEvents
                .apply("Prepare Events for the Output Topic",
                        ParDo.of(new DoFn<String, KV<String, String>>() {
                            @ProcessElement
                            public void processElement(ProcessContext c)
                                    throws Exception {
                                /*
                                System.out.println("c.element is : " + c.element());
                                System.out.println("c.element KV is : " + KV.of("South", c.element()));
                                System.out.println("c.element KV is : " + KV.of("region", c.element()));
                                */
                                c.output(KV.of("South", c.element()));
                            }
                        }));

        // Publish the above filtered and enriched events to the destination topic
        eventsKV
                .apply("WriteToKafka",
                        KafkaIO.<String, String> write()
                                .withBootstrapServers(
                                        options.getKafkaServer())
                                .withTopic(options.getOutputTopic())
                                .withKeySerializer(
                                        org.apache.kafka.common.serialization.StringSerializer.class)
                                .withValueSerializer(
                                        org.apache.kafka.common.serialization.StringSerializer.class));

        // Initiate the pipeline execution
        PipelineResult run = pipeline.run();
        // The waitUntilFinish method is used to block the main thread until the pipeline execution is complete or
        // until the specified duration has elapsed. In this case, the duration is set to -1 and hence the pipeline
        // will continue running until it is explicitly terminated or encounters an error.
        run.waitUntilFinish(Duration.standardSeconds(options.getDuration()));
    }
}
There are inline comments in the code above to help you understand the multiple actions in the App class.
In general, PipelineOptions plays a crucial role in configuring and parameterizing a Beam pipeline. withValidation() applies validation to the options to ensure that they conform to the expected properties, and as(Options.class) casts the options to the custom Options interface defined as part of the App class. The Options interface specifies the configuration options for the pipeline. Using this interface, the pipeline can be configured with different options at runtime, like Kafka topics, Kafka brokers, and other pipeline-specific options.
The code connects to the Redpanda cluster and reads the events from the configured input topic. The ReadFromKafka transformation step reads the data from a Kafka topic using the KafkaIO connector and returns a PCollection object. PCollection is a fundamental data structure of Apache Beam that represents a distributed data set that the pipeline operates on.
The code also creates the PCollection<String> object named data.
As part of the Filter and Enrich Event Information pipeline transformation, you filter only the events from the southern region and enrich the data with the state description. To achieve this, you'll use other methods like filterAndEnrichEvents and classes like StateAndRegion, EnrichedUserActivity, and UserActivity. You'll create these helper classes in the next steps.
The filtered and enriched southern region events are then written to the output topic in Redpanda as part of the WriteToKafka transformation.
You've now finished setting up the App.class functionality.
Next, you'll create the other helper classes mentioned above. Create a class called EnrichedUserActivity.java in the org.example package for holding enriched data/event information to write to the output topic, and paste in the code below:
package org.example;

import com.fasterxml.jackson.annotation.JsonProperty;
import lombok.AllArgsConstructor;
import lombok.Data;
import lombok.NoArgsConstructor;

@NoArgsConstructor
@AllArgsConstructor
@Data
public class EnrichedUserActivity {

    @JsonProperty("user_id")
    private String userId;
    @JsonProperty("product_id")
    private int productId;
    @JsonProperty("state_description")
    private String stateDescription;

    @JsonProperty("region")
    private String region;

}
Create a class named StateAndRegion.java in the same package and paste in the following code to define the mapping information related to the states and regions of the country:
package org.example;

import java.util.HashMap;

public class StateAndRegion {

    private HashMap<String, String> stateRegionMap = new HashMap<>();
    private HashMap<String, String> stateCodeAndDescriptionMap = new HashMap<>();
    StateAndRegion() {
        stateRegionMap.put("TN", "South");
        stateRegionMap.put("AP", "South");
        stateRegionMap.put("KL", "South");
        stateRegionMap.put("KA", "South");
        stateRegionMap.put("PY", "South");
        stateRegionMap.put("DL", "North");
        stateRegionMap.put("RJ", "North");
        stateRegionMap.put("UK", "North");
        stateRegionMap.put("UP", "North");
        stateRegionMap.put("HP", "North");

        stateCodeAndDescriptionMap.put("TN", "Tamil Nadu");
        stateCodeAndDescriptionMap.put("AP", "Andhra Pradesh");
        stateCodeAndDescriptionMap.put("KL", "Kerala");
        stateCodeAndDescriptionMap.put("KA", "Karnataka");
        stateCodeAndDescriptionMap.put("PY", "Pondicherry");
        stateCodeAndDescriptionMap.put("DL", "Delhi");
        stateCodeAndDescriptionMap.put("RJ", "Rajasthan");
        stateCodeAndDescriptionMap.put("UK", "Uttarakhand");
        stateCodeAndDescriptionMap.put("UP", "Uttar Pradesh");
        stateCodeAndDescriptionMap.put("HP", "Himachal Pradesh");
    }
    public String getRegionByStateCode(String stateCode) {
        return stateRegionMap.get(stateCode);
    }

    public String getStateDescriptionByStateCode(String stateCode) {
        return stateCodeAndDescriptionMap.get(stateCode);
    }
}
This class contains the HashMap variable with the mapping details of each state code to its region, as well as each state code to its description. These data points are used in two ways during the data enrichment operation. First, they're used to filter data based on region. Secondly, they're involved in a lookup operation that maps state codes to their corresponding state descriptions.
Next, create a class named UserActivity.java in the org.example package to map the incoming data stream and paste in the following code:
package org.example;

import com.fasterxml.jackson.annotation.JsonProperty;
import lombok.AllArgsConstructor;
import lombok.Data;
import lombok.NoArgsConstructor;

@NoArgsConstructor
@AllArgsConstructor
@Data
public class UserActivity {

    @JsonProperty("user_id")
    private String userId;
    @JsonProperty("product_id")
    private int productId;
    @JsonProperty("state_code")
    private String stateCode;

}
You've created an entire Beam streaming data pipeline application in Java. Now for the moment of truth.
Use the Maven build tool from your IDE or from the command line to build your project. If you are using the source code from the cloned repository, you can use the following command to build the project:
mvnw clean install
Once the application JAR is built, you can execute the application with the following command:
"<path_to_java_binary>/java" -jar target/streaming-pipeline-with-redpanda-and-apache-beam-1.0-SNAPSHOT-jar-with-dependencies.jar --runner=DirectRunner
Next, access the Redpanda container's terminal and execute the following command to produce some data to test the streaming application:
rpk topic produce user_activity
The console will be listening to input data that you can feed in by pasting the following JSON content:
{"user_id": "user1", "product_id": 1, "state_code": "TN"}
{"user_id": "user2", "product_id": 2, "state_code": "KL"}
{"user_id": "user3", "product_id": 3, "state_code": "DL"}
{"user_id": "user4", "product_id": 4, "state_code": "AP"}
{"user_id": "user5", "product_id": 5, "state_code": "HP"}
Note that the input data contains geolocation data from states belonging to both the South (TN, KL, AP) and North (DL, HP) regions.
Next, open another terminal, connect to the Redpanda container, and execute the following commands:
docker exec -it redpanda-0 bashrpk topic consume events_from_south
The first command initiates a consumer connection to the Redpanda cluster, and the second listens to the output topic events_from_south, where the Apache Beam application has published the filtered and enriched data.
You should see the following output:
{
  "topic": "events_from_south",
  "key": "South",
  "value": "EnrichedUserActivity(userId=user1, productId=1, stateDescription=Tamil Nadu, region=South)",
  "timestamp": 1681468886805,
  "partition": 0,
  "offset": 0
}
{
  "topic": "events_from_south",
  "key": "South",
  "value": "EnrichedUserActivity(userId=user2, productId=2, stateDescription=Kerala, region=South)",
  "timestamp": 1681468886810,
  "partition": 0,
  "offset": 1
}
{
  "topic": "events_from_south",
  "key": "South",
  "value": "EnrichedUserActivity(userId=user4, productId=4, stateDescription=Andhra Pradesh, region=South)",
  "timestamp": 1681468886810,
  "partition": 0,
  "offset": 2
}
The above output clearly shows that only the southern region data was enriched with corresponding state descriptions and registered in the output topic.
Congratulations! You've successfully built a streaming ETL pipeline with Apache Beam and Redpanda and learned how to execute the data pipeline that you built. Apache Beam is an ideal choice for integrating with existing data infrastructure due to its support for a wide range of data sources and sinks, including Apache Cassandra, Google Cloud Pub/Sub, Apache Solr, Elasticsearch, Google BigQuery, Amazon S3, and Azure Blob Storage.
It simplifies the process of building data processing pipelines with a unified programming model that works seamlessly for both streaming and batch use cases. With Beam, developers can focus on the pipeline logic rather than the underlying infrastructure.
You can find the source code for this tutorial in this repository. Make sure to check out the documentation and browse the Redpanda blog for more tutorials. If you get stuck, just ask in the Redpanda Community on Slack.
Subscribe to our VIP (very important panda) mailing list to pounce on the latest blogs, surprise announcements, and community events!
Opt out anytime.