How to build a governed Agentic AI pipeline with Redpanda
Everything you need to move agentic AI initiatives to production — safely
Upgrade inventory management with real-time technologies in just 7 steps
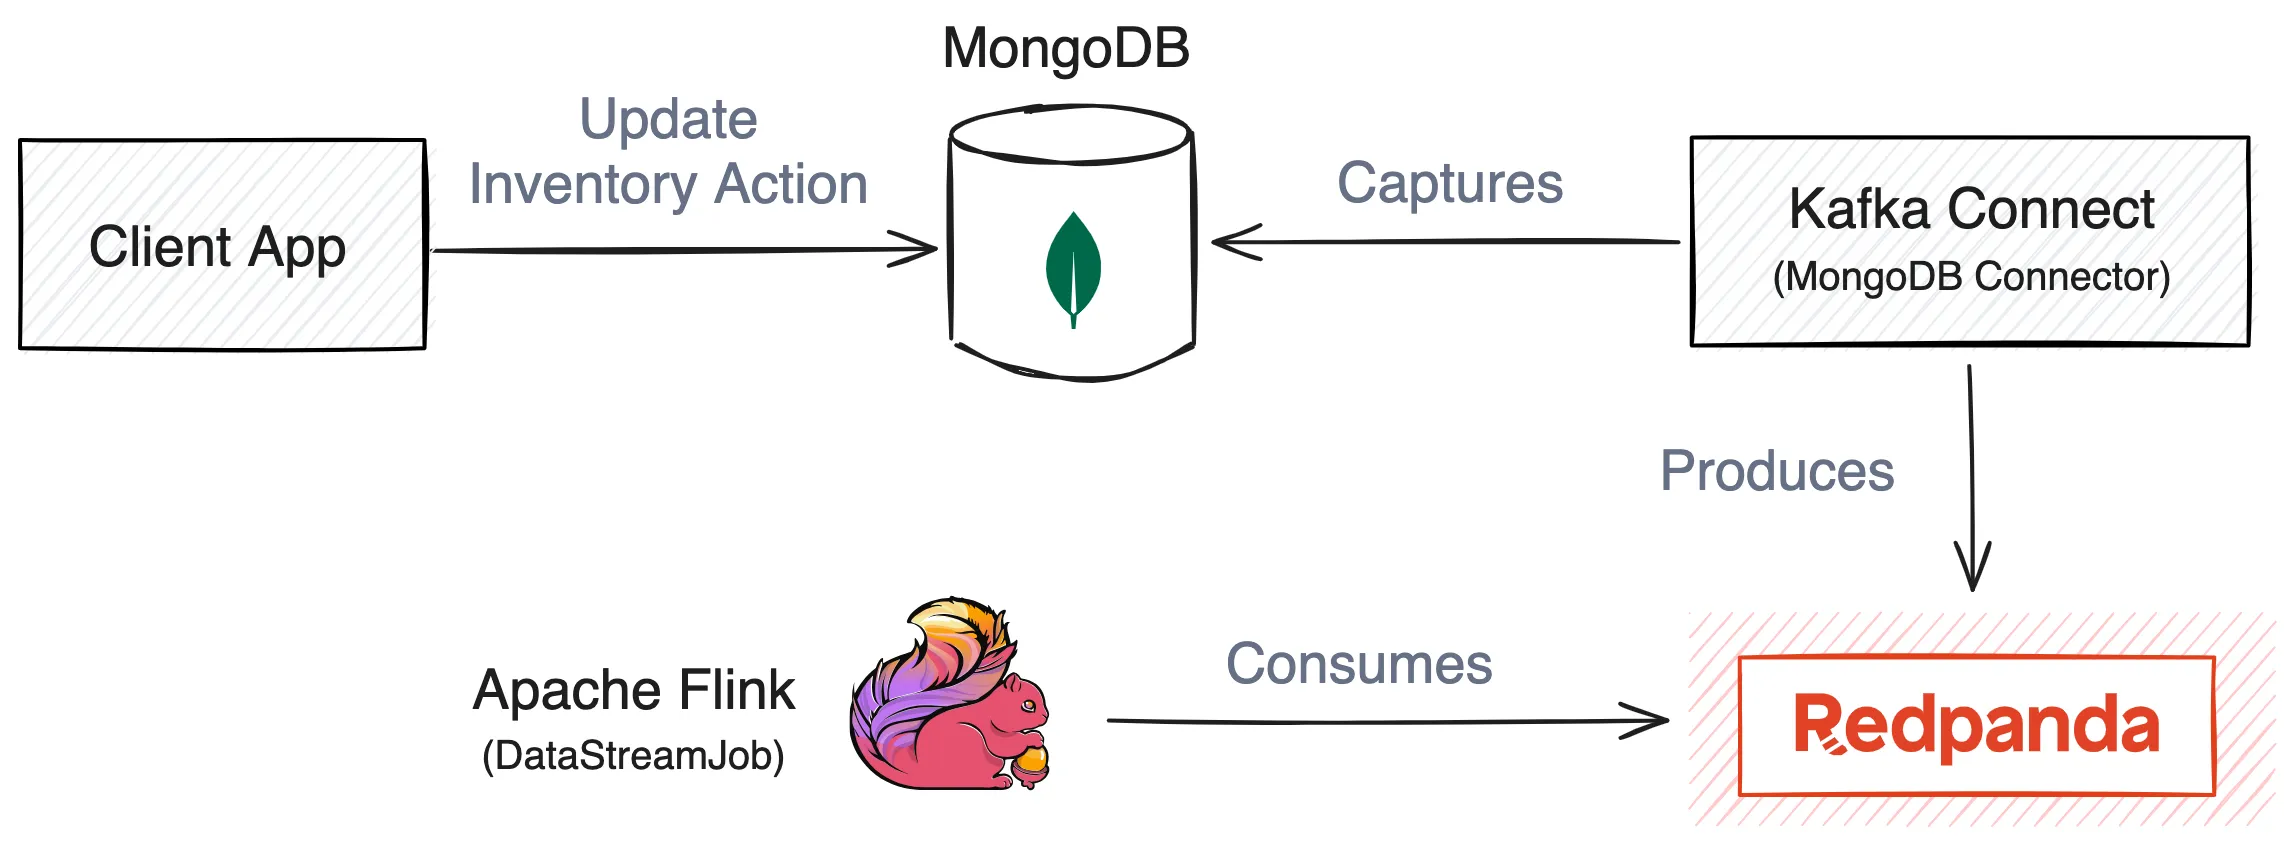
You can build an inventory monitoring system using real-time data technologies like change data capture (CDC) in MongoDB, data streaming with Redpanda, and real-time data stream processing in Apache Flink. This system captures sales as they occur in real time, and data changes in the MongoDB collection will be instantly tracked to Redpanda topics via Kafka Connect. Flink will then consume the event data from Redpanda topics.
You need to start an instance of Apache Flink to run in session mode. This will enable you to submit your stream processing. You can start Apache Flink using a specific command from the root directory of the project. You can check that the container started successfully by running the docker ps command.
You can set up MongoDB and Kafka Connect using a Docker Compose file called compose-mongo.yml. This file has the configuration to start the MongoDB and Kafka Connect instances. It builds the Kafka Connect container with the MongoDB source connector obtained from the official Maven repository. You can start the MongoDB container and Kafka Connect instance by executing a specific command.
The preexisting Flink application was created using an archetype and is located in the folder named FlinkIMS. The structure of the folder is as follows: DataStreamJob.java is an Apache Flink job that will read data from the Redpanda.
Before getting started, you'll need to have a Java Developer Environment with at least JDK 19+ and Maven 3.8.6, Docker Desktop running on your machine, and a code editor like VS Code. All codes and configuration files used in this tutorial are located in a GitHub repository. Redpanda also has a cloud deployment, but this tutorial uses the self-managed option.
An inventory management system is a combination of software, processes, and sometimes hardware that tracks and manages the flow of goods throughout the supply chain of businesses. It involves digitally keeping records of goods and materials supplied to your business and how they are distributed out of it. This system can automate the reordering of supplies based on rules that consider current stock levels in real time. It can also automate the generation of discount sales on items closer to expiration to avoid complete losses.
Inventory management and monitoring are similar to managing stock in a corner store. Imagine you own a store that stocks various items like chips, drinks, and candy bars. You do regular stock takes, counting items and recording quantities to manage sold and available stock. You also set minimum stock levels, reorder items when they fall below this threshold, and track expiration dates to avoid waste.
Modern inventory systems automate this process by updating inventory as items are bought. However, manual checks are still necessary, and you might run out of stock before your next count. Real-time inventory systems address this by updating stock levels as sales occur, providing an accurate, up-to-date inventory picture. Responses can be automated based on the data—for example, creating discounts for items about to expire and flagging discrepancies between the system's stock levels and manual stock takes.
In this tutorial, you'll learn how to build an inventory monitoring system for your products using real-time data technologies like change data capture (CDC) in MongoDB, data streaming with Redpanda (a leaner and easier-to-use Apache Kafka® alternative), and real-time data stream processing in Apache Flink®.
An inventory management system is a combination of software, processes, and sometimes hardware that tracks and manages the flow of goods throughout the supply chain of businesses. This involves digitally keeping records of goods and materials supplied to your business and how they are distributed out of it, similar to the corner store scenario.
Once you have a system like this, you can automate the reordering of supplies based on rules that consider current stock levels in real time (like your minimum chips level at the corner store). Also, based on product batch details such as expiration date, you can automate the generation of discount sales on items closer to expiration to avoid complete losses.
This system will capture sales as they occur in real time, and data changes in the MongoDB collection will be instantly tracked to Redpanda topics via Kafka Connect. Flink will then consume the event data from Redpanda topics.

Before getting started, you'll need to make sure you have the following:
All codes and configuration files used in this tutorial are located in this GitHub repository. Start by cloning the repository, making modifications where necessary for your testing purposes:
git clone  https://github.com/redpanda-data-blog/inventory-monitoring-flink-mongodb
cd mongo-redpanda-flink
It's worth noting that Redpanda also has a cloud deployment, but this tutorial uses the self-managed option.
To start, set up three nodes in your Redpanda cluster.
To do so, execute the command below from the root directory of the project:
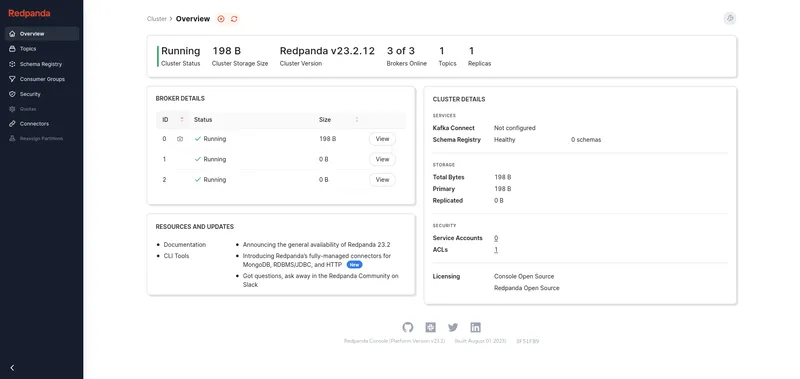
sudo docker-compose -f ./compose-redpanda.yml up -dOnce you’re done, visit http://127.0.0.1:8080 in your web browser to access Redpanda Console:

This will allow you to easily visualize the activities of your Redpanda cluster.
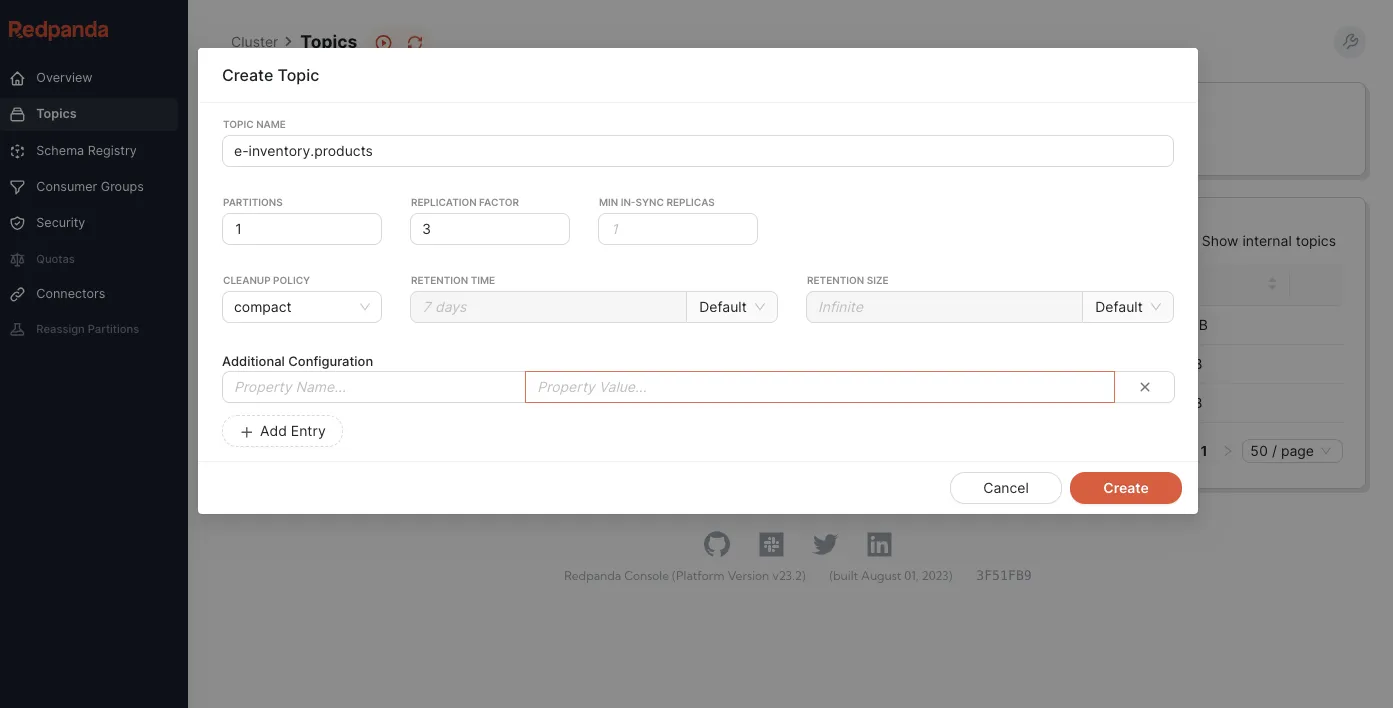
Next, create the topic that will consume data from Redpanda. Go to the http://127.0.0.1:8080/topics in Redpanda Console, then click on Create Topic.

Fill in the topic details for the name put e-inventory.products, the partitions put 1, replication factor put 3, select compact as cleanup policy and click on Create.

Now, your topic is ready to consume data.
A Docker Compose file called compose-mongo.ymlis provided with the configuration to start the MongoDB and Kafka Connect instances. This builds the Kafka Connect container with the MongoDB source connector obtained from the official Maven repository. You can execute the command below to start the MongoDB container and Kafka Connect instance:
sudo docker-compose -f ./compose-mongo.yml up -dCheck that the container started successfully by running the docker ps command, as seen in the image below:

In the root directory of the project, you have a file named config.js with the following content:
rsconf = {
          _id: "rs0",   // the name of the replica set
          members: [{ _id: 0, host: "mongo-inventory:27017", priority: 1.0 }], //adding this instance to the set
};

rs.initiate(rsconf);  //initiating the replica set configured above

rs.status();  // returning the current status of the replication set


db = db.getSiblingDB("e-inventory"); // Creating database
db.createCollection("products"); // creating collection for products inventory
db.createCollection("orders"); // creating collection for orders recieved
This configuration creates a database named e-inventory and an empty collection named products inside the database, which you'll use to add/update your product inventory.
To apply the configuration to your mongodb container and create the database and the products collection, you need to run the following command:
cat "$PWD/config.js" | sudo docker exec -i mongo-inventory mongoshNow that your database is ready, you need to set up Kafka Connect with the MongoDB connector to read changes from the MongoDB database to the Redpanda cluster.
The Connect container is running in distributed mode using the connect-distributed.properties file in the repository and is listening on port 8083 of the host machine. All the properties used are explained in the documentation.
Use the following command to check the available plugins and see if the MongoDB connector plugin is installed as expected:
curl -sS localhost:8083/connector-plugins

## Output ##
[{"class":"com.mongodb.kafka.connect.MongoSinkConnector","type":"sink","version":"1.11.2"},{"class":"com.mongodb.kafka.connect.MongoSourceConnector","type":"source","version":"1.11.2"},{"class":"org.apache.kafka.connect.mirror.MirrorCheckpointConnector","type":"source","version":"3.4.1"},{"class":"org.apache.kafka.connect.mirror.MirrorHeartbeatConnector","type":"source","version":"3.4.1"},{"class":"org.apache.kafka.connect.mirror.MirrorSourceConnector","type":"source","version":"3.4.1"}]
In the root directory of the project, the register-connector.json file defines the various database options to establish a connection to the running MongoDB instance:
{
  "name": "mongo-source",
  "config": {
    "connector.class": "com.mongodb.kafka.connect.MongoSourceConnector",
    "tasks.max": "1",
    "topics": "e-inventory.products",
    "connection.uri": "mongodb://mongo-inventory:27017/?replicaSet=rs0",
    "database": "e-inventory",
    "collection": "products",
    "key.converter": "org.apache.kafka.connect.json.JsonConverter",
    "value.converter": "org.apache.kafka.connect.json.JsonConverter",
    "bootstrap.servers": "redpanda-0:9092,redpanda-1:9092,redpanda-2:9092",
    "name": "mongo-source"
  }
}
All configuration options used are explained in the documentation.
Register the connector with the configuration file created by making an HTTP request to the Kafka Connect RESTful API, as seen with the curl command and output below:
curl -i -X POST -H "Accept:application/json" -H  "Content-Type:application/json" http://localhost:8083/connectors/ -d @register-connector.json

##output

HTTP/1.1 201 Created
Date: Sun, 19 May 2024 19:13:01 GMT
Location: http://localhost:8083/connectors/mongo-source
Content-Type: application/json
Content-Length: 355
Server: Jetty(9.4.51.v20230217)

{"name":"mongo-source3","config":{"connector.class":"com.mongodb.kafka.connect.MongoSourceConnector","connection.uri":"mongodb://mongo-inventory:27017/?replicaSet=rs0","database":"e-inventory","collection":"products","output.json.formatter":"com.mongodb.kafka.connect.source.json.formatter.ExtendedJson","name":"mongo-source3"},"tasks":[],"type":"source"}
Confirm that the connector is present by making another HTTP request to the API:
curl -H "Accept:application/json" localhost:8083/connectors/

## Output ##
["mongo-source"]Now that you have your stream pipeline set up, you need to start an instance of Apache Flink to run in session mode. This will enable you to submit your stream processing. From the root directory of the project, start Apache Flink using the following command:
sudo docker-compose -f ./compose-flink.yml up -dYou can check that the container started successfully by running the docker ps command:

You also need to create a network that all your containers are on so they can communicate with one another. To create the network, run the following command:
sudo docker network create redpanda_networkThen, connect your containers to the network with the following commands:
sudo docker network connect redpanda_network redpanda-0
sudo docker network connect redpanda_network redpanda-1
sudo docker network connect redpanda_network redpanda-2
sudo docker network connect redpanda_network mongo-redpanda-flink-taskmanager-1
sudo docker network connect redpanda_network mongo-redpanda-flink-jobmanager-1
sudo docker network connect redpanda_network mongo-inventory
sudo docker network connect redpanda_network kafka-connect
sudo docker network connect redpanda_network redpanda-console
This will make sure that all of your containers are on the same network. To check your container names, run the command docker ps and then use docker network connect redpanda_network <your-container-name>.
Note: If you get an error, check the docker image names because they might have a different naming based on your docker setup.
The preexisting Flink application was created using an archetype and is located in the folder named FlinkIMS. The structure of the folder is as follows:
FlinkIMS/
├── pom.xml
└── src
    └── main
        ├── java
        │   └── FlinkIMS
        │       └── DataStreamJob.java
        └── resources
            └── log4j2.properties
DataStreamJob.java is an Apache Flink job that will read data from the Redpanda topics and log it in the console. The following code configures the Redpanda source by reading from the Kafka topic e-inventory.products and sets the consumer group ID to e-ims-group:
final String bootstrapServers = "redpanda-0:9092,redpanda-1:9092,redpanda-2:9092";
final String productTopic = "e-inventory.products";

KafkaSource<String> source = KafkaSource.<String>builder()
        .setBootstrapServers(bootstrapServers)
        .setTopics(productTopic)
        .setGroupId("e-ims-group")
        .setStartingOffsets(OffsetsInitializer.earliest())
        .setValueOnlyDeserializer(new SimpleStringSchema())
        .build();
It's configured to use SimpleStringSchema to deserialize the messages as strings.
The following code uses env.fromSource to create a data stream from Redpanda that reads messages from the Kafka topic e-inventory.products:
DataStream<String> productStream = env.fromSource(source, WatermarkStrategy.noWatermarks(), "Kafka source");Log the incoming data from the Kafka topic to the console:
productStream.print();Finally, execute the job to start processing the data:
env.execute("Flink Kafka Source Example");In the root directory of the project, build the project and create a JAR file using this command:
cd FlinkIMS
mvn clean package
You should get an output similar to the following:
…output omitted…
[INFO] Replacing /Users/username/Desktop/mongo-redpanda-flink/FlinkIMS/target/FlinkIMS-1.0-SNAPSHOT.jar with /Users/username/Desktop/mongo-redpanda-flink/FlinkIMS/target/FlinkIMS-1.0-SNAPSHOT-shaded.jar
[INFO] ------------------------------------------------------------------------
[INFO] BUILD SUCCESS
[INFO] ------------------------------------------------------------------------
[INFO] Total time:  4.053 s
[INFO] Finished at: 2024-05-19T15:57:28+03:00
Next, submit the Flink job to the Flink cluster:
sudo docker cp ./target/FlinkIMS-1.0-SNAPSHOT.jar mongo-redpanda-flink-jobmanager-1:/job.jar
sudo docker exec -it mongo-redpanda-flink-jobmanager-1 flink run -d /job.jar
Note: If you get any errors, you might have the wrong name for your docker image. Check and replace mongo-redpanda-flink-jobmanager-1 with yours.You should get an output similar to the following:
Successfully copied 19.9MB to mongo-redpanda-flink-jobmanager-1:/job.jar
Job has been submitted with JobID 9efdf1bee86c7c7fb962060622de6a5c
You can check the Flink dashboard at http://localhost:8081 to see the status of your job.

To see the logs from the Flink task manager, you need to connect to the Docker container using the following command:
sudo docker logs -f mongo-redpanda-flink-taskmanager-1To insert or update products in your collection in MongoDB, you need to connect to your mongo-inventory container by opening a shell and then making inventory changes. These changes will be reflected in your system in real time. Use the following commands:
sudo docker exec -it mongo-inventory mongosh

use e-inventory

db.products.insertMany([
  {
    itemId: "PER-00000001",
    itemName: "Bananas (Cavendish)",
    itemType: "Produce",
    supplier: {
      supplierId: "SUP-00001",
      name: "Tropical Fruitz Ltd",
      contact: {
        email: "supplier@tropicalfruitz.com",
        phone: "+1 (555) 555-5555"
      }
    },
    unitPrice: 2.5,
    unitOfMeasure: "kg",
    reorderPoint: 5,
    reorderQuantity: 50,
    perishable: true,
    batches: [
      {
        batchId: "PER-00001-A",
        purchaseDate: "2024-04-21",
        expiryDate: "2024-04-25",
        currentStock: 25,
        discount: {
          enabled: true,
          discountType: "percentage",
          discountValue: 0.0
        }
      }
    ]
  }
])
Note: To exit the shell, type exit and then enter.After you insert or update a product, you'll see the product in the Flink task manager's logs. You should see something similar to this:
{"_id": {"_data": "82664A0646000000012B042C0100296E5A10043A2EABB01D2446B182078E38FE32C66F463C6F7065726174696F6E54797065003C696E736572740046646F63756D656E744B65790046645F69640064664A064653BF0AE6DF2202E5000004"}, "operationType": "insert", "clusterTime": {"$timestamp": {"t": 1716127302, "i": 1}}, "wallTime": {"$date": {"$numberLong": "1716127302375"}}, "fullDocument": {"_id": {"$oid": "664a064653bf0ae6df2202e5"}, "itemId": "PER-00000002", "itemName": "Bananas (Cavendish)", "itemType": "Produce", "supplier": {"supplierId": "SUP-00001", "name": "Tropical Fruitz Ltd", "contact": {"email": "supplier@tropicalfruitz.com", "phone": "+1 (555) 555-5555"}}, "unitPrice": {"$numberDouble": "2.5"}, "unitOfMeasure": "kg", "reorderPoint": {"$numberInt": "5"}, "reorderQuantity": {"$numberInt": "50"}, "perishable": true, "batches": [{"batchId": "PER-00001-A", "purchaseDate": "2024-04-21", "expiryDate": "2024-04-25", "currentStock": {"$numberInt": "25"}, "discount": {"enabled": true, "discountType": "percentage", "discountValue": {"$numberInt": "0"}}}]}, "ns": {"db": "e-inventory", "coll": "products"}, "documentKey": {"_id": {"$oid": "664a064653bf0ae6df2202e5"}}}This indicates that the Flink job is working, and you can view the logs and monitor the live changes to your inventory.
In this tutorial, you learned how to set up an inventory monitoring system using MongoDB, Redpanda, and Flink. You configured MongoDB to capture changes, sent those changes to Redpanda, and processed the data in real time with Flink.
To learn more, browse the Redpanda blog for tutorials and dive into the free courses at Redpanda University. If you have questions, join the Redpanda Community on Slack and ask our team.
Subscribe to our VIP (very important panda) mailing list to pounce on the latest blogs, surprise announcements, and community events!
Opt out anytime.