Full CDC semantics land in the Iceberg output for Redpanda Connect
Your lakehouse mirrors the database, instantly.
Learn how to build a real-time chat application using Redpanda, React, and Flask.


For the backend, you can use the Flask-based application and the kafka-python library to produce and consume messages from Redpanda. The Flask application provides two endpoints: message and messages. The message endpoint accepts HTTP POST requests for getting the message and sending it to Redpanda, while the messages endpoint exposes the list of messages that are consumed from Redpanda as event streams.
For the frontend, you can use the React application. You need to set the event source object in the sse constant. With the sse EventSource object instance, you can create any supported type of event listeners. You need to create one with the type message to receive the messages from the backend. Also, you need to implement the code that calls the API with the URL http://localhost:5000/message in the submit function.
To implement a basic chat application, you need to create a publish-subscribe (pub-sub) system where senders can publish their messages and the subscribers can read them. You need a message backbone that’s fast, resilient, and durable. In this context, you can use Redpanda as the message backbone, React for the frontend, and Flask for the backend.
You can prepare a Redpanda instance in different ways. In this tutorial, you’ll run Redpanda in a Docker container. For information on installing or running Redpanda, refer to this guide.
Before you start, you’ll need the following: npm and npx CLI (both 9.2.0 or higher), Python 3.10 or higher, a Python virtual environment created and activated, Docker 20.10.21 or higher, and an IDE of your choice (preferably VS Code, which supports both Python and JavaScript/React).
The way we communicate has changed drastically over the last 30 years. It’s no longer just our voices over the phone to others. Now its rapid-fire texts over the internet and seemingly endless choices of downloadable chat applications.
Although we’ve gone from simple text-based messages to images, videos, and music—the fundamental technical architecture hasn’t changed much from the first instant messaging systems.
In brief, to implement a basic chat application you need to create a publish-subscribe (pub-sub) system where senders can publish their messages and the subscribers can read them. To create a pub-sub system, you need a message backbone that’s fast, resilient, and durable.
One such message backbone is Redpanda, and in this tutorial, you’ll use it to create a chat application along with React for the frontend and Flask for the backend. Ready?
Before you start, you’ll need the following:
npm and npx CLI (both 9.2.0 or higher)Imagine the company you’re working for wants to stop using an external chat application in favor of an internal one due to security concerns. Being a savvy developer, you obviously volunteer to build the chat application.
You decide to use React for the frontend, Flask for the backend, and Redpanda as the message backbone of the asynchronous chat communication.
For the Flask-based backend, you plan to use the kafka-python library to produce and consume messages from Redpanda, an Apache Kafka®-compatible streaming data platform that’s 10x faster and 6x lower in total costs than Kafka itself.
For the stream-based communication between the frontend and the backend, you’ll use server-sent events (SSE), an HTTP MIME type of text/event-stream.

You can prepare a Redpanda instance in a few different ways. For information on installing or running Redpanda, refer to this guide.) In this tutorial, you’ll run Redpanda in a Docker container.
An example command to run Redpanda on Docker would be:
docker run -d --name=redpanda --rm \
    -p 9092:9092 \
    -p 9644:9644 \
    docker.vectorized.io/vectorized/redpanda:latest \
    redpanda start \
    --advertise-kafka-addr localhost \
    --overprovisioned \
    --smp 1  \
    --memory 1G \
    --reserve-memory 500M \
    --node-id 0 \
--check=falseVerify the Redpanda cluster to see if it’s up and running by executing the following command:
docker exec -it redpanda \
rpk cluster info
The output should be as follows:
CLUSTER
=======
redpanda.2c50123c-c7ac-4102-b363-423dddb78350

BROKERS
=======
ID    HOST       PORT
0*    localhost  9092
Create a topic called messages on Redpanda.
docker exec -it redpanda \
rpk topic create messages
You should see the following output:
TOPIC     STATUS
messages OKTo get you going faster, here’s a GitHub repository with all the projects created for you. However, these projects miss some important parts that you’ll need to implement throughout this tutorial. (Can’t make it too easy.)
Run the following command to clone the repository and change directory to the newly created directory, which is your workspace for this tutorial.
git clone https://github.com/redpanda-data-blog/2023-redpanda-chat.git \
&& cd redpanda-flask-chat-app-demo
In the apps directory, you can see two different applications, which emerge as the whole chat application:
rp-chat-backend is the Flask application that provides our backendrp-chat-frontend is the React application that provides our frontendOpen the rp-chat-backend application with an editor of your choice and open the app.py file. This is a simple Flask application that provides two endpoints: message and messages. While the message endpoint accepts HTTP POST requests for getting the message and sending it to Redpanda, the messages endpoint exposes the list of messages that are consumed from Redpanda as event streams.
In our repository, you’ll notice that some parts of the code are marked as TODO. Those missing pieces are what you have to implement.As you can see, you’re missing the BOOTSRAP_SERVERS and TOPIC_NAME at the very beginning of the code.
Set the values for those variables:
BOOTSTRAP_SERVERS = 'localhost:9092'
TOPIC_NAME = 'messages'
Go to the send_message() method, which gets the message as a POST request and must send the message data to the Redpanda topic messages.
To interact with any POST request, Flask library provides a decorator called @app.route where you can define the URL path and the method for receiving the request.
Add the following code snippet to implement the producer, which is responsible for sending the data:
producer = KafkaProducer(bootstrap_servers=[BOOTSTRAP_SERVERS])
producer.send(TOPIC_NAME, bytes(f'{message}','UTF-8'))
producer.close()
The producer connects to the Redpanda bootstrap servers and sends the message in byte array format to the messages topic.
Now you need to implement the consumer. Go to get_messages(), which consumes the messages from Redpanda and returns them as an event stream response.
The get_messages method uses the same @app.route decorator with send_message(), but notice that it uses a different URL path /messages and a different HTTP method GET.
Add the following code snippet to implement the consumer, which is responsible for consuming the data:
consumer = KafkaConsumer(TOPIC_NAME,
                        auto_offset_reset='earliest',
                        enable_auto_commit=False,
                        bootstrap_servers=BOOTSTRAP_SERVERS)
The rest of the get_messages() method consists of looping in the message data and preparing the right format for the server site events response.
The whole app.py file should appear as follows:
from flask import Flask, Response, send_from_directory, request
from flask_cors import CORS, cross_origin
from kafka import KafkaProducer, KafkaConsumer

BOOTSTRAP_SERVERS = 'localhost:9092'
TOPIC_NAME = 'messages'

app = Flask(__name__)
cors = CORS(app)
app.config['CORS_HEADERS'] = 'Content-Type'

@app.route('/message', methods=['POST'])
def send_message():
    try:
        message = request.json
        producer = KafkaProducer(bootstrap_servers=[BOOTSTRAP_SERVERS])
        producer.send(TOPIC_NAME, bytes(f'{message}','UTF-8'))
        producer.close()
        return message
    except Exception as err:
        print(f"Unexpected {err=}, {type(err)=}")
        return None

@app.route('/messages', methods=['GET'])
def get_messages():
    consumer = KafkaConsumer(TOPIC_NAME,
                        auto_offset_reset='earliest',
                        enable_auto_commit=False,
                        bootstrap_servers=BOOTSTRAP_SERVERS)
    def events():
        for message in consumer:
            try:
                yield 'data: {0}\n\n'.format(message.value.decode('utf-8'))
            except Exception as err:
                print(f"Unexpected {err=}, {type(err)=}")
    return Response(events(), mimetype="text/event-stream")
You might notice you have some imports added at the beginning of the file. Before running this application, you need to install these dependencies into the Python virtual environment that you created beforehand.
Open a terminal window and run the following command to install the flask, flask-cors, and kafka-python dependencies:
pip install kafka-python flask flask-corsYou can run the application with the following command:
flask --app app runIf you don't see any errors on the page, this means you've successfully run the Flask application.
To quickly test your application, open a new terminal window and run the following command:
curl -H "Content-Type: application/json" \
-X POST http://localhost:5000/message \
-d '{"username":"testuser","text":"test message","timestamp":1672770358623}'
If everything is right, the output should be as follows:
{"text":"test message","timestamp":1672770358623,"username":"testuser"}Run the following command to test if you can receive messages:
curl -H "Content-Type: application/json" -X GET http://localhost:5000/messages
You should see the message you've just sent with the previous command:
data: {'username': 'testuser', 'text': 'test message', 'timestamp': 1672770358623}
This means your backend—and the API you've configured for it—works!
Open the rp-chat-frontend application with an editor of your choice and open the App.js file, which is under the src directory. This is the main file of the frontend—the React application.
Go to the sse constant and implement it by setting the event source object; use the event source URL as the parameter.
const sse = new EventSource("http://localhost:5000/messages");
With the sse EventSource object instance, you can create any supported type of event listeners. While some of them, such as open or close, are created for you, you must create one with the type message to receive the messages from the backend.
Add a new listener with the type message that gets the event data, parse it, and set it in the state.
 sse.addEventListener("message", (event) => {
    console.log("New message event:", event.data);
    const parsedData = JSON.parse(event.data.replaceAll("'", '"'));
    setData((data) => [...data, parsedData]);
  });
This completes the message receival part of the chat application. However, the part that submits the messages by using the HTTP POST API you've implemented for the backend is not complete yet.
Go to the function submit and implement the code that calls the API with the URL http://localhost:5000/message.
The final submit function should look like this:
  const submit = async (event) => {
    try {
      let res = await fetch("http://localhost:5000/message", {
        headers: {
          Accept: "application/json",
          "Content-Type": "application/json",
        },
        method: "POST",
        body: JSON.stringify({
          username: username,
          text: text,
          timestamp: Date.now(),
        }),
      });
...code omitted...
  };
At the beginning of the file, notice that you have a library called react-native-sse. This is the library that enables server site events usage within a React application. Before running the frontend application, you have to install this dependency.
Open a terminal window and run the following command to install the react-native-sse dependency:
npm install react-native-sseYou can run the application with the following command:
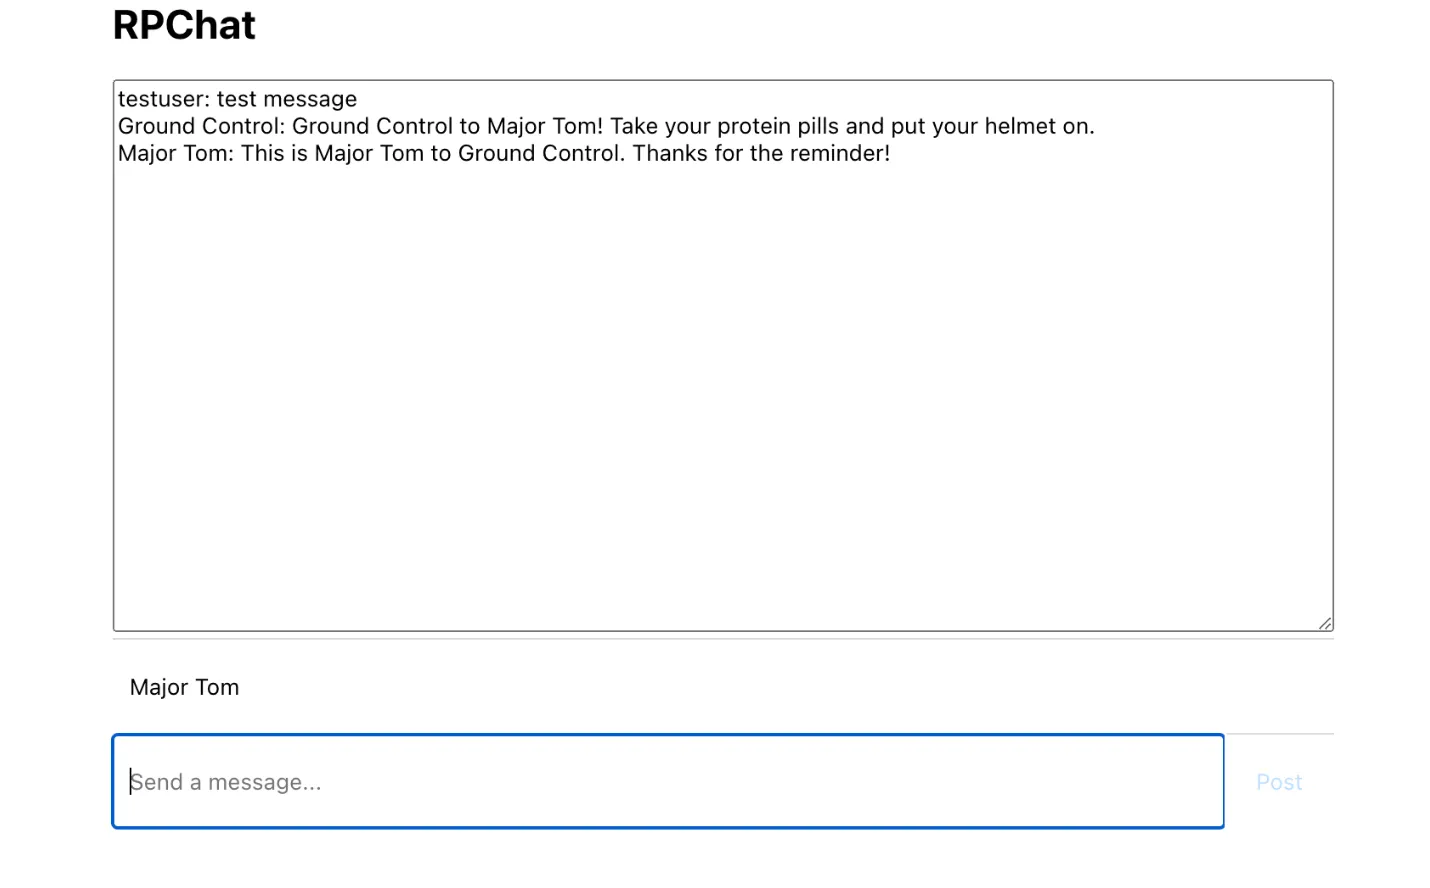
npm startThis should open a new tab in your browser for the address http://localhost:3000/, which is the main page of the RPChat application. You can see the previous message you've sent by using the API to test it.

Open another browser window and place it side by side with the previous browser window. In the first chat window, set a nickname as Ground Control and on the other chat window set the nickname as Major Tom.
Let's make Ground Control send a message to Major Tom as "Ground Control to Major Tom! Take your protein pills and put your helmet on".
Major Tom can reply as "This is Major Tom to Ground Control. Thanks for the reminder!". Go ahead and use all of Bowie’s “Space Oddity” lyrics to finish the conversation or you can use your own imagination to test out the chat application. You can even add a few other participants to the chat.

Congratulations! You've implemented a chat application that uses the Python Flask framework for the backend and the React framework for the frontend. You also implemented HTTP endpoints in the Flask backend, provided an SSE response to be used in the frontend, connected the backend to the Redpanda broker, and implemented the production and consumption of messages using the kafka-python library.
You can find the solutions for this tutorial on GitHub in the solutions branch of this project’s repo.
Want to learn more? You can find plenty more Redpanda Tutorials on our blog, or dive into our free courses at Redpanda University.
If you get stuck, have a question, or just want to chat with our engineers and fellow Redpanda users, join our Redpanda Community on Slack.
Subscribe to our VIP (very important panda) mailing list to pounce on the latest blogs, surprise announcements, and community events!
Opt out anytime.