Build a real-time lakehouse architecture with Redpanda and Databricks
One architecture for real-time and analytics workloads. Easy to access, governed, and immediately queryable
Learn how to use CockroachDB with Redpanda for change data capture.
In the cloud-native era, applications have gradually transformed towards a more distributed, less coupled architecture. Monolithic architectures have evolved into microservices, and microservices are evolving into ever smaller services or functions.
Aside from all the benefits of distributed architecture — like separation of concerns — this approach can have drawbacks, one of which is the data itself.
Data becomes a real problem when you want to share it in a distributed system. For monolithic applications, it used to be the case that you’d have a single database as a cluster with replicated nodes, but things have changed.
Distributed applications like microservices need their dedicated databases or any other middlewares as a data store, such as a dedicated cache system like Redis or a search engine like Elasticsearch.

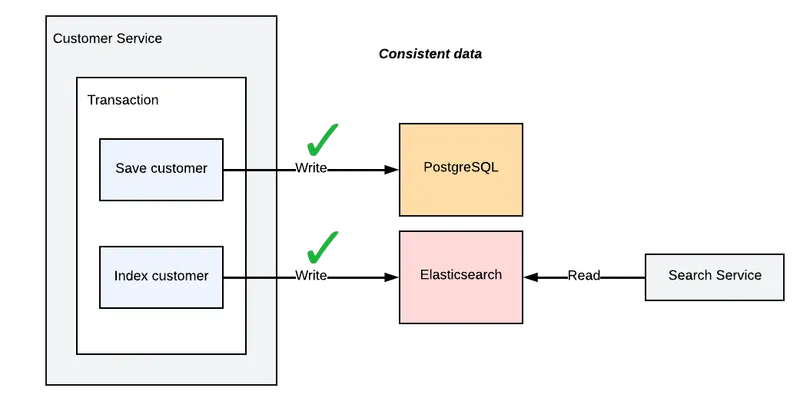
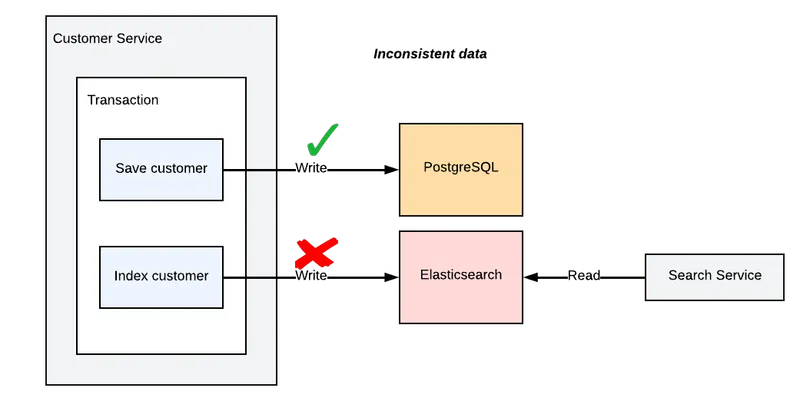
Because of the distributed architecture, you need to keep the same data in different databases or middleware systems, and you must keep this data consistent. In most cases, developers try to do so by doing dual writes.

A dual write happens when an application changes the same data in two different systems without any layer for data consistency, like transactions or distributed transactions. Not every system supports distributed transactions, so you can not guarantee data consistency in those cases.

However, change data capture (CDC), a data integration pattern, enables capturing row-level changes into a configurable sink for downstream processing such as reporting, caching, full-text indexing, or — most importantly — helping avoid dual writes and ensuring data durability and consistency.
CockroachDB, a distributed and reliable database, supports CDC via its Changefeeds. CockroachDB provides Changefeeds for data sinks like AWS S3, webhooks, or an Apache KafkaⓇ API-compatible streaming data system like Redpanda.
Redpanda provides a fast and fault-tolerant, safe by default system while being fully compatible with Kafka API. You can use CockroachDB CDC to capture changes and stream into Redpanda to implement any vital CDC use case more efficiently, such as reporting, avoiding dual writes, or most importantly, keeping the data consistency through the shards of CockroachDB.
Because CockroachDB has a distributed architecture, keeping the transactional jobs consistent through its shards is crucial. CDC with Changefeeds provides emitting changes to sinks like Kafka or Redpanda as a solution for this.
The CDC mechanism of CockroachDB not only provides a data capturing mechanism but also an integration point to Redpanda, which can stream the captured change events to other data points like data warehouses, OLAP databases, or search engines.
In this post, you'll learn how to stream CDC from CockroachDB to Redpanda via the following steps:
rpk CLI.rpk CLI.If you’d like to follow along in your own editor, you can access all the resources for this tutorial in this repository.
To complete this tutorial, you’ll need the following:
Suppose that you are a contractor who is about to sign a five-year contract with a potential customer, the PandaBank. Before closing the deal, they would like you to accomplish a small task of theirs as an assignment to see if you are suitable for the work.
PandaBank uses CockroachDB internally, and most of the daily account transactions are kept in this database. Currently, they have a mechanism for indexing the account transaction changes in Elasticsearch, but they noticed that it creates data inconsistencies between the actual data and the indexed log data that is in Elasticsearch.
They want you to create a base mechanism to avoid any data inconsistency issues between the systems. They require you to create a basic implementation of a CDC using CockroachDB’s changefeed mechanism and Redpanda for a durable, Kafka API-compliant messaging system.
For their assignment, you don’t need to implement the Elasticsearch part, just the CDC part. You are responsible for creating a CockroachDB instance and a Redpanda instance on your local machine. Because PandaBank runs Redpanda on Docker, you’ll need to do so as well.
The following image shows the architectural diagram of the system they require you to implement:

In this tutorial, you will run Redpanda in a container via Docker.
Note: For more information on installing Redpanda on other platforms, refer to this documentation.
Make sure that you have installed Docker and started the Docker daemon in your macOS environment. Then, open a terminal window and run the following command to run Redpanda:
docker run -d --pull=always --name=redpanda-1 --rm \
    -p 9092:9092 \
    -p 9644:9644 \
    docker.vectorized.io/vectorized/redpanda:latest \
    redpanda start \
    --overprovisioned \
    --smp 1  \
    --memory 1G \
    --reserve-memory 0M \
    --node-id 0 \
    --check=false
Redpanda will be accessible via localhost:9092 on your computer.
In order to install CockroachDB on your local macOS environment, run the following command:
Note: Make sure you’ve already installed the Homebrew package manager, as noted in the prerequisites.
brew install cockroachdb/tap/cockroach
After installing CockroachDB, run a single-node cluster that is in insecure mode:
Note: For information on starting a CockroachDB cluster in secure mode, you can refer to this documentation.
cockroach start-single-node --insecure
In another terminal, run the following command to access the CockroachDB SQL client interface:
cockroach sql --insecure
On the client interface, run the following commands to enable enterprise usage since CDC is an Enterprise Changefeed. Refer to the prerequisites section if you have not signed up for a trial license yet.
SET CLUSTER SETTING cluster.organization = '_YOUR_ORGANIZATION_';
SET CLUSTER SETTING enterprise.license = '_YOUR_LICENSE_';On the terminal window where the SQL query client is open, run the following command to create a database called bank in CockroachDB:
root@:26257/defaultdb> CREATE DATABASE bank;
Select the bank database to be used for the rest of the actions in the query window:
root@:26257/defaultdb> USE bank;
Create a table called accounts with integer fields named id and balance:
root@:26257/bank> CREATE TABLE accounts (id INT PRIMARY KEY, balance INT);
Create a Changefeed for the table accounts. Set the Redpanda broker address for the Changefeed to configure it to send the captured change data:
root@:26257/bank> CREATE CHANGEFEED FOR TABLE accounts INTO 'kafka://localhost:9092' WITH UPDATED;
Note: For more information on creating a Changefeed on CockroachDB, refer to their documentation.
Leave the terminal window open for later use.
In another terminal window, run the following command to create a Redpanda topic called accounts:
docker exec -it redpanda-1 \
rpk topic create accounts
The output should look like this:
TOPIC     STATUS
accounts  OK
Notice that the topic has the same name as the CockroachDB table accounts. CockroachDB CDC produces data to a topic with the same name as the table by default.
In the same terminal window, run the following command to start consuming from the accounts topic:
docker exec -it redpanda-1 \
rpk topic consume accounts
Leave the terminal window open to view the consumed messages in the following steps.
In order to confirm that the CDC mechanism works, you must create, update, and delete some data in the accounts table. You’ll also observe and examine the captured events in the Redpanda accounts topic.
In the SQL client terminal window, run the following command to insert some data into the accounts table:
root@:26257/bank> INSERT INTO accounts (id, balance) VALUES (1, 1000), (2, 250), (3, 700);
This creates the following accounts in the CockroachDB accounts table:
Account ID  Balance
1           1000
2           250
3 700After inserting the data, verify that the Redpanda CLI consumer prints out the consumed data:
{
  "topic": "accounts",
  "key": "[1]",
  "value": "{\"after\": {\"balance\": 1000, \"id\": 1}, \"updated\": \"1648496379523876000.0000000000\"}",
  "timestamp": 1648496379856,
  "partition": 0,
  "offset": 0
}
{
  "topic": "accounts",
  "key": "[2]",
  "value": "{\"after\": {\"balance\": 250, \"id\": 2}, \"updated\": \"1648496379523876000.0000000000\"}",
  "timestamp": 1648496379856,
  "partition": 0,
  "offset": 1
}
{
  "topic": "accounts",
  "key": "[3]",
  "value": "{\"after\": {\"balance\": 700, \"id\": 3}, \"updated\": \"1648496379523876000.0000000000\"}",
  "timestamp": 1648496379856,
  "partition": 0,
  "offset": 2
}
Notice that you have all the data from the accounts table as separate event logs in your Redpanda instance’s accounts topic.
The application development team of PandaBank shared a small containerized application with you that runs some transactions on these bank accounts. This application connects to CockroachDB over localhost:26257, so be sure that CockroachDB is accessible in your local environment.
Use the following command to run the transaction between accounts:
git clone git@github.com:redpanda-data-blog/2022-cdc-with-cockroachdb.git
cd 2022-cdc-with-cockroachdb/account_transaction_manager/
docker build -t account-transaction-manager .
docker run account-transaction-manager
The output of this command should look like this:
DEBUG:root:print_balances(): status message: SELECT 3
Balances at Mon Mar 28 19:43:34 2022:
(1, 1000)
(2, 250)
(3, 700)
DEBUG:root:transfer_funds(): status message: UPDATE 1
DEBUG:root:transfer_funds(): status message: UPDATE 1
DEBUG:root:print_balances(): status message: SELECT 3
Balances at Mon Mar 28 19:43:35 2022:
(1, 700)
(2, 350)
(3, 900)
When you run the SELECT * FROM accounts; command in the CockroachDB SQL client, you will see the following results:
Account ID  Balance
1           700
2           350
3           900
Verify that the new changes captured by CockroachDB CDC are reflected to your Redpanda consumer. In the consumer’s terminal window, you should see the following result:
{
  "topic": "accounts",
  "key": "[1]",
  "value": "{\"after\": {\"balance\": 900, \"id\": 1}, \"updated\": \"1648496614787637000.0000000000\"}",
  "timestamp": 1648496615283,
  "partition": 0,
  "offset": 3
}
{
  "topic": "accounts",
  "key": "[2]",
  "value": "{\"after\": {\"balance\": 350, \"id\": 2}, \"updated\": \"1648496614787637000.0000000000\"}",
  "timestamp": 1648496615283,
  "partition": 0,
  "offset": 4
}
{
  "topic": "accounts",
  "key": "[1]",
  "value": "{\"after\": {\"balance\": 700, \"id\": 1}, \"updated\": \"1648496614835272000.0000000000\"}",
  "timestamp": 1648496615283,
  "partition": 0,
  "offset": 5
}
{
  "topic": "accounts",
  "key": "[3]",
  "value": "{\"after\": {\"balance\": 900, \"id\": 3}, \"updated\": \"1648496614835272000.0000000000\"}",
  "timestamp": 1648496615283,
  "partition": 0,
  "offset": 6
}
Notice the balance changes that represent the transaction history in the consumer output.
As the last step, delete the bank accounts and see how CDC captures them. Run the following SQL query in the query console of CockroachDB:
root@:26257/bank> DELETE FROM bank.accounts where id <> 0;
The Redpanda consumer should have the following captured events:
{
  "topic": "accounts",
  "key": "[1]",
  "value": "{\"after\": null, \"updated\": \"1648497640110587000.0000000000\"}",
  "timestamp": 1648497640200,
  "partition": 0,
  "offset": 6
}
{
  "topic": "accounts",
  "key": "[2]",
  "value": "{\"after\": null, \"updated\": \"1648497640110587000.0000000000\"}",
  "timestamp": 1648497640200,
  "partition": 0,
  "offset": 7
}
{
  "topic": "accounts",
  "key": "[3]",
  "value": "{\"after\": null, \"updated\": \"1648497640110587000.0000000000\"}",
  "timestamp": 1648497640200,
  "partition": 0,
  "offset": 8
}
Notice that the value field becomes null when the change event is a delete. CockroachDB CDC successfully captures data change events and sends them to Redpanda for further consumption.
Congratulations! You’ve successfully captured the bank account transaction changes and made them consumable as events from Redpanda.
In this tutorial, you’ve learned how to run Redpanda in a container using Docker and how to create a topic and consume messages from it. You also learned to install CockroachDB, create a table using its SQL query interface, and configure it for using CDC.
You can now use CockroachDB to capture changes and stream them to Redpanda to implement CDC use cases such as reporting, caching, full-text indexing, avoiding dual writes, and much more.
Find all the resources for this tutorial in this repository, or join the Redpanda Community on Slack to ask specific questions. View Redpanda’s documentation here.

One architecture for real-time and analytics workloads. Easy to access, governed, and immediately queryable

Everything you need to move agentic AI initiatives to production — safely
Subscribe to our VIP (very important panda) mailing list to pounce on the latest blogs, surprise announcements, and community events!
Opt out anytime.