Stream Oracle changes to ClickHouse in real time with Redpanda Connect
A hands-on walkthrough of our new Oracle CDC connector
Learn how to build and run a streaming data pipeline application in Java using Redpanda and a Neo4j graph database


Neo4j is a graph database management system designed for storing, querying, and managing large and complex networks of data. It offers some significant advantages compared to relational databases, which store data in tables, with each row representing an individual record and each column a specific data attribute.
In this tutorial, we'll explore event-driven graph analysis using Redpanda and Neo4j. You'll learn how to leverage the power of Redpanda's next generation streaming data platform combined with Neo4j's graph database capabilities for deep insights into complex data relationships.
The relationships between data in relational databases are defined by the foreign keys referencing the primary keys in other tables. Analyzing and querying interconnected data in this structure requires complex JOIN operations, which may result in slower performance for complex queries and analysis.
In contrast to traditional databases that store data in tables, Neo4j stores data as nodes, relationships, and properties. This allows for more efficient querying and analysis of interconnected data.
Neo4j also supports a query language called Cypher, which makes searching and manipulating graph data easy. Neo4j is particularly well-suited for applications that require the ability to traverse and analyze relationships between data points quickly and efficiently. These applications include social networks, recommendation engines, fraud detection, and knowledge graphs. Many large organizations use Neo4j, including eBay, Adobe, IBM, and Caterpillar.
Since Redpanda is essentially a drop in replacement for Apache Kafka®, it's easy to build integrations in the same way you normally would with Kafka itself.
To demonstrate how to stream data from Redpanda to Neo4j, you'll build a streaming application to handle movies and their director-related relationship data as part of this tutorial.
This data typically consists of a movie's title, its year of release, and the name of the person who directed that movie. The movies and directors will serve as nodes or vertices, and the relationships between them will serve as edges. A movie's year of release is considered a property of the edges in this tutorial.
As part of this tutorial, the feed of movie data will be done through Redpanda's producer command line interface (CLI) utility, rpk, and the produced data will be persisted in a topic.
The application that you'll develop consumes data from this topic and streams it into a Neo4j database in the form of nodes, edges, and properties as listed above. You'll use Neo4j's user interface and Cypher to query and analyze the database.
You can find the source code for this tutorial in this GitHub repository. The following diagram shows the workflow.
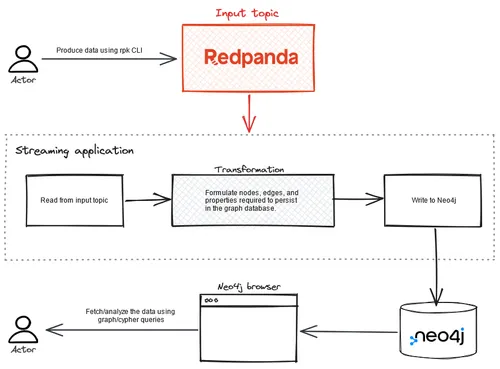
Event-driven graph analysis with Redpanda and Neo4j
To follow this tutorial, you'll need:
To begin, check that you have a running Redpanda container by executing the following command:
docker psIf you're running a single-node Redpanda cluster per the quick start instructions, then you should see an output similar to this:
CONTAINER ID   IMAGE                                              COMMAND                  CREATED         STATUS         PORTS                                                                              NAMES
25c9d6bc1b0e   docker.redpanda.com/redpandadata/redpanda:latest   "/entrypoint.sh redp…"   6 seconds ago   Up 5 seconds   0.0.0.0:8081-8082->8081-8082/tcp, 0.0.0.0:9092->9092/tcp, 0.0.0.0:9644->9644/tcp   redpanda
Execute the following command to connect to the Redpanda container's terminal session:
docker exec -it redpanda bashThen, execute the following CLI command inside the Redpanda container's terminal session to list the topics:
rpk topic listBy default, there won't be any topics listed in response to the rpk topic list command. Create a movies-directed-by topic to later publish the events related to this tutorial:
rpk topic create movies-directed-byYou can leave this Redpanda container's terminal session connected for later use.
Now that you have the topic ready in Redpanda, go ahead and set up Neo4j on your machine. Execute the following command to pull the Neo4j container image, as it's one of the simplest ways to try Neo4j on your local machine:
docker pull neo4jStart the Neo4j container by executing the command below:
docker run --name neo4j-container -p7474:7474 -p7687:7687 -d neo4j
Once the container is started, open a browser and access http://localhost:7474/browser/ to connect to the Neo4j browser, a web-based tool for interacting with Neo4j databases. With the Neo4j browser's UI, you can create and execute queries, visualize data, and explore the relationships between nodes. The browser includes a query editor with syntax highlighting and autocomplete, as well as a results view that displays query output in table or graph form.
You should see a screen like the one below:
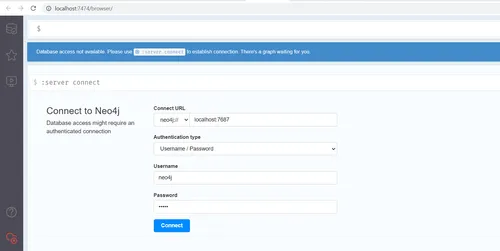
Use the default credentials (neo4j for both the username and password) and click Connect to connect to the Neo4j database. Once you are successfully authenticated for the first time, you'll be asked to change the password, as shown below:
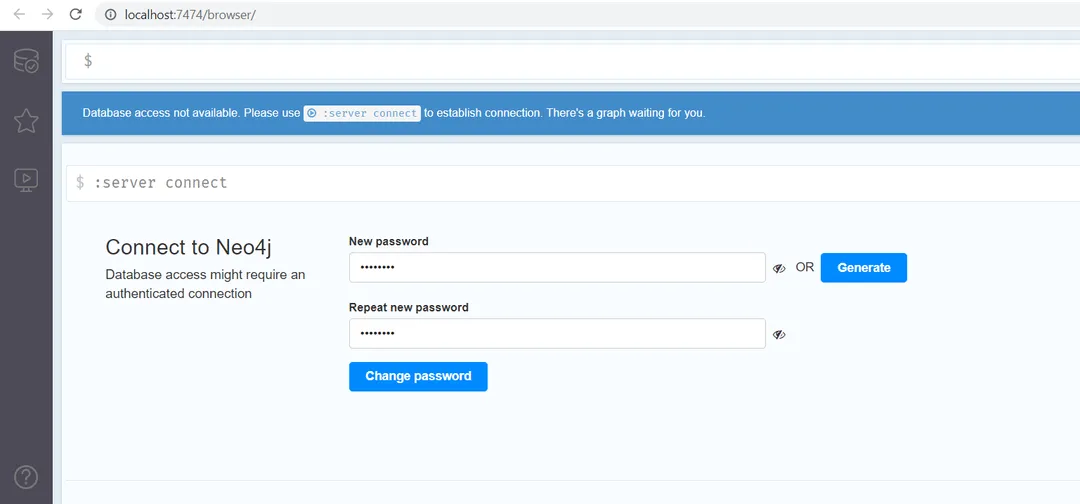
Set the password to password. You'll be using this updated password to connect Neo4j to the application that you'll build in the next step. Once the password has been changed, you should see the following screen interface:
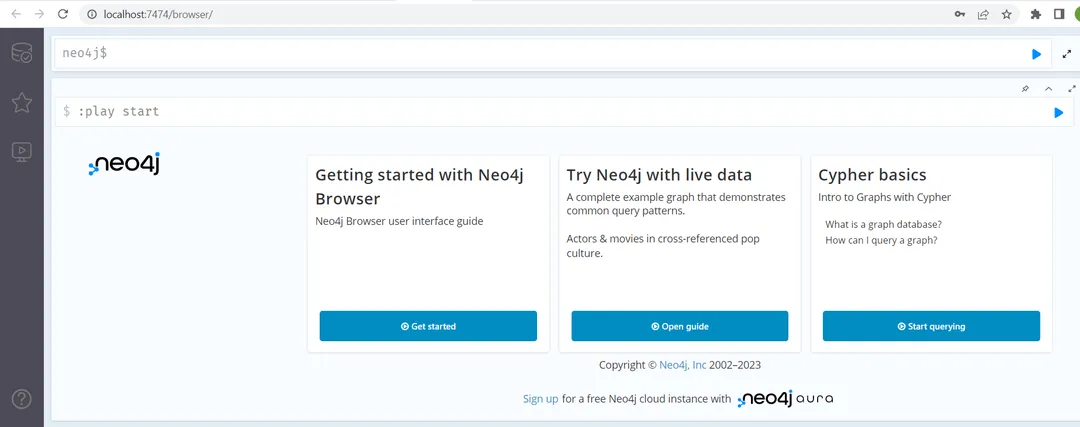
Leave this screen open, as you'll use this interface later for graph data analysis.
Now that you have a running Redpanda container and a Neo4j database, you can build a Java application to stream the events from your Redpanda topic to Neo4j. Create a project directory named event-driven-graph-analysis-with-redpanda-and-neo4j on your machine. Next, use the IDE of your choice to create a Java Maven project. The structure should be as follows:
event-driven-graph-analysis-with-redpanda-and-neo4j
|-- pom.xml
|-- src
    |-- main
    |   |-- java
    |       |-- org
    |           |-- example
| |-- App.javaEdit the pom.xml file and paste in the following code to add the necessary dependencies for this tutorial:
<?xml version="1.0" encoding="UTF-8"?>
<project xmlns="http://maven.apache.org/POM/4.0.0" xmlns:xsi="http://www.w3.org/2001/XMLSchema-instance"
         xsi:schemaLocation="http://maven.apache.org/POM/4.0.0 https://maven.apache.org/xsd/maven-4.0.0.xsd">
    <modelVersion>4.0.0</modelVersion>
    <groupId>org.example</groupId>
    <artifactId>event-driven-graph-analysis-with-redpanda-and-neo4j</artifactId>
    <version>1.0-SNAPSHOT</version>
    <name>event-driven-graph-analysis-with-redpanda-and-neo4j</name>
    <description>Demo project for event-driven-graph-analysis-with-redpanda-and-neo4j</description>
    <properties>
        <java.version>17</java.version>
        <maven.compiler.source>17</maven.compiler.source>
        <maven.compiler.target>17</maven.compiler.target>
    </properties>
    <dependencies>
        <dependency>
            <groupId>org.apache.kafka</groupId>
            <artifactId>kafka-clients</artifactId>
            <version>3.4.0</version>
        </dependency>
        <dependency>
            <groupId>org.neo4j.driver</groupId>
            <artifactId>neo4j-java-driver</artifactId>
            <version>5.6.0</version>
        </dependency>
        <dependency>
            <groupId>com.fasterxml.jackson.core</groupId>
            <artifactId>jackson-databind</artifactId>
            <version>2.14.2</version>
        </dependency>
        <dependency>
            <groupId>com.google.guava</groupId>
            <artifactId>guava</artifactId>
            <version>31.1-jre</version>
        </dependency>

        <!-- Logging dependencies -->
        <dependency>
            <groupId>ch.qos.logback</groupId>
            <artifactId>logback-classic</artifactId>
            <version>1.4.6</version>
        </dependency>
        <dependency>
            <groupId>org.slf4j</groupId>
            <artifactId>slf4j-api</artifactId>
            <version>2.0.5</version>
        </dependency>

    </dependencies>

    <build>
        <plugins>
            <plugin>
                <groupId>org.apache.maven.plugins</groupId>
                <artifactId>maven-jar-plugin</artifactId>
                <version>3.2.0</version>
                <configuration>
                    <archive>
                        <manifest>
                            <mainClass>org.example.App</mainClass>
                        </manifest>
                    </archive>
                </configuration>
            </plugin>
            <plugin>
                <artifactId>maven-assembly-plugin</artifactId>
                <version>3.3.0</version>
                <configuration>
                    <archive>
                        <manifest>
                            <mainClass>org.example.App</mainClass>
                        </manifest>
                    </archive>
                    <descriptorRefs>
                        <descriptorRef>jar-with-dependencies</descriptorRef>
                    </descriptorRefs>
                </configuration>
                <executions>
                    <execution>
                        <id>make-assembly</id>
                        <phase>package</phase>
                        <goals>
                            <goal>single</goal>
                        </goals>
                    </execution>
                </executions>
            </plugin>
        </plugins>
    </build>

</project>
You can see that the neo4j-java-driver JAR and Kafka client JARs are included as dependencies to enable interaction with the Redpanda cluster and Neo4j database.
Next, you'll create a consumer application that uses the Kafka client library to read JSON messages from the topic in Redpanda and uses the Neo4j Java driver to persist the data into the Neo4j database. To do this, edit the App.java file and paste in the following code:
package org.example;

import com.fasterxml.jackson.databind.JsonNode;
import com.fasterxml.jackson.databind.ObjectMapper;
import com.google.common.collect.ImmutableMap;
import org.apache.kafka.clients.consumer.ConsumerRecord;
import org.apache.kafka.clients.consumer.ConsumerRecords;
import org.apache.kafka.clients.consumer.KafkaConsumer;
import org.neo4j.driver.AuthTokens;
import org.neo4j.driver.Driver;
import org.neo4j.driver.GraphDatabase;
import org.neo4j.driver.Session;

import java.time.Duration;
import java.util.Collections;
import java.util.Properties;
public class App {
    private static final String TOPIC = "movies-directed-by";
    private static final ObjectMapper objectMapper = new ObjectMapper();
    public static void main(String[] args)  {
        // Set the properties for the consumer
        Properties props = new Properties();
        props.put("bootstrap.servers", "localhost:9092");
        props.put("group.id", "test");
        props.put("enable.auto.commit", "true");
        props.put("auto.commit.interval.ms", "1000");
        props.put("key.deserializer", "org.apache.kafka.common.serialization.StringDeserializer");
        props.put("value.deserializer", "org.apache.kafka.common.serialization.StringDeserializer");
        KafkaConsumer<String, String> consumer = new KafkaConsumer<>(props);
        // Subscribe to a topic
        consumer.subscribe(Collections.singletonList(TOPIC));

        // Establish a connection to the Neo4j database
        try (Driver driver = GraphDatabase.driver("bolt://localhost:7687", AuthTokens.basic("neo4j", "password"))) {
            while (true) {
                // Add a consumer that polls for records from the subscribed topic
                // The consumed messages are processed by extracting the values for the fields "movieId", "movieName",
                // "directorName", and "year". These fields are then passed to the createMovieDirectedBy method to
                // make entries in the Neo4j graph database.
                ConsumerRecords<String, String> records = consumer.poll(Duration.ofMillis(100));
                for (ConsumerRecord<String, String> record : records) {
                    JsonNode jsonNode = objectMapper.readTree(record.value());
                    String movieId = jsonNode.get("movieId").asText();
                    String movieName = jsonNode.get("movieName").asText();
                    String directorName = jsonNode.get("directorName").asText();
                    int year = jsonNode.get("year").asInt();
                    createMovieDirectedBy(driver, movieId, movieName, directorName, year);
                }
            }
        } catch (Exception e) {
            e.printStackTrace();
        }
    }

    // The createMovieDirectedBy method creates a new node for the movie and also creates a new node for the director.
    // It then creates a relationship between the director node and the movie node with the label DIRECTED and a year
    // property with the provided year value.
    private static void createMovieDirectedBy(Driver driver, String movieId, String movieName, String directorName, int year) {
        try (Session session = driver.session()) {
            session.writeTransaction(tx -> {
                tx.run("MERGE (m:Movie {id: $movieId, name: $movieName})\n" +
                                "MERGE (d:Director {name: $directorName})\n" +
                                "MERGE (d)-[:DIRECTED {year: $year}]->(m)\n",
                        ImmutableMap.of("movieId", movieId, "movieName", movieName, "directorName", directorName, "year", year));
                return null;
            });
        }

    }
}
The above Java code is a consumer application that uses the Kafka client library to read JSON messages from a topic named movies-directed-by, processes the messages to extract movie and director information, and then creates corresponding nodes and relationships in a Neo4j graph database.
The code uses the KafkaConsumer class from the Kafka Java client library to consume messages from the topic and the ObjectMapper class from the Jackson library to parse the JSON messages. It also uses the Neo4j Java driver to establish a connection to the database and the GraphDatabase.driver() method to create a driver instance. The createMovieDirectedBy() method defines a transaction that creates the relevant nodes and relationships in the Neo4j database. The code runs in an infinite loop to continuously read and process messages from the topic into the Neo4j database.
You'll now build the application JAR using the Maven command or your IDE. If you cloned the GitHub repository, then you can use the following command from the project directory, event-driven-graph-analysis-with-redpanda-and-neo4j, to build the JAR:
mvnw clean installOnce the application JAR is built, ensure that you're in the project directory. If not, switch to it:
cd event-driven-graph-analysis-with-redpanda-and-neo4jYou can now execute the application with the following command:
"<path_to_java_binary>/java" -jar target/event-driven-graph-analysis-with-redpanda-and-neo4j-1.0-SNAPSHOT-jar-with-dependencies.jar
You'll see that your application is running. It will continue to listen for any incoming messages to the movies-directed-by topic in Redpanda. Next, you'll produce some messages on the topic.
Return to the Redpanda container's terminal and execute the command below:
rpk topic produce movies-directed-by
The console will be listening to input data that you can feed in by pasting the JSON content below:
{ "movieId": "1", "movieName": "The Shawshank Redemption", "year": 1994, "directorName":  "Frank Darabont" }
{ "movieId": "2", "movieName": "The Godfather", "year": 1972, "directorName":  "Francis Ford Coppola" }
{ "movieId": "7", "movieName": "Pulp Fiction", "year": 1994, "directorName":  "Quentin Tarantino" }
{ "movieId": "3", "movieName": "The Dark Knight", "year": 2008, "directorName":  "Christopher Nolan" }
You should see an output in the console similar to the following:
Produced to partition 0 at offset 0 with timestamp 1682079349188.
Produced to partition 0 at offset 1 with timestamp 1682079349188.
Produced to partition 0 at offset 2 with timestamp 1682079349188.
Produced to partition 0 at offset 3 with timestamp 1682079349188.
The above output indicates that a total of four messages were published to the topic.
Since the Java application is already running and listening to this topic, it will automatically consume the data and push it into the Neo4j database.
Switch back to the Neo4j browser to verify the data persisted in the Neo4j database. You can then perform some graph data analysis using Cypher queries.
Copy and paste the following Cypher query in the Neo4j query prompt to return the names of the movies that were released during the year 1994, along with their directors:
MATCH (d:Director) -[rel:DIRECTED]->(m:Movie) where rel.year=1994 RETURN m.name,d.name, rel.year
The pasted query will look like this:
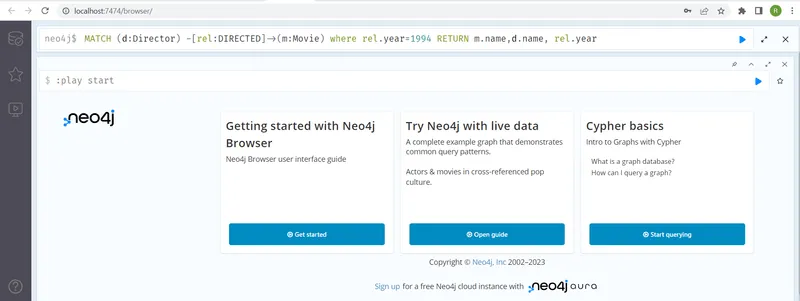
Click the play, or execute, button on the right-hand side of the query text box. You should see the results below:

Similarly, you can perform a variety of data analyses yourself using the same query prompt window. For instance, try executing the below aggregate query to return the number of movies released during the year 1994:
MATCH (d:Director) -[rel:DIRECTED]->(m:Movie) where rel.year=1994 RETURN count(m)
This query's result will be "2", since you published two JSON messages with the movie year of 1994. And you're all done!
In this tutorial, you built a streaming data pipeline application in Java using Redpanda and a Neo4j graph database. You also learned how to execute the application and access graph data stored in Neo4j via its user interface and Cypher queries.
As Neo4j supports various other use cases, like analyzing graph or relationship data in social networks, recommendation engines, fraud detection, and knowledge graphs, you can apply the information from this tutorial in a wide variety of scenarios.
Don't forget to take Redpanda's free Community edition for a test drive and check our documentation for guidance. You can also browse step-by-step tutorials on the Redpanda blog. If you get stuck or want to chat with our team and fellow Redpanda users, join the Redpanda Community on Slack.
Subscribe to our VIP (very important panda) mailing list to pounce on the latest blogs, surprise announcements, and community events!
Opt out anytime.