
Bridge Queries in Redpanda SQL
Have your real-time cake and eat your analytics too
Manage your Apache Kafka Access Control Lists with a user-friendly Web UI.


You can try out the Redpanda Console by spinning up the demo environment with Docker Compose, then connecting to localhost:8080 and navigating to the Security tab. However, the Redpanda container doesn't have auth enabled by default, and activating TLS and SASL is somewhat involved. For a step-by-step guide, you can refer to the Redpanda Field Guides course at the free Redpanda University.
Redpanda Console simplifies the management of ACLs by providing a visual interface where you can easily see what a principal can and cannot access. You can make adjustments with just a few clicks, which is much more efficient than typing out commands. Changes made via RPK on the command line show up in the Console, and vice versa, because they're operating on the same resources.
AAA, which stands for Authentication, Authorization, and Auditing (also known as Accounting), plays a crucial role in network management. Authentication is the process of proving your identity, Authorization determines what you're allowed to do, and Auditing keeps a record of your actions. This system helps maintain control and accountability in network management.
Access Control Lists (ACLs) are used in Redpanda and Apache KafkaⓇ to implement Authorization. They control access to topics, consumer groups, and the cluster. However, managing ACLs can be complex and requires a lot of typing, especially when dealing with a large number of them.
Come over and pull up a chair.
I want to tell you a story about the old days before the Cloud settled over the land.
In those days, I worked on switches and routers, and they weren't the little box that your ISP dropped behind your couch when they installed your Internet connection.
They were big, and they were powerful.

Those who had access to them could control the fate of billions of packets as they flowed across the wire, and this was a great responsibility.
"The work of the gods" is how my mentor Dave described it.
Alas, humans are only human, and everyone who has ever managed a router has a story about a single errant keystroke that sent those packets careening into the void of the null interface.
Access to these devices was tightly controlled and regulated by a service known as AAA (triple-A), which stood for Authentication, Authorization, and Auditing (also known as Accounting).
Authentication is how you prove you are who you are.
Authorization is what you’re allowed to do.
Auditing keeps a record of what you’ve done, so that when the voices of a billion packets go silent, other administrators know who gets to buy tonight’s round at the bar.
These days, everything has an authentication layer, and many things also have an authorization layer.
You might know it as Role-Based Access Control (RBAC).
(Accounting has unfortunately been reduced to simple logging to the ephemeral console or left as an exercise for the reader, but that doesn’t mean that it’s any less important. How many times have you used git blame to figure out who to throw the Nerf football at? 😜)
Redpanda and Apache KafkaⓇ implement Authorization through the use of Access Control Lists (ACLs).
Kafka has a dedicated script for managing ACLs, called kafka-acls.sh, and its use looks something like this:
kafka-acls.sh \
    --authorizer-properties zookeeper.connect=zookeeper:2181 \
    --add \
    --cluster \
    --operation Alter \
    --deny-principal User:ANONYMOUS
Redpanda uses rpk and, while it’s nice to have all of the functionality in a single binary instead of a bunch of shell scripts, configuring ACLs still requires a lot of typing:
rpk acl create \
    --allow-principal connect \
    --operation read,write,describe,describe_configs \
    --resource-pattern-type=prefixed \
    --topic docker-connect-
For one ACL, that’s not so bad, but what about when you have ten, or a hundred?
You have to create a different ACL for topics, consumer groups, and the cluster, and it’s difficult to see from the list how they interact with one other:
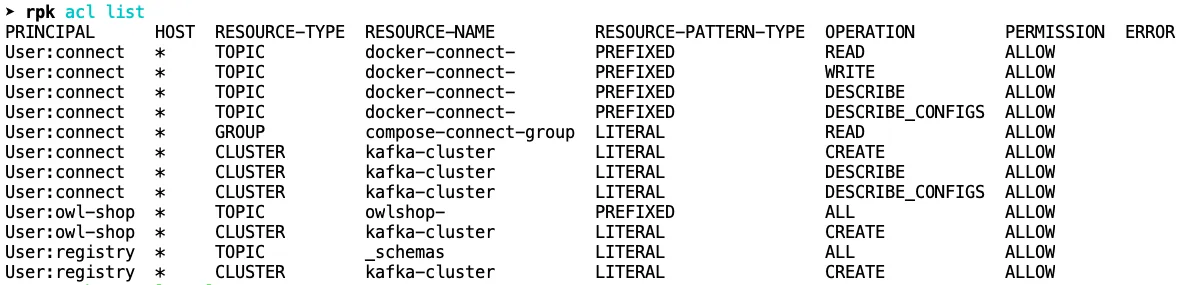
This is where you might wish you had Accounting, because it’s easy to lose track of the relationships and grant too much or too little permission to a principal.
Unless you’re using the new Redpanda Console!
Compare what you see above for the connect user with what Console shows you below:
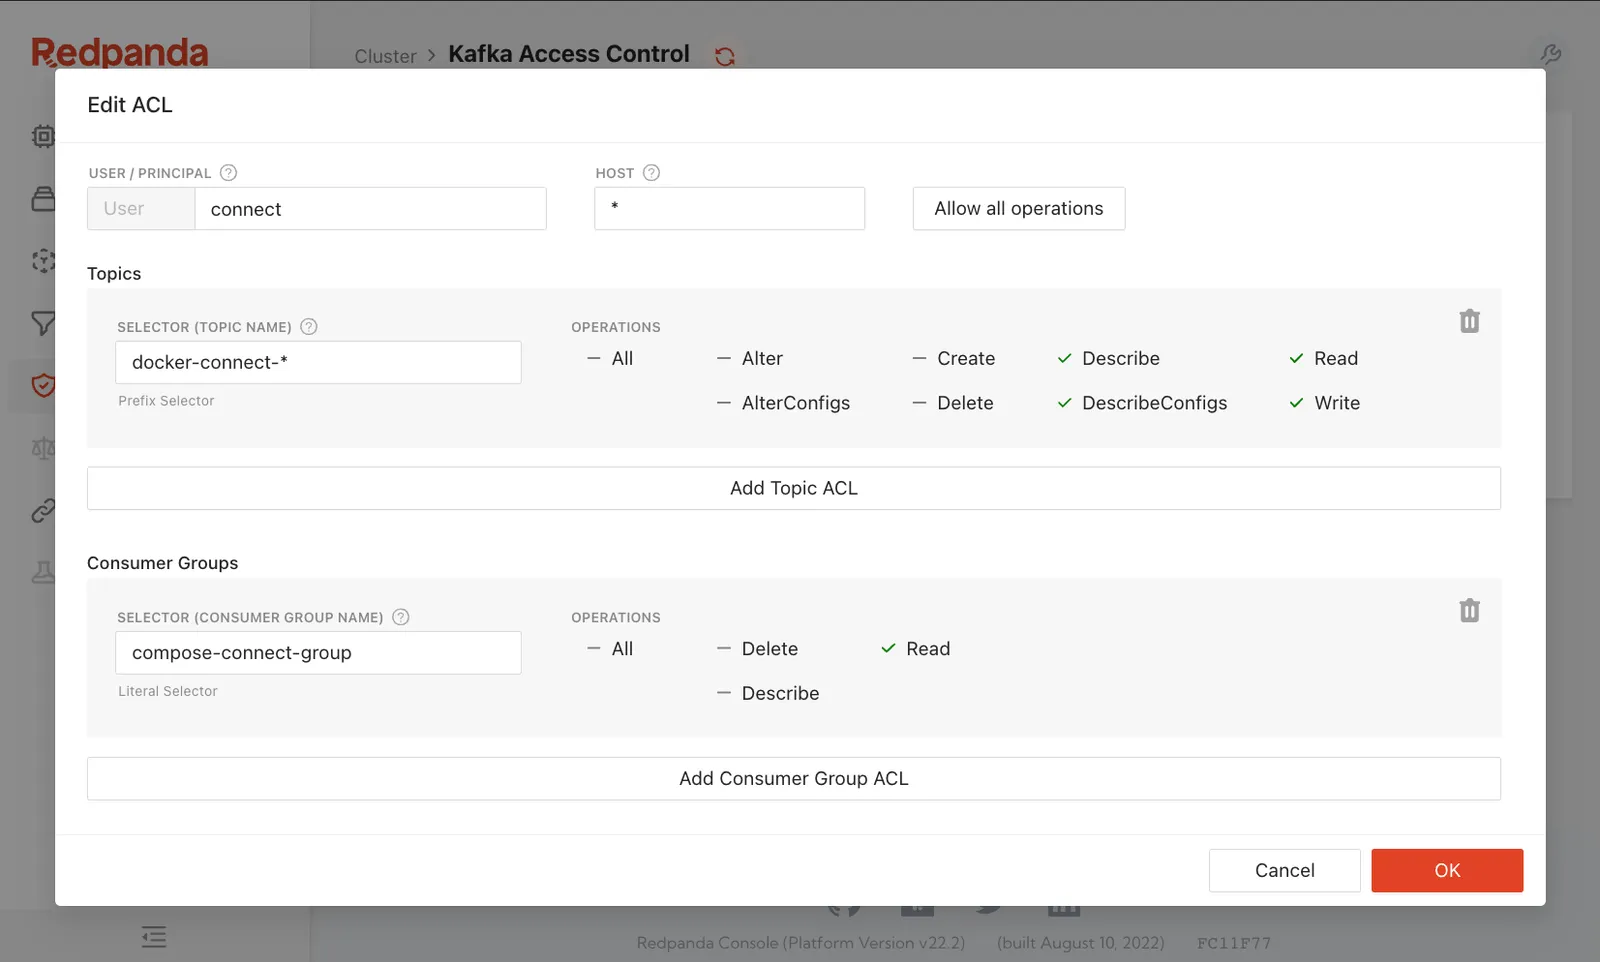
In a single pane, you can see what the principal can and cannot access and make adjustments with a couple of clicks.
Some of the Kafka veterans who are reading this are probably shaking their fists and yelling, “So what?! I can recite every ACL in my cluster from memory! I know them like I know the keys on my keyboard!”
I get it. You’re a different breed of operator, a Navy SEAL of administration.
No one’s trying to change you.
But look at the person next to you, the one who’s neck deep in automation and looking for ways to do their job faster while also doing less work. Everyone wants a shortcut.
We built Redpanda Console for them, and its beauty is that it’s merely a second interface to the same thing.
Changes made via RPK on the command line show up in Console, and vice versa, because they’re operating on the same resources.
Choose the one that makes you happy.
That’s really all we want.
Redpanda Console helps you do more with less, but mostly it just helps you do more.
The fastest way to see how easy it is to work with ACLs in Redpanda Console is to spin up the demo environment with Docker Compose, connect to localhost:8080 and jump over to the Security tab.
There you’ll be able to create and edit ACLs, but the Redpanda container doesn’t have auth enabled by default.
Activating TLS and SASL is somewhat involved because once SASL is active, all of the demonstration components that talk to Redpanda also need to authenticate.
Chicken, meet egg.
Rather than put all of those steps into this article, we’ve created a new Redpanda Field Guides course at the free Redpanda University and made it a chapter there.
If you'd like to bring up the same demo environment with Authentication, Authorization, and encryption, that chapter has a step-by-step guide that you can follow. Once you're done, you can carry that knowledge over to your production environment.
I’ll see you there!
Subscribe to our VIP (very important panda) mailing list to pounce on the latest blogs, surprise announcements, and community events!
Opt out anytime.