Build a real-time lakehouse architecture with Redpanda and Databricks
One architecture for real-time and analytics workloads. Easy to access, governed, and immediately queryable
Learn how to build a real-time data pipeline using Kubernetes, Redpanda, Postgres, and Go.
This blog provides a step-by-step tutorial to help you learn how to build a data pipeline on Kubernetes using Redpanda, Postgres, and Go. You’ll start by setting up Redpanda and Postgres on Kubernetes and then deploy client applications (producer and consumer) that will interact with them. Finally, we will wrap up a brief walk-through of the client application code.
These applications are written using the Go programming language, which is known for its simplicity and performance.
You can refer to this GitHub repo for all code used in the tutorial.

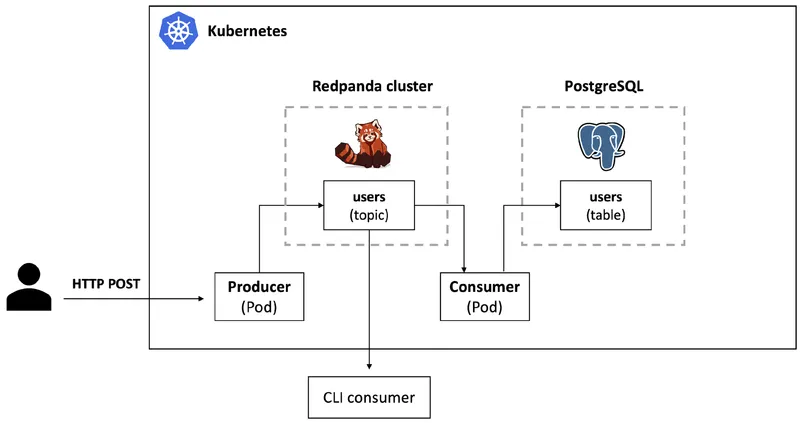
The demo application presents an ETL pipeline and the architecture has been kept simple for the purposes of this tutorial.
It consists of a producer application (Kubernetes Deployment) that exposes an HTTP endpoint to which external clients can POST data which is then sent to a topic in the Redpanda cluster in Kubernetes.
Note: Redpanda HTTP Proxy (pandaproxy) also provides a REST API using which you can produce events to topics, and much more! This tutorial uses a separate application to achieve similar results. The final approach depends on your specific requirements.
Then, a consumer application (yet another Kubernetes Deployment) creates a consumer group, receives data from this topic and persists it to a Postgres database in the same Kubernetes cluster.
There are multiple Go clients for Kafka, each with their pros and cons. For learning purposes, the producer and consumer applications have been built using separate client libraries - franz-go and sarama respectively. While sarama is one of the earliest Go clients for Kafka, is well established, and extensively used, franz-go is relatively new (at the time of writing) yet very promising library that aims to support every Kafka feature from Kafka v0.8.0 onward, as well as future KIPs using code generation.
To follow along, you will need to have kind (Kubernetes IN Docker), Helm, and Go installed.
Clone this GitHub repo:
git clone https://github.com/redpanda-data-blog/2022-data-pipeline-with-k8s-and-go

cd 2022-data-pipeline-with-k8s-and-goIt’s easy to get started with Redpanda on Kubernetes. Create a multi-node Kubernetes kind cluster:
kind create cluster --name rp-kind --config kind-config.yaml

kubectl get nodes

#output
NAME                    STATUS   ROLES           AGE   VERSION
rp-kind-control-plane   Ready    control-plane   54s   v1.24.0
rp-kind-worker          Ready    <none>          33s   v1.24.0
rp-kind-worker2         Ready    <none>          34s   v1.24.0
rp-kind-worker3         Ready    <none>          34s   v1.24.0
Use Helm to spin up a multi-node Redpanda cluster.
helm repo add redpanda https://charts.redpanda.com/
helm repo update
helm install redpanda redpanda/redpanda \
    --namespace redpanda \
    --create-namespace
It will take a few seconds for the cluster creation. Use this command to track the progress:
kubectl -n redpanda rollout status statefulset redpanda --watch

#output
Waiting for 3 pods to be ready...
Waiting for 2 pods to be ready...
Waiting for 1 pods to be ready...
statefulset rolling update complete 3 pods at revision redpanda-76d98b7647...
Once the cluster is ready, create a topic with three partitions:
#for convenience, use an alias
alias rpk="kubectl -n redpanda exec -ti redpanda-0 -c redpanda -- rpk --brokers=redpanda-0.redpanda.redpanda.svc.cluster.local.:9093"

#create topic
rpk topic create users --partitions 3

#output
TOPIC  STATUS
users OKhelm repo add bitnami https://charts.bitnami.com/bitnami
helm install postgres-demo bitnami/postgresqlWait for Postgres instance to be ready. To confirm, you can check for the StatefulSet status:
kubectl get statefulset postgres-demo-postgresql

#output
NAME                       READY   AGE
postgres-demo-postgresql   1/1     52s
Once Postgres is ready, connect to it and create a table:
export POSTGRES_PASSWORD=$(kubectl get secret --namespace default postgres-demo-postgresql -o jsonpath="{.data.postgres-password}" | base64 -d)

kubectl run postgres-demo-postgresql-client --rm --tty -i --restart='Never' --namespace default --image docker.io/bitnami/postgresql:14.5.0-debian-11-r14 --env="PGPASSWORD=$POSTGRES_PASSWORD" --command -- psql --host postgres-demo-postgresql -U postgres -d postgres -p 5432
You will eventually see the postgres command prompt (if not then press Enter once for it to appear). Then create a table named users:
CREATE TABLE users (
    user_id serial PRIMARY KEY,
    email VARCHAR ( 255 ) NOT NULL,
    username VARCHAR ( 50 ) NOT NULL
);
The key infrastructure components (Redpanda and Postgres) are ready. Keep this Postgres client pod terminal open, since we will use it later. Go ahead and deploy the client applications from a new terminal.
First, build the application Docker image and load it into a kind cluster node:
cd producer

docker build -t redpanda-go-producer .
kind load docker-image redpanda-go-producer --name rp-kind
To deploy producer application to Kubernetes:
kubectl apply -f ../deploy/producer.yaml
kubectl get pods
Wait for the Pod to go into Running status and check the producer application logs:
kubectl logs -f $(kubectl get pod -l app=redpanda-go-producer -o jsonpath="{.items[0].metadata.name}")

#output (logs)
using default value for redpanda broker redpanda-0.redpanda.redpanda.svc.cluster.local.:9093
using default value for redpanda topic users
....
The producer application has an HTTP endpoint we can interact with in order to send data to Redpanda.
Make sure to expose the application port locally:
kubectl port-forward svc/redpanda-go-producer-service 9090:9090
From a different terminal, send test data to the HTTP endpoint:
curl -i -XPOST -d '{"name":"foo1", "email":"foo1@bar.com"}' http://localhost:9090
curl -i -XPOST -d '{"name":"foo2", "email":"foo2@bar.com"}' http://localhost:9090
curl -i -XPOST -d '{"name":"foo3", "email":"foo3@bar.com"}' http://localhost:9090
You can also install a handy utility (jo) and use this script to generate and send test data:
for i in {1..10};
    do jo email=user${i}@foo.com name=user${i} | curl -i -X POST -d @- http://localhost:9090;
    done
To consume data using CLI:
alias rpk="kubectl -n redpanda exec -ti redpanda-0 -c redpanda -- rpk --brokers=redpanda-0.redpanda.redpanda.svc.cluster.local.:9093"

rpk topic consume users
So far, we have seen the first half of the application. Now, we will deploy a consumer application to process data from the users topic in Redpanda.
Build the Docker image and load it into the kind cluster node:
cd consumer

docker build -t redpanda-go-consumer .
kind load docker-image redpanda-go-consumer --name rp-kind
Deploy the consumer application to Kubernetes:
kubectl apply -f ../deploy/consumer.yaml
Wait for Pod to go into Running status and check the producer application logs:
kubectl get pods
kubectl logs -f $(kubectl get pod -l app=redpanda-go-consumer -o jsonpath="{.items[0].metadata.name}")

#output (logs)
using default value for redpanda broker redpanda-0.redpanda.redpanda.svc.cluster.local.:9093
using default value for redpanda topic users
using default value for database host postgres-demo-postgresql.default.svc.cluster.local
posgtres connection url postgres://postgres:XGNCXP2BxH@postgres-demo-postgresql.default.svc.cluster.local:5432/postgres
starting consumer
consumer ready
message received: value = {"email":"user2@foo.com","name":"user2"}, topic = users, partition = 1, topic = 0
message received: value = {"email":"user3@foo.com","name":"user3"}, topic = users, partition = 2, topic = 0
successfully added record to database {user2@foo.com user2}
successfully added record to database {user2@foo.com user2}
....
After establishing connection with Redpanda and Postgres, the consumer application gets the data from Redpanda topic, inserts them into the Postgres table and marks them as processed.
Return to the Postgres client pod terminal and check for data in the users table:
select * from users;

//output
 user_id |     email      | username
---------+----------------+----------
       1 | user11@foo.com | user11
       3 | user14@foo.com | user14
       2 | user12@foo.com | user12
       4 | user15@foo.com | user15
       5 | user13@foo.com | user13
Your results might be different depending on the test data.
Great job so far! You have:
Horizontal scalability is a key characteristic of cloud-native applications. Both Kubernetes and Redpanda shine here! You can scale out the consumer application to handle a high volume of events being sent to topics in Redpanda.
We started out with a single instance of the consumer application. Increase the number of replicas of the consumer Deployment:
kubectl scale deployment/redpanda-go-consumer --replicas=2
As a result of the scale out, the Redpanda topic partitions will get redistributed among the two instances. Since we created a topic with three partitions, data from two of these partitions will be handled by one instance while the remaining partition data will be taken care of by the second consumer instance.
This should be evident when you inspect the new Pod as well as the previous one to see how partition assignment has changed:
kubectl get pod -l app=redpanda-go-consumer
kubectl logs -f <name of new pod>

#output (logs)
[sarama] consumer/broker/1 accumulated 1 new subscriptions
[sarama] consumer/broker/1 added subscription to users/1
[sarama] consumer/broker/0 accumulated 1 new subscriptions
[sarama] consumer/broker/0 added subscription to users/2
To test this, send some more data to Redpanda using the producer application (as per instructions in the previous section). You will see that events are being processed by both the consumer instances (Pods).
For example, to send 500 records, you can use this script:
for i in {1..500};
    do jo email=user${i}@foo.com name=user${i} | curl -i -X POST -d @- http://localhost:9090;
doneTo further test and improve your understanding, you can try these on your own:
Deployment to three Pods. Produce data and the observe logs of all the consumer instances. Which Pod is consuming data from which partition?Deployment to include four Pods. Produce data and the observe logs of all the consumer instances. Is there an instance which is not getting any data at all? If yes, why?This section covers a brief overview of the key parts of the code.
NewClient is used to create kgo.Client instance:
client, err := kgo.NewClient(
        kgo.SeedBrokers(broker),
        kgo.RecordPartitioner(kgo.RoundRobinPartitioner()),
    )
Notice the choice of the partitioner in this case - kgo.RoundRobinPartitioner()
Data is sent to Redpanda using a synchronous Producer that produces all records in one range loop and waits for them all to be produced before returning.
res := client.ProduceSync(context.Background(), &kgo.Record{Topic: topic, Value: payload})
You can also use an asynchronous producer.
The consumer runs as a separate goroutine:
//.....
    client, err := sarama.NewConsumerGroup([]string{broker}, consumerGroup, config)
    if err != nil {
        log.Panicf("error creating consumer group client: %v", err)
    }

    consumer := SimpleConsumerHandler{
        ready: make(chan bool),
    }

    go func() {
        defer wg.Done()
        for {
            err := client.Consume(ctx, []string{topic}, &consumer)
            if err != nil {
                log.Panicf("error joining consumer group: %v", err)
            }
            if ctx.Err() != nil {
                return
            }
            consumer.ready = make(chan bool)
        }
    }()
    //....
The consumer processing logic is implemented in SimpleConsumerHandler which in turn implements the sarama.ConsumerGroupHandler interface:
//...
func (consumer *SimpleConsumerHandler) ConsumeClaim(session sarama.ConsumerGroupSession, claim sarama.ConsumerGroupClaim) error {
    for {
        select {
        case message := <-claim.Messages():
            log.Printf("message received: value = %s, topic = %v, partition = %v, topic = %v", string(message.Value), message.Topic, message.Partition, message.Offset)

            var u User
            err := json.Unmarshal(message.Value, &u)
            //...
            _, err = db.Exec(insertSQL, u.Email, u.Username)
            log.Println("successfully added record to database", u)
            session.MarkMessage(message, "")
            //...

        case <-session.Context().Done():
            return nil
        }
    }
}
//...Once you finish the tutorial, follow these steps to delete the components. To uninstall the Redpanda Helm release:
helm uninstall redpanda -n redpanda
To uninstall the PostrgeSQL cluster:
helm uninstall postgres-demo
To delete the producer and consumer application:
kubectl delete -f deploy
To delete the kind cluster:
kind delete clusters rp-kind
In this tutorial, you deployed and tested an ETL solution using Redpanda, Postgres, and Go. You scaled the consumer application to distribute the processing load among multiple consumer instances. Instead of doing this manually (using kubectl scale), you can also make use of the Horizontal Pod Autoscaler or explore auto-scaling via an open source project called KEDA (Kubernetes Event-driven Autoscaling) and see how the Kafka scaler can help scale your Redpanda-based applications efficiently.
Take Redpanda for a test drive here. Check out the documentation to understand the nuts and bolts of how the platform works, or read more blogs to see the plethora of ways to integrate with Redpanda. To ask Solution Architects and Core Engineers questions and interact with other Redpanda users, join the Redpanda Community on Slack.
Apache KafkaⓇ is a commonly used solution for real-time streaming data processing. Thanks to its Kafka compatible API, Redpanda combined with Kubernetes can provide a solid foundation for solutions that can scale out elastically to handle large volumes of data.

One architecture for real-time and analytics workloads. Easy to access, governed, and immediately queryable

Everything you need to move agentic AI initiatives to production — safely
Subscribe to our VIP (very important panda) mailing list to pounce on the latest blogs, surprise announcements, and community events!
Opt out anytime.