


Real-time Change Data Capture with Redpanda Connect and MySQL
Stream every insert, update, and delete from your database the moment it happens

Enterprise integration patterns (EIP) are especially relevant in the cloud-native era. Learn how to implement a Dead Letter Channel EIP using Apache Camel and Redpanda!


In the tutorial provided in this blog, you learn how to use Apache Camel along with Redpanda to implement the dead letter channel pattern in your applications. You simulate a message generated from a web application and send it to the Redpanda topic. Redpanda acts as a messaging system, and the topic acts as a messaging channel. You use Apache Camel to consume the message from the Redpanda topic and raise an exception when a user login message matches a denylisted user. Such messages are routed to a dead letter topic in Redpanda.
Applications communicate using messaging patterns through a messaging channel. When an application needs to send information, it adds that information to a specific messaging channel, from which a receiving application then obtains the information. This allows different applications developed in different programming languages to communicate with each other.
Messaging patterns describe the ways that various components of a message-passing system connect and communicate to allow interaction between different types of software, which may be written in different languages and exist on various platforms in numerous locations. They make it simpler for programs and applications to communicate across various environments.
Messaging channel EIPs are helpful in creating a message bus to enable multiple applications to communicate with one another, implementing a fallback mechanism with a dead letter queue to handle failure scenarios, and acting as a publish-subscribe channel when an application needs to act as a broadcaster to send events/messages to all subscribers.
Apache Camel is a flexible open source integration framework built on well-known enterprise integration patterns. It provides an interface to implement EIPs along with debugging tools, a configuration system, and more. It can implement most of the messaging channel EIPs, including message bus, dead letter channel, and publish-subscribe.
For enterprise application integration, the collection focuses mainly on message patterns. Because each environment simply needs to understand the standard messaging format and protocol, messaging makes it simpler for programs and applications to communicate across various environments. Messaging patterns describe the ways that various components of a message-passing system connect and communicate to allow interaction between different types of software, which may be written in different languages and exist on various platforms in numerous locations.
So, how do multiple applications communicate with one another using messaging patterns? The answer is through a messaging channel. When an application needs to send information, it adds that information to a specific messaging channel, from which a receiving application then obtains the information. This process is pictured in the following diagram:
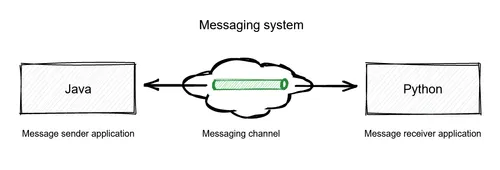
Enterprise Integration Pattern (EIP) for messaging channels
The diagram shows two different applications that were developed in different programming languages and that run in different runtime environments. Although these applications vary in characteristics, they can still communicate with each other through the messaging channel integration pattern.
In this post, you'll learn more about enterprise integration patterns (EIPs) and explore some of their use cases via messaging channels. We'll introduce you to Apache Camel and the list of messaging channel-oriented patterns that it implements. To wrap it up, you can follow a hands-on tutorial to implement one of the messaging channel EIPs using Apache Camel and Redpanda.
All the source code used in the tutorial is in this GitHub repository.
Messaging channel EIPs are helpful in a variety of use cases:
Apache Camel is a flexible open source integration framework built on well-known enterprise integration patterns. With Apache Camel, you can create routes and mediation rules in many domain-specific languages, like Java, Kotlin, and Groovy.
Camel provides an interface to implement EIPs along with debugging tools, a configuration system, and more. It can implement most of the messaging channel EIPs, including but not limited to those mentioned in the use cases just above:
In the tutorial below, you'll learn how to use Apache Camel along with Redpanda to implement the dead letter channel pattern in your applications.
To proceed with the tutorial, you'll want to be familiar with Docker and have hands-on experience with Java programming and the Maven build process. You'll also need the following:
Consider this scenario: You have a web application that generates messages for each user login event, which are sent to a default targeted messaging channel. There's another application that requires such user login messages for analytical purposes. However, in the event that a user login message matches a denylisted user, the system should raise an exception on such a message, filter it, and reroute it to a dead letter channel.
As part of this tutorial, you will use a script to simulate the message generated from the imaginary web application and send it to the Redpanda topic, user-login. In this demo context, Redpanda will act as a messaging system, and the topic will act as a messaging channel. You will use Apache Camel to consume the message from the Redpanda topic and raise an exception when a user login message matches a denylisted user. Such messages will be routed to a dead letter topic, user-login-DLT, in Redpanda.
Here's an architecture diagram explaining this sample use case:

Architecture diagram for the Redpanda messaging system
To start, create a project directory called apache-camel-and-redpanda on your machine. Inside it, create subdirectories called redpanda and apache-camel-with-redpanda-app. The redpanda directory will hold the files to start the Redpanda Docker container and a custom script to generate and send user login messages to the Redpanda topic. The apache-camel-with-redpanda-app directory will hold the application logic based on Java and Apache Camel technologies to interact with the Redpanda messaging system.
Redpanda is available for self-hosted use and as a cloud service, and there are many options for preparing a Redpanda instance. For information on installing or running Redpanda on a variety of platforms, refer to the documentation.
For the purposes of this tutorial, Redpanda runs locally in a Docker container. Switch to the redpanda subdirectory and create a directory named custom-scripts, in which you will later create a message producer script. You need to specify the absolute path of this custom-scripts directory as part of the docker run command to mount the volume in the redpanda Docker container. This will ensure that your custom message producer script is available in the Docker container for later execution.
The following is a sample command set to create a Docker network called redpanda-network and start the redpanda service in a Docker container:
docker network create redpanda-network

docker run -d --name=redpanda --rm ^
    --network redpanda-network ^
    -p 9092:9092 ^
	-v <input_absolute_path_of_custom-scripts_dir>:/opt/redpanda/custom-scripts/ ^
	docker.vectorized.io/vectorized/redpanda:latest ^
    redpanda start ^
    --advertise-kafka-addr PLAINTEXT://redpanda:29092,PLAINTEXT_HOST://host.docker.internal:9092 ^
    --kafka-addr PLAINTEXT://0.0.0.0:29092,PLAINTEXT_HOST://0.0.0.0:9092 ^
    --overprovisioned ^
    --smp 1  ^
    --memory 1G ^
    --reserve-memory 500M ^
    --node-id 0 ^
    --check=false
After running your Redpanda instance using your preferred method, you can check if the service is up and running by executing the following command:
docker psIf the service is running, you'll get an output like this:
CONTAINER ID   IMAGE                                 COMMAND                  CREATED         STATUS         PORTS                                             NAMES

b754ca13318e vectorized/redpanda "/entrypoint.sh redp…" 9 seconds ago Up 6 seconds 8081-8082/tcp, 9644/tcp, 0.0.0.0:9092->9092/tcp redpandaLog in to the redpanda container terminal and create the topics for this demo use case:
docker exec -it redpanda bash

rpk topic create user-login
rpk topic create user-login-DLT
Keep this terminal running, as you'll need it later on to execute a message producer script.
Switch to the redpanda/custom-scripts directory, create a file named produce-events.sh, and paste in the code below:
#!/bin/bash

TOPIC=user-login

# Create Redpanda topic
rpk topic create $TOPIC

rpk topic create $TOPIC-DLT

# Counter for the USER_ID
USER_ID=1

# Infinite loop to produce data
while true ; do
    JSON_STRING="{"\"user_id"\": $USER_ID, "\"user_name"\": "\"user_$USER_ID"\"}"
    # Send the message
    echo ${JSON_STRING} | rpk topic produce $TOPIC

    sleep 5
    # Increment the USER_ID
    USER_ID=$(($USER_ID+1))
done
The above script will continue to produce a JSON string as a message in the following format:
{"user_id": 1, "user_name": "user_1"}The numeric digit is part of the user detail that gets changed dynamically as part of every message. You will run this script after creating the EIP application in Java.
Switch to the apache-camel-with-redpanda-app directory and create a Java-based Maven project in your favorite IDE, with the code in pom.xml as shown below:
<?xml version="1.0" encoding="UTF-8"?>
<project xmlns="http://maven.apache.org/POM/4.0.0"
    xmlns:xsi="http://www.w3.org/2001/XMLSchema-instance" xsi:schemaLocation="http://maven.apache.org/POM/4.0.0 https://maven.apache.org/xsd/maven-4.0.0.xsd">
    <modelVersion>4.0.0</modelVersion>
    <parent>
        <groupId>org.springframework.boot</groupId>
        <artifactId>spring-boot-starter-parent</artifactId>
        <version>2.7.7</version>
        <relativePath/>
        <!-- lookup parent from repository -->
    </parent>
    <groupId>com.example</groupId>
    <artifactId>apache-camel-with-redpanda</artifactId>
    <version>0.0.1-SNAPSHOT</version>
    <name>apache-camel-with-redpanda</name>
    <description>EIP using Apache Camel and Redpanda</description>
    <properties>
        <java.version>17</java.version>
    </properties>
    <dependencies>
        <dependency>
            <groupId>org.springframework.boot</groupId>
            <artifactId>spring-boot-starter-web</artifactId>
        </dependency>

        <dependency>
            <groupId>org.apache.camel.springboot</groupId>
            <artifactId>camel-spring-boot-starter</artifactId>
            <version>3.20.0</version>
        </dependency>

        <dependency>
            <groupId>org.apache.camel.springboot</groupId>
            <artifactId>camel-kafka-starter</artifactId>
            <version>3.20.0</version>
        </dependency>

        <dependency>
            <groupId>org.projectlombok</groupId>
            <artifactId>lombok</artifactId>
            <optional>true</optional>
        </dependency>
        <dependency>
            <groupId>org.springframework.boot</groupId>
            <artifactId>spring-boot-starter-test</artifactId>
            <scope>test</scope>
        </dependency>
    </dependencies>

    <build>
        <plugins>
            <plugin>
                <groupId>org.springframework.boot</groupId>
                <artifactId>spring-boot-maven-plugin</artifactId>
                <configuration>
                    <excludes>
                        <exclude>
                            <groupId>org.projectlombok</groupId>
                            <artifactId>lombok</artifactId>
                        </exclude>
                    </excludes>
                </configuration>
            </plugin>
        </plugins>
    </build>

</project>
This file contains the dependencies required for the integration of Apache Camel with Redpanda.
Once you create the project in your IDE, ensure your child directories under the apache-camel-with-redpanda-app directory follow the hierarchical structure as shown below:
src/main/java/com/example/apachecamelwithredpanda/
src/main/resources/
src/main/java/com/example/apachecamelwithredpanda/
src/main/resources/
This structure will help match the project contents with the import statements defined in the application source code, which you are about to develop. If you want to follow a different structure or different naming aspects, feel free to do so, but you'll need to take care of modifying the source code appropriately to make the project work.
Switch to the src/main/resources directory and create an application.properties file with the following content:
camel.component.kafka.brokers=localhost:9092
camel.component.kafka.brokers=localhost:9092
This property represents the redpanda service listening port for the incoming requests.
Switch to the src/main/java/com/example/apachecamelwithredpanda/ directory and create a file named ApacheCamelWithRedpandaApplication.java with the code below:
package com.example.apachecamelwithredpanda;

import org.springframework.boot.SpringApplication;
import org.springframework.boot.autoconfigure.SpringBootApplication;

@SpringBootApplication
public class ApacheCamelWithRedpandaApplication {

    public static void main(String[] args) {
        SpringApplication.run(ApacheCamelWithRedpandaApplication.class, args);
    }

}
This class file serves as your main application file that starts up your EIP application developed with Apache Camel, along with other required dependencies.
Next, create a class file named CamelRedpandaRouter.java with the following code:
package com.example.apachecamelwithredpanda;

import org.apache.camel.builder.RouteBuilder;
import org.springframework.beans.factory.annotation.Value;
import org.springframework.stereotype.Component;

@Component
public class CamelRedpandaRouter extends RouteBuilder {

    @Value("${camel.component.kafka.brokers}")
    private String kafka_server;

    @Override
    public void configure() throws Exception {
        System.out.println("kafka_server is " + kafka_server);
        // Kafka consumer
        from("kafka:user-login?brokers=" + kafka_server)
                .log("Message received from Kafka : ${body}")
                .bean(UserLoginProcessor.class, "process(${body})")
                .errorHandler(deadLetterChannel("kafka:user-login-DLT?brokers=" + kafka_server).useOriginalMessage());

    }

}
The above class extends the Apache Camel RouteBuilder class. The class overrides its configure method with the logic to consume messages from the user-login topic in Redpanda and directs the consumed message to a bean method process in the UserLoginProcessor class. When there is an exception raised during the message processing in UserLoginProcessor, the message gets routed to the dead letter topic, user-login-DLT.
Next, create the UserLoginProcessor.java file with the code below:
package com.example.apachecamelwithredpanda;
package com.example.apachecamelwithredpanda;

import com.fasterxml.jackson.core.JsonProcessingException;
import com.fasterxml.jackson.databind.JsonMappingException;
import com.fasterxml.jackson.databind.ObjectMapper;

public class UserLoginProcessor {
    public static void process(String body) throws Denylist {
        ObjectMapper mapper = new ObjectMapper();
        UserLogin userLogin = null;
        try {
            userLogin = mapper.readValue(body, UserLogin.class);
        } catch (JsonMappingException e) {
            e.printStackTrace();
        } catch (JsonProcessingException e) {
            e.printStackTrace();
        }

        if (userLogin.getUser_name().contains("9") || userLogin.getUser_name().contains("4")) {
            throw new Denylist("Encountered User name containing denylisted pattern");
        }

        System.out.println("userLogin details are : " + userLogin);
    }

}
This class reads the routed user login message from the user-login topic. If the content matches any of the denylisted users (user IDs containing the digits 4 or9), then a custom-defined exception, Denylist, is raised.
Next, create a class file named UserLogin.java with the following code:
package com.example.apachecamelwithredpanda;

import lombok.AllArgsConstructor;
import lombok.Data;
import lombok.NoArgsConstructor;

@Data
@AllArgsConstructor
@NoArgsConstructor
public class UserLogin {
    private int user_id;
    private String user_name;

}
This file will serve as a message content mapper class to map the contents of the topic to a plain Java object.
Next, create a user-defined exception class file named Denylist.java with the code below:
package com.example.apachecamelwithredpanda;

public class Denylist extends Exception {

    public Denylist(String exceptionMessage) {
        super(exceptionMessage);
    }

}
And just like that, you've come to the end of the EIP application development. You can then build the Maven project to generate the application JAR in your favorite IDE. For convenience, the GitHub repository also provides the built application JAR for you to download. Run the application using the following command:
cd <directory where the JAR file is located>
java -jar ./apache-camel-with-redpanda-0.0.1-SNAPSHOT.jar
You should see an output like this:
…output omitted…

2023-01-08 10:25:48.569  INFO 15660 --- [main] c.e.a.ApacheCamelWithRedpandaApplication : Starting ApacheCamelWithRedpandaApplication v0.0.1-SNAPSHOT using Java 17.0.5 on PF1J5G40 with PID 15660
2023-01-08 10:25:51.278  INFO 15660 --- [main] o.s.b.w.embedded.tomcat.TomcatWebServer  : Tomcat started on port(s): 8080 (http) with context path ''
kafka_server is localhost:9092
2023-01-08 10:25:51.621  INFO 15660 --- [main] o.a.c.impl.engine.AbstractCamelContext   : Apache Camel 3.20.0 (camel-1) is starting

…output omitted…Now that you have the Apache Camel-based EIP application running, switch to the redpanda container terminal and execute the produce-events.sh shell script using this command:
/opt/redpanda/custom-scripts/produce-events.sh
You will see an output like this:
Produced to partition 0 at offset 0 with timestamp 1673154473451.
Produced to partition 0 at offset 1 with timestamp 1673154478807.
Produced to partition 0 at offset 2 with timestamp 1673154483833.
Produced to partition 0 at offset 3 with timestamp 1673154488858.
Produced to partition 0 at offset 4 with timestamp 1673154493887.
Produced to partition 0 at offset 5 with timestamp 1673154498921.
Produced to partition 0 at offset 6 with timestamp 1673154503949.
Produced to partition 0 at offset 7 with timestamp 1673154508983.
Produced to partition 0 at offset 8 with timestamp 1673154514011.
Produced to partition 0 at offset 9 with timestamp 1673154519041.
Produced to partition 0 at offset 10 with timestamp 1673154524097.
While these messages are being pushed to the topic, if you switch your window to the terminal where the Apache Camel EIP application is running, you should see the messages being consumed and printed in the console output, as shown below:
2023-01-08 10:38:18.951  INFO 21668 --- [mer[user-login]] route1 : Message received from Kafka : {"user_id": 6, "user_name": "user_6"}
userLogin details are : UserLogin(user_id=6, user_name=user_6)
2023-01-08 10:38:23.965  INFO 21668 --- [mer[user-login]] route1 : Message received from Kafka : {"user_id": 7, "user_name": "user_7"}
userLogin details are : UserLogin(user_id=7, user_name=user_7)
2023-01-08 10:38:28.998  INFO 21668 --- [mer[user-login]] route1 : Message received from Kafka : {"user_id": 8, "user_name": "user_8"}
userLogin details are : UserLogin(user_id=8, user_name=user_8)
2023-01-08 10:38:34.020  INFO 21668 --- [mer[user-login]] route1 : Message received from Kafka : {"user_id": 9, "user_name": "user_9"}
2023-01-08 10:38:39.062 INFO 21668 --- [mer[user-login]] route1 : Message received from Kafka : {"user_id": 10, "user_name": "user_10"}As per the demo use case, the user IDs containing the digits 4 or 9 are denylisted, and thus, those messages should be routed to the dead letter topic. Connect to a new redpanda container terminal and execute the command below:
rpk topic consume user-login-DLTYou should see the messages with user IDs 4 or 9 getting consumed:
{
  "topic": "user-login-DLT",
  "value": "{\"user_id\": 9, \"user_name\": \"user_9\"}",
  "timestamp": 1673154514039,
  "partition": 0,
  "offset": 0
}You've now successfully implemented an end-to-end enterprise integration pattern flow using Apache Camel and Redpanda! Apache Camel is a production-grade choice when you want to implement an EIP-based solution. Also, developers are switching to Redpanda instead of Kafka when performance and safety are crucial criteria. Since Redpanda is compliant with the Apache Kafka API, it is considered a safer choice when it comes to selecting a streaming platform.
You can find the source code for this article in this GitHub repository.
To learn more about Redpanda, check out our documentation and browse the Redpanda blog for tutorials and guides on how to easily integrate with Redpanda. For a more hands-on approach, take Redpanda's free Community edition for a test drive!
If you get stuck, have a question, or want to chat with our solution architects, core engineers, and fellow Redpanda users, join our Redpanda Community on Slack.
Enterprise Integration Patterns provide a collection of design patterns for creating systems that integrate new and preexisting software in a commercial setting. The collection offers sixty-five varieties of design patterns as a generic solution for integrating multiple systems in a software enterprise environment. These patterns are detailed enough to give designers and architects practical advice while remaining abstract enough to apply to the majority of integration technologies. Patterns also give developers a vocabulary to effectively define their solutions.
Subscribe to our VIP (very important panda) mailing list to pounce on the latest blogs, surprise announcements, and community events!
Opt out anytime.

