
How to build a governed Agentic AI pipeline with Redpanda
Everything you need to move agentic AI initiatives to production — safely
Learn about Amazon DynamoDB then migrate data from PostgreSQL using Debezium and Kafka Connect
However, with the exponential growth of data volume, variety, and velocity (often referred to as the “three V's” of big data), traditional databases can struggle to manage unstructured and semi-structured data types. NoSQL ("non-SQL" or "not only SQL") databases such as MongoDB, Cassandra, and Amazon DynamoDB address this challenge by offering flexible storage without fixed schemas.
This post introduces you to Amazon DynamoDB—a NoSQL solution for unstructured data, scalability, and high-throughput needs. Then we’ll dive into the tutorial, which shows you how to migrate data from PostgreSQL to DynamoDB using Debezium and Kafka Connect for efficient data transformation and ingestion.
Amazon DynamoDB is a fully managed NoSQL database service offered by Amazon Web Services (AWS). It provides low-latency, high-throughput performance by automatically distributing data and traffic for the database tables over a sufficient number of servers to handle throughput and storage requirements.
DynamoDB supports both key-value and document data models, making it a flexible option for a wide range of applications. Its seamless scalability, managed backup and restore options, and in-memory caching for internet-scale applications make it a popular choice for modern web applications.
In Big Data applications, companies dealing with vast amounts of data in various formats can leverage DynamoDB's flexible schema to handle the data. For example, Lyft uses DynamoDB to store various types of ride data and user information, handling over one billion events per day.
In terms of scalability, DynamoDB's support for automatic sharding and on-demand capacity mode allows it to handle more than ten trillion requests per day. Snapchat uses DynamoDB to store metadata for billions of its users and their snaps, ensuring low-latency access even with unpredictable loads.
Additionally, for applications requiring rapid development and diverse data types, DynamoDB's document data model allows developers to store JSON documents without a predefined schema, as seen with Capital One. It leverages DynamoDB to quickly prototype and deploy new banking features for millions of its customers.
Let's say you work for a delivery and logistics company handling a high volume of daily delivery requests from e-commerce platforms and consumers.
Due to clients' expansion plans, the company anticipates a significant increase in requests. You need to ensure your APIs and infrastructure can handle the incoming request traffic and data loads. To handle this, you are migrating from a PostgreSQL RDBMS to Amazon's DynamoDB NoSQL service.
The following diagram illustrates the components of the migration exercise as well as the roles they play in the solution for the delivery and logistics company:
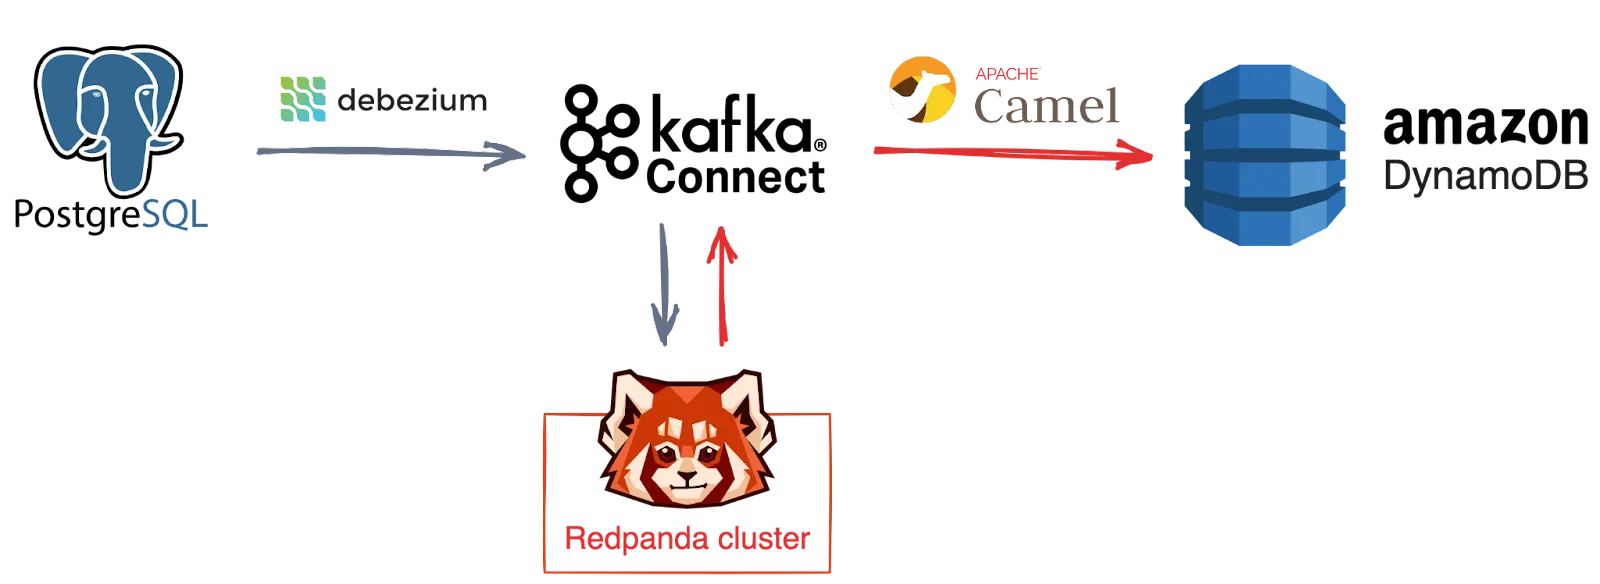
Data migration from PostgreSQL to DynamoDB using Redpanda and Kafka Connect
If you're following along with the implementation in this tutorial, all code and config files used here are located in this GitHub repository. You can clone the repository to speed up the process and make modifications where necessary for testing.
To get started, you'll need the following:
You will need to set up three node clusters and the Redpanda Console by following the instructions in the documentation. Alternatively, you can execute the command below to use the Docker Compose file in the project repository for setup:
docker-compose -f ./compose-redpanda.yml up
Once that is done successfully, you can enter http://127.0.0.1:8080 in your web browser to access the Redpanda Console:
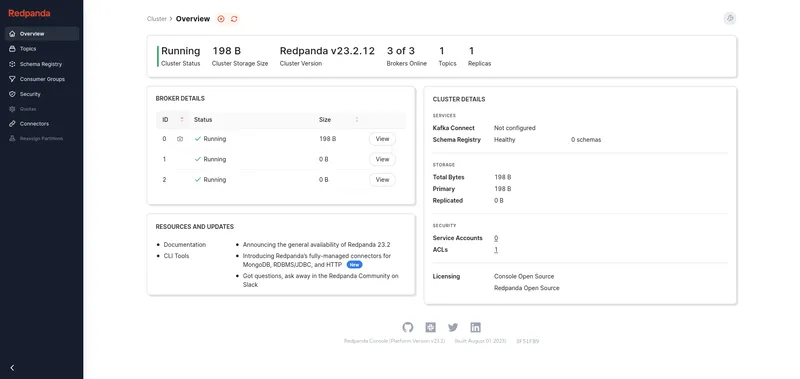
Redpanda Console running on Docker
This will let you easily visualize the activities of your Redpanda cluster.
Your PostgreSQL database will need to be configured with the logical replication feature enabled, which is required for the Debezium source connector to work. Debezium provides extensive documentation if you need a little help.
You can run a preconfigured instance for this project by executing the command below in the project's root directory:
docker run -d --network pg-dynamodb_redpanda_network --name postgres-db -p 5432:5432 \
-v "$PWD/pgconfig.conf":/usr/share/postgresql/postgresql.conf.sample \
-v "$PWD/initial-data.sql":/docker-entrypoint-initdb.d/initial-data.sql \
-e POSTGRES_PASSWORD=mynotsosecretpassword postgres:14
This will start a Docker instance of a PostgreSQL 14 server with the logical replication feature enabled, a database named shipments, a table named deliveries, and some initial records imported.
To create the destination DynamoDB table, you'll need to provide the details to create the sink connector configuration for ingesting the data. Log in to any AWS CLI environment (CloudShell is used here), then copy-paste and execute the command below to create a table named Deliveries. Take note of the AWS region you are working in.
 aws dynamodb create-table \
  --table-name Deliveries \
  --attribute-definitions \
    AttributeName=id,AttributeType=S \
    AttributeName=created_at,AttributeType=S \
    AttributeName=sender_name,AttributeType=S \
    AttributeName=origin_city,AttributeType=S \
    AttributeName=recipient_name,AttributeType=S \
  --key-schema \
    AttributeName=id,KeyType=HASH \
    AttributeName=created_at,KeyType=RANGE \
  --provisioned-throughput \
    ReadCapacityUnits=5,WriteCapacityUnits=5 \
  --global-secondary-indexes \
    "[
      {
        \"IndexName\": \"SenderNameIndex\",
        \"KeySchema\": [
          {\"AttributeName\":\"sender_name\",\"KeyType\":\"HASH\"}
        ],
        \"Projection\": {\"ProjectionType\":\"ALL\"},
        \"ProvisionedThroughput\": {
          \"ReadCapacityUnits\": 5,
          \"WriteCapacityUnits\": 5
        }
      },
      {
        \"IndexName\": \"OriginCityIndex\",
        \"KeySchema\": [
          {\"AttributeName\":\"origin_city\",\"KeyType\":\"HASH\"}
        ],
        \"Projection\": {\"ProjectionType\":\"ALL\"},
        \"ProvisionedThroughput\": {
          \"ReadCapacityUnits\": 5,
          \"WriteCapacityUnits\": 5
        }
      },
      {
        \"IndexName\": \"RecipientNameIndex\",
        \"KeySchema\": [
          {\"AttributeName\":\"recipient_name\",\"KeyType\":\"HASH\"}
        ],
        \"Projection\": {\"ProjectionType\":\"ALL\"},
        \"ProvisionedThroughput\": {
          \"ReadCapacityUnits\": 5,
          \"WriteCapacityUnits\": 5
        }
      }
    ]"
In the above command, the table is created by defining only key-related attributes for the purposes of querying. You can refer to the documentation to understand the parameters specified above.
You should see an output similar to this:
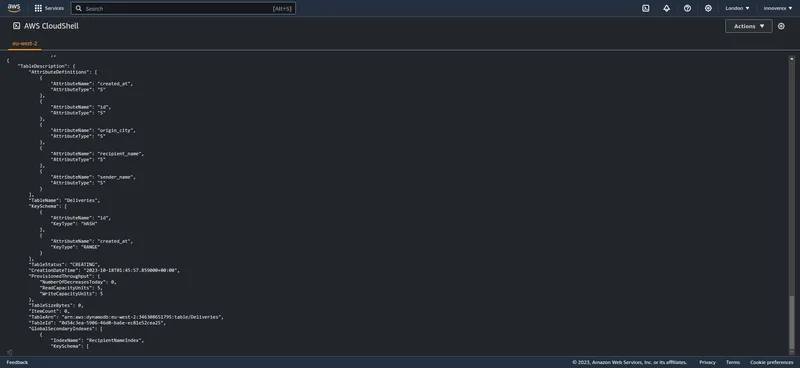
Creating a DynamoDB table in CloudShell
Use the AWS CLI command below to list all the existing tables to confirm the presence of the newly created table:
aws dynamodb list-tablesYou should see your new table listed:
{
    "TableNames": [
        "Deliveries"
    ]
}Now that your databases and data are ready, you need to set up a Kafka Connect instance with the required source and sink connector plugins.
Maven repositories provide both the Debezium Postgres and Camel DynamoDB connector plugin files downloadable in archive formats. These are already downloaded and extracted into the connectors directory in this project.
Create a file called connect.dockerfile in your current directory and paste the following code into it:
FROM bitnami/kafka:3.4.1

# Copy Debezium source connector plugin files
COPY ./connectors/debezium-connector-postgres /opt/connectors/debezium-connector-postgres

# Copy Camel sink connector plugin files
COPY ./connectors/camel-aws-ddb-sink-kafka-connector /opt/connectors/camel-aws-ddb-sink-kafka-connector

# Copy Connect instance configuration file
COPY ./connect-distributed.properties /opt/bitnami/kafka/config/connect-distributed.properties

# Start Kafka Connect instance in distributed mode with configuration file
CMD ["/opt/bitnami/kafka/bin/connect-distributed.sh", "/opt/bitnami/kafka/config/connect-distributed.properties"]
Bitnami's Kafka Docker image closely tracks the Kafka project upstream sources, so it's used as a base here. The Debezium and Camel plugin files are then installed to the plugin path of the image.
You can use Docker Compose to simplify both the building and running of the Connect instance using the Dockerfile created earlier. To do so, you can create a file called compose-connect.yml with the code below:
version: "3.7"
networks:
  redpanda_network:
    driver: bridge
services:
  connect-instance:
    image: kconnect:1.0.0
    build:
      context: '.'
      dockerfile: connect.dockerfile
    container_name: kafka-connect
    networks:
      - redpanda_network
    ports:
      - 8083:8083
This uses connect.dockerfile to create an image named kconnect:1.0.0 and starts a container named kafka-connect, which is attached to the same network as the Redpanda cluster and PostgreSQL server instance that are running.
You can start this using the command below; note that you can add the --build flag to rebuild the container each time you make changes to the Dockerfile:
docker-compose -f ./compose-connect.yml up -d
docker-compose -f ./compose-connect.yml up -d
You should have an output similar to this:
Building connect-instance
Sending build context to Docker daemon  78.01MB
Step 1/5 : FROM bitnami/kafka:3.4.1
 ---> 0e008d006f90
Step 2/5 : COPY ./connectors/debezium-connector-postgres /opt/connectors/debezium-connector-postgres
 ---> Using cache
 ---> 7ec6e0c6cdb6
Step 3/5 : COPY ./connectors/camel-aws-ddb-sink-kafka-connector /opt/connectors/camel-aws-ddb-sink-kafka-connector
 ---> Using cache
 ---> 9e1f8fd0a0d6
Step 4/5 : COPY ./connect-distributed.properties /opt/bitnami/kafka/config/connect-distributed.properties
 ---> Using cache
 ---> 4851d515ba7b
Step 5/5 : CMD ["/opt/bitnami/kafka/bin/connect-distributed.sh", "/opt/bitnami/kafka/config/connect-distributed.properties"]
 ---> Using cache
 ---> 827a6a1e3e1a
Successfully built 827a6a1e3e1a
Successfully tagged kconnect:1.0.0
Creating kafka-connect ... done
Using the docker ps command, you can check to see if the Connect container is running successfully as expected:

Connect container running
Here, only one Connect instance is used, but depending on the amount of your data and other needs, you may run separate Kafka Connect clusters for source and sink operations.
Now, check to be sure your connector plugins are installed as expected using the following command:
curl -sS localhost:8083/connector-plugins
It should produce an output text similar to the following, containing both classes for Debezium and Camel connectors:
[{"class":"org.apache.camel.kafkaconnector.CamelSinkConnector","type":"sink","version":"4.0.0"},{"class":"org.apache.camel.kafkaconnector.awsddbsink.CamelAwsddbsinkSinkConnector","type":"sink","version":"4.0.0"},{"class":"io.debezium.connector.postgresql.PostgresConnector","type":"source","version":"2.4.0.Final"},{"class":"org.apache.camel.kafkaconnector.CamelSourceConnector","type":"source","version":"4.0.0"},{"class":"org.apache.kafka.connect.mirror.MirrorCheckpointConnector","type":"source","version":"3.4.1"},{"class":"org.apache.kafka.connect.mirror.MirrorHeartbeatConnector","type":"source","version":"3.4.1"},{"class":"org.apache.kafka.connect.mirror.MirrorSourceConnector","type":"source","version":"3.4.1"}]
Now that you have the core components up and running, you need to establish a data pipeline between the PostgreSQL server, Redpanda, and the DynamoDB table. You'll do this by providing connection parameters to both connector plugins via Kafka Connect's REST API.
Create a file named register-source-connector.json and paste the snippet below into it:
{
   "name":"shipments-source-connector",
   "config":{
      "connector.class":"io.debezium.connector.postgresql.PostgresConnector",
      "database.hostname":"postgres-db",
      "plugin.name":"pgoutput",
      "tasks.max": "1",
      "database.port":"5432",
      "database.user":"postgres",
      "database.password":"mynotsosecretpassword",
      "database.dbname":"shipments",
      "database.whitelist": "shipments",
      "table.whitelist": "public.deliveries",
      "schema.include.list":"public",
      "database.server.name":"shipments-server",
      "topic.prefix":"shipments",
      "snapshot.mode": "initial",
      "key.converter": "org.apache.kafka.connect.storage.StringConverter",
      "value.converter": "org.apache.kafka.connect.json.JsonConverter",
      "value.converter.schemas.enable": "false",
      "transforms": "unwrap",
      "transforms.unwrap.type": "io.debezium.transforms.ExtractNewRecordState"
  }
}
This defines the various options and parameters by which the Debezium connector will connect to your running PostgreSQL server and how the data is going to be handled. All configuration options used and available are explained in Debezium's documentation.
You now need to register the connector with the file created by making an HTTP request to Kafka Connect's RESTful API with this command:
curl -i -X POST -H "Accept:application/json" -H "Content-Type:application/json" http://localhost:8083/connectors/ -d @register-source-connector.json
This should provide you with an output similar to the following, confirming success:
HTTP/1.1 201 Created
Date: Tue, 17 Oct 2023 13:31:38 GMT
Location: http://localhost:8083/connectors/shipments-source-connector
Content-Type: application/json
Content-Length: 502
Server: Jetty(9.4.51.v20230217)

{"name":"shipments-source-connector","config":{"connector.class":"io.debezium.connector.postgresql.PostgresConnector","database.hostname":"postgres-db","plugin.name":"pgoutput","tasks.max":"1","database.port":"5432","database.user":"postgres","database.password":"mysecretpassword","database.dbname":"shipments","schema.include.list":"public","database.server.name":"shipments-server","topic.prefix":"shipments","snapshot.mode":"initial","name":"shipments-source-connector"},"tasks":[],"type":"source"}
Once successful, you should expect Debezium to create some topics on the Redpanda cluster and start moving data from the database into the respective topics. You can view this from the Redpanda Console by clicking Topics in the left navigation menu.
Here, the topic name created was shipments.public.deliveries, which uses the format {topic.prefix}.{schema}.{tablename}. Clicking the topic opens the topic details page with the records in the topic:
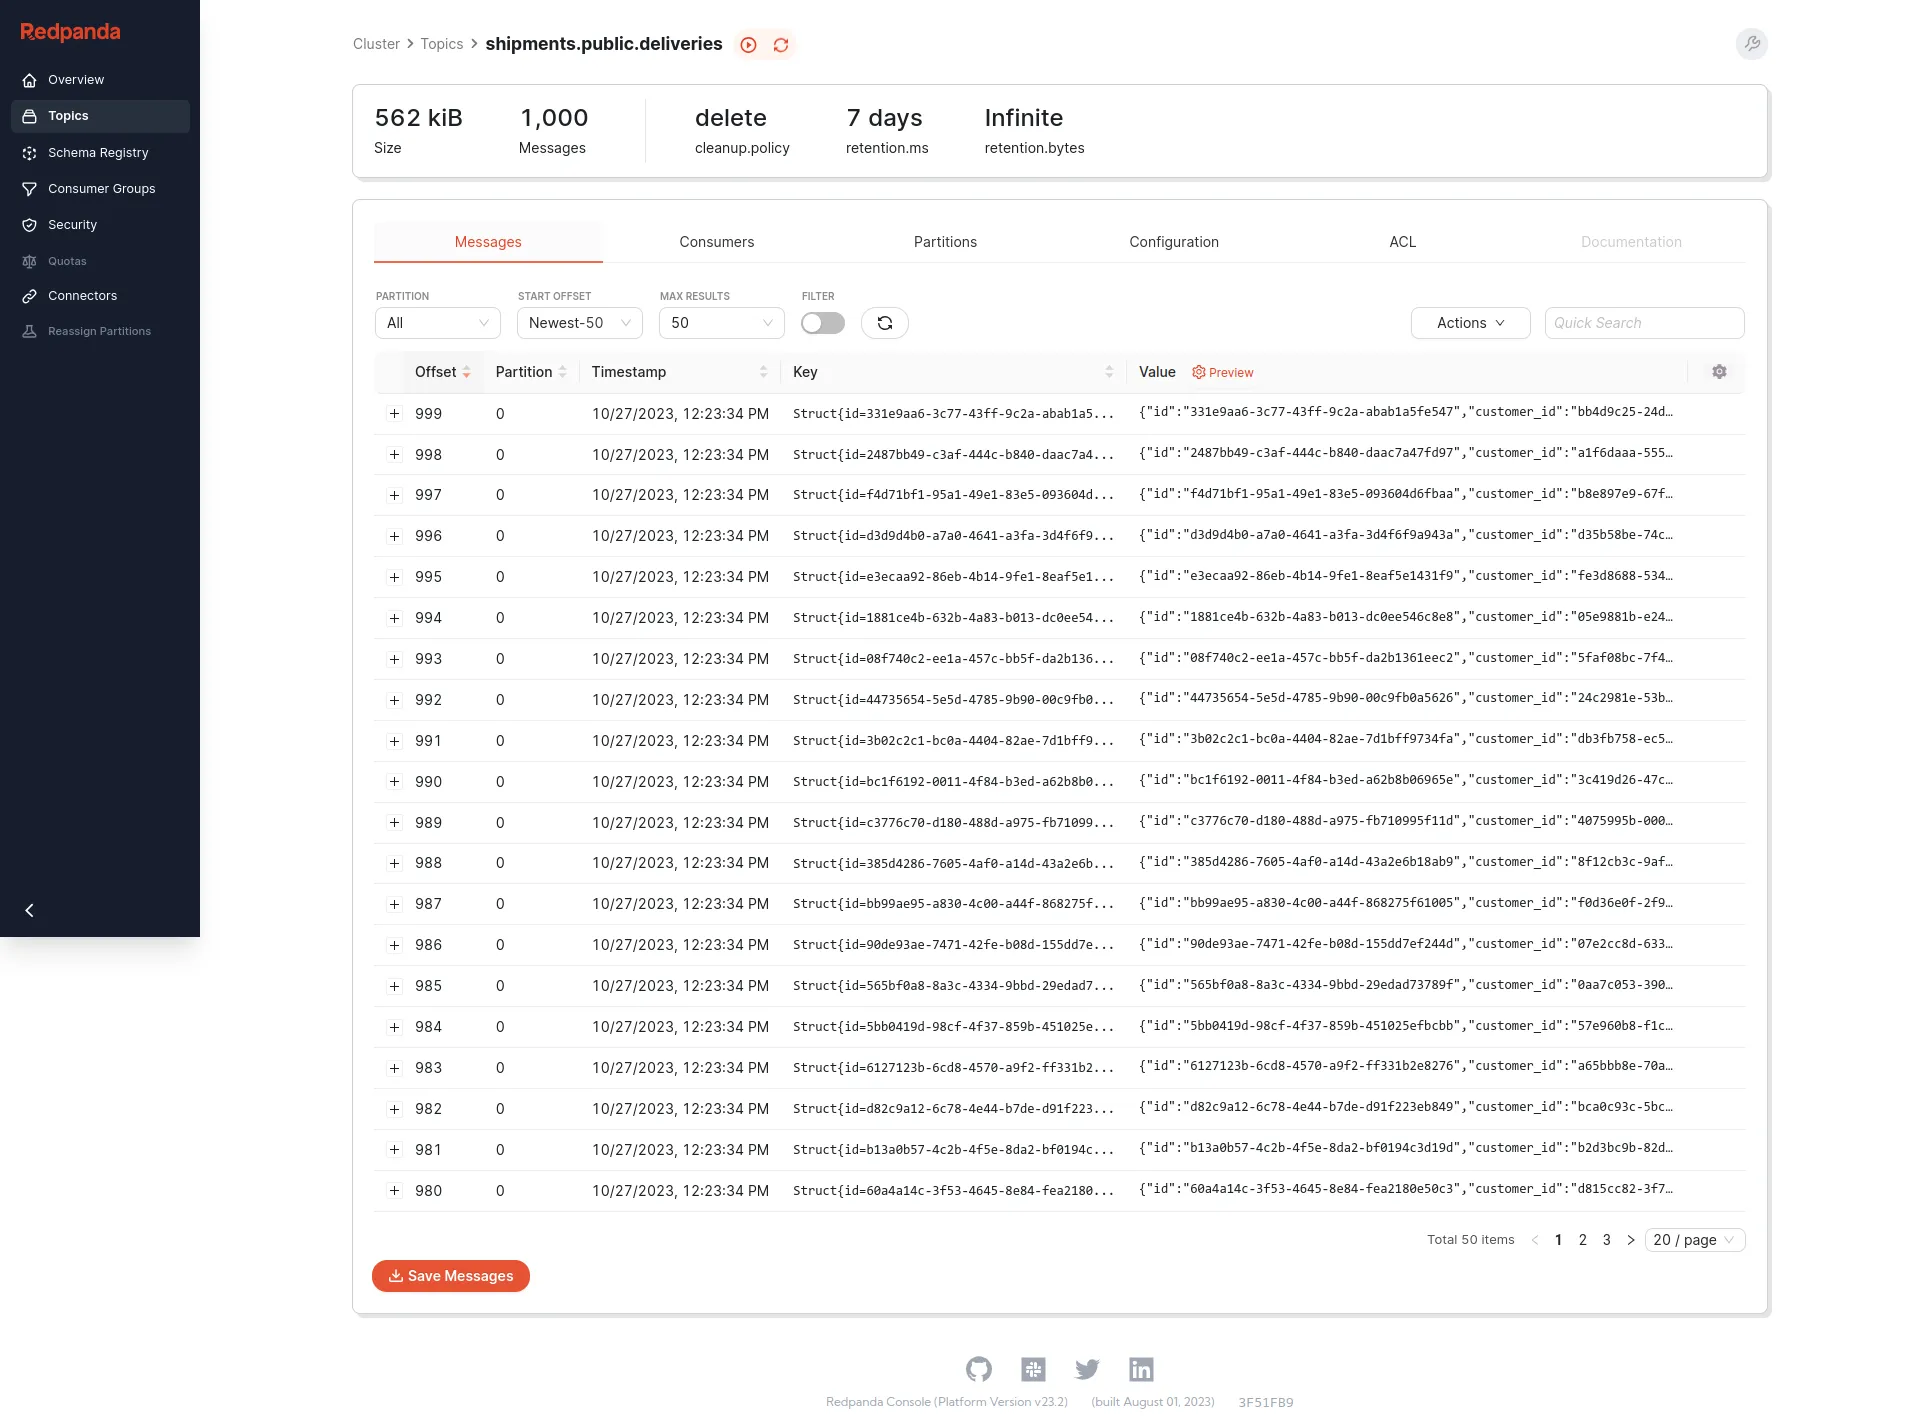
Redpanda Console: topic details view
You can further preview the individual records on the same page. Your data is now successfully coming in from the PostgreSQL database and is ready to be consumed and ingested into your DynamoDB table.
Next, you need to provide the Camel DynamoDB connector with the parameters to connect to Redpanda and the DynamoDB table.
If you don't already have one, create an IAM user account with access and secret keys generated that has the AmazonDynamoDBFullAccess permission assigned to it at a minimum.
Create a file named register-sink-connector.json and paste the snippet below into it, replacing all uppercase text in <> with values corresponding to your AWS account:
{
  "name": "ddb-sink-connector",
  "config": {
    "connector.class": "org.apache.camel.kafkaconnector.awsddbsink.CamelAwsddbsinkSinkConnector",
    "tasks.max": "1",
    "camel.kamelet.aws-ddb-sink.table":"Deliveries",
    "camel.kamelet.aws-ddb-sink.accessKey":"<YOUR_AWS_ACCESS_KEY>",
    "camel.kamelet.aws-ddb-sink.secretKey":"<YOUR_AWS_SECRET_KEY>",
    "camel.kamelet.aws-ddb-sink.region":"<YOUR_AWS_REGION>",
    "key.converter": "org.apache.kafka.connect.storage.StringConverter",
    "key.converter.schemas.enable": false,
    "value.converter": "org.apache.kafka.connect.json.JsonConverter",
    "value.converter.schemas.enable": "false",
    "topics":"shipments.public.deliveries",
    "camel.sink.unmarshal": "jackson"
  }
}
Using Kafka Connect's RESTful API once again, register the Camel sink connector with the file created:
curl -i -X POST -H "Accept:application/json" -H "Content-Type:application/json" http://localhost:8084/connectors/ -d @register-sink-connector.json
This should provide an output similar to the following:
HTTP/1.1 201 Created
Date: Wed, 17 Oct 2023 07:08:42 GMT
Location: http://localhost:8084/connectors/ddb-sink-connector
Content-Type: application/json
Content-Length: 718
Server: Jetty(9.4.51.v20230217)

{"name":"ddb-sink-connector","config":{"connector.class":"org.apache.camel.kafkaconnector.awsddbsink.CamelAwsddbsinkSinkConnector","tasks.max":"1","camel.kamelet.aws-ddb-sink.table":"Deliveries","camel.kamelet.aws-ddb-sink.accessKey":"AKIAVBIM233JUB656MZS","camel.kamelet.aws-ddb-sink.secretKey":"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","camel.kamelet.aws-ddb-sink.region":"eu-west-2","key.converter":"org.apache.kafka.connect.storage.StringConverter","key.converter.schemas.enable":"false","value.converter":"org.apache.kafka.connect.json.JsonConverter","value.converter.schemas.enable":"false","topics":"shipments.public.deliveries","camel.sink.unmarshal":"jackson","name":"ddb-sink-connector"},"tasks":[],"type":"sink"}
Once this is successful, the Camel DynamoDB sink connector will automatically establish a connection between Redpanda, the Connect instance, and the DynamoDB table. It will consume the records from the Redpanda topic and have them ingested into the Deliveries table in DynamoDB.
You can now begin to explore the data in your table via your Amazon DynamoDB console:
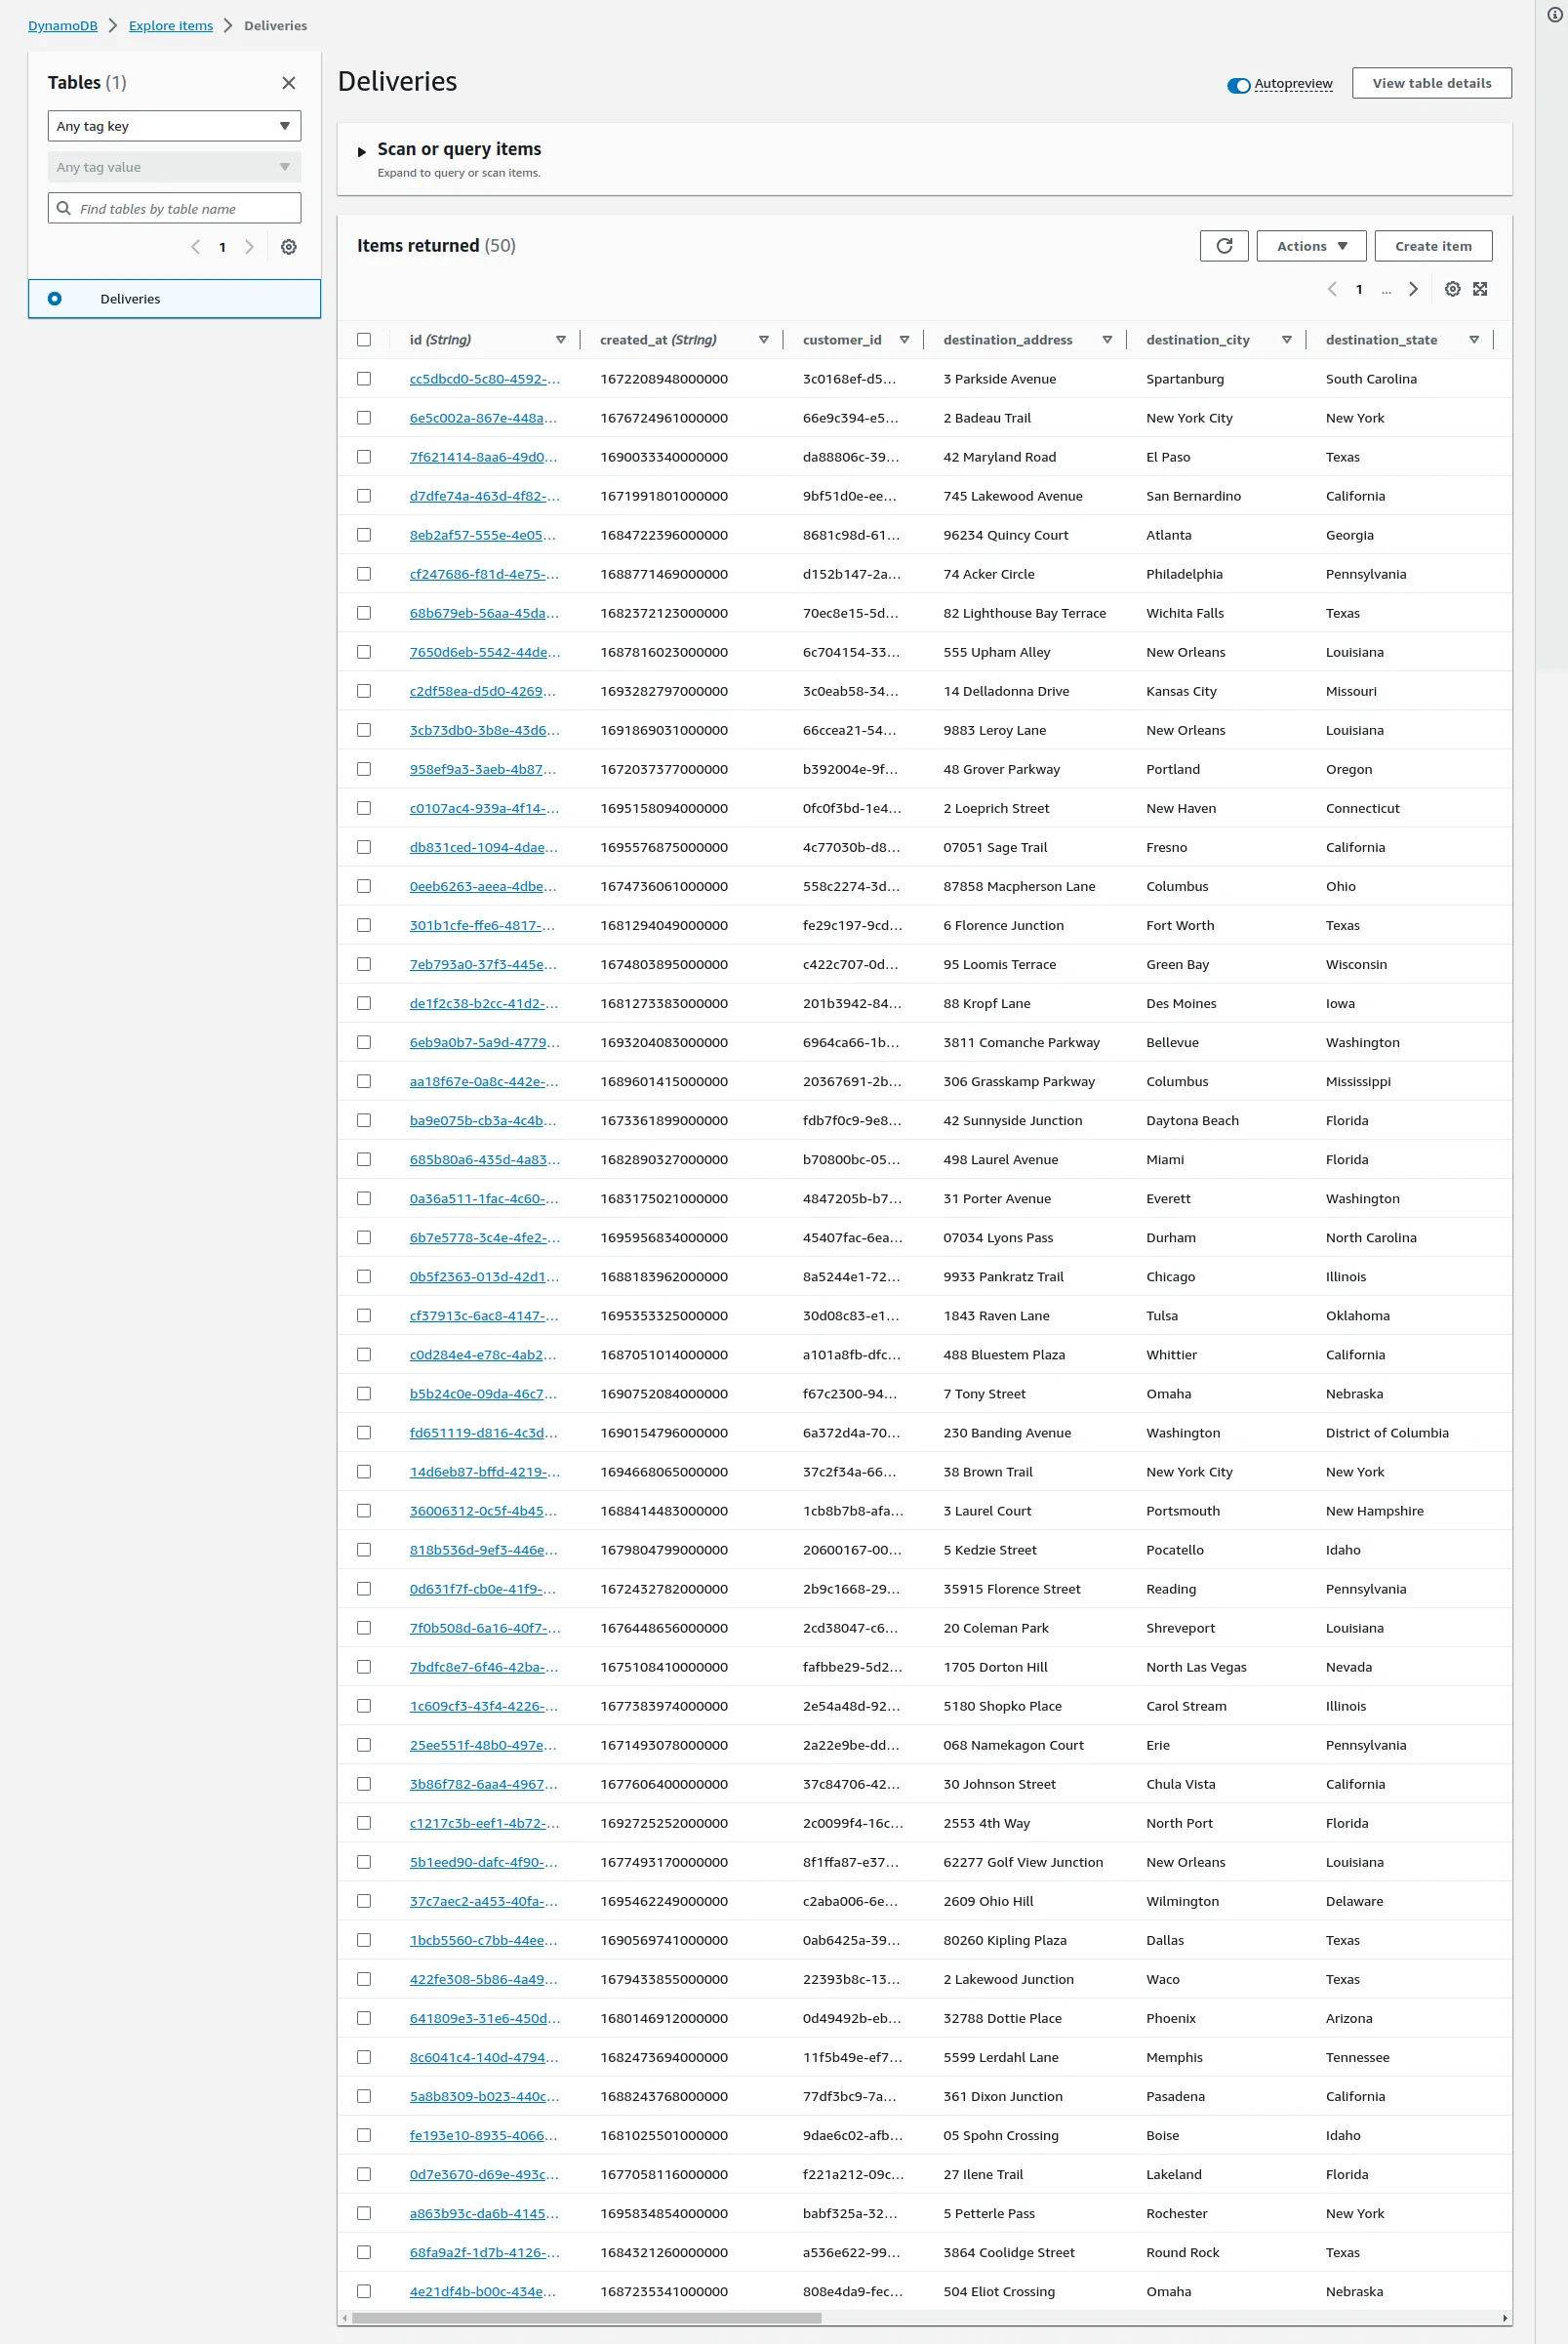
Ingested data from Redpanda to DynamoDB
You'll notice the initial data set is ingested from Redpanda, with all the data attributes and values being identical to the data in the PostgreSQL database table. This process may take a while to complete, depending on the amount of data being migrated.
When it's done, pat yourself on the back because you've successfully migrated your data from a PostgreSQL server to DynamoDB using Redpanda!
This post introduced you to NoSQL databases, focusing on Amazon DynamoDB's flexibility for handling unstructured data, scalability, and high-throughput needs. You also learned how to migrate data from PostgreSQL to DynamoDB using Debezium and Kafka Connect for efficient data transformation and ingestion.
To learn more about Redpanda, browse the Redpanda blog for tutorials and dive into the free courses at Redpanda University. To try it for yourself, take Redpanda for a test drive! If you have questions or want to chat with the team, join the Redpanda Community on Slack.
In a relational database management system (RDBMS) like PostgreSQL or MariaDB, data is stored in structured tables that allow complex queries and ensure data integrity. This type of database is known for its robustness, functionality, and compatibility with various standards of Structured Query Language (SQL).
Subscribe to our VIP (very important panda) mailing list to pounce on the latest blogs, surprise announcements, and community events!
Opt out anytime.