Full CDC semantics land in the Iceberg output for Redpanda Connect
Your lakehouse mirrors the database, instantly.
Learn how to use Spark Streaming and Redpanda to create a real-time, structured stream for analytics.


Apache Spark has a high-level API called Structured Streaming. You can use Structured Streaming to stream the same operations you would normally perform in batch mode. Structured Streaming is well-integrated with the Apache Kafka API, so you can easily integrate it with Redpanda. For example, the Structured Streaming API can consume data from Redpanda, process that data in Spark to create analytics data, and send the processed data back to Redpanda for distribution.
Real-time analytics allow businesses to prepare and measure data as soon as it enters their system. This capability enables businesses to process and respond to insights from the data and make better decisions. Real-time data analytics are useful in various areas, such as website monitoring, financial-market monitoring, IoT monitoring, and real-time fraud detection.
Apache Spark is a popular framework for streaming-data processing. It provides features like batch and streaming data, SQL analytics, data science, and machine learning computations at scale. Spark processes in memory, making it faster than other frameworks that rely on disk for processing. This speed is a great advantage when building a real-time data analytics pipeline.
Before starting the integration process, you'll need a recent version of Docker installed on your machine, a command-line interface or terminal to run commands on, Apache Spark 3.3.0 downloaded and extracted to your HOME directory to use the spark-submit CLI for running Apache Spark applications, and a Docker network called pandonline.
Business agility is crucial in cloud-native environments because these environments generate a large amount of data at a rapid rate. This data reflects significant changes in business value. Therefore, the ability to quickly act or react to any change in business-event data is increasingly important.
Business agility is one of the most important and sought-after traits today, particularly if you are operating in cloud-native environments. Within these environments, all interactions or business events generate pure data at a rapid rate, data which could reflect significant changes in your business value. Thus, the ability to rapidly act or react to any change in business-event data is becoming increasingly important.
However, to respond to event data, you first need to process it. The fastest way to do this is in real-time, processing the data as soon as it enters your streaming system. Streaming applications allow you to create real-time data pipelines to distribute your data across all your systems in a resilient way. These pipelines can also be used for analytical processing, usually referred to as real-time analytics.
You can use real-time analytics to prepare and measure data as soon as it enters your system, enabling you to process and respond to insights from the data and make better decisions. Website monitoring, financial-market monitoring, IoT monitoring, and real-time fraud detection are just a few examples of areas where real-time data analytics are useful.
Apache SparkⓇ is a popular framework for streaming-data processing that provides features like batch and streaming data, SQL analytics, data science, and machine learning computations at scale. Spark is a third-generation data-processing framework that processes in memory, making it faster than other frameworks that rely on the disk for processing. This is a great advantage when building a real-time data analytics pipeline because the faster the pipeline is, the closer it gets to real-time analysis.
Besides its speed, Apache Spark has a high-level API called Structured StreamingⓇ. You can use Structured Streaming to stream the same operations you would normally perform in batch mode. Structured Streaming is well-integrated with the Apache KafkaⓇ API, so you can easily integrate it with Redpanda. For example, the Structured Streaming API can consume data from Redpanda, process that data in Spark to create analytics data, and send the processed data back to Redpanda for distribution.
In this tutorial, you'll learn how to do the following:
rpk CLIYou'll need the following prerequisites before starting:
pandonline. You can create the network by using this command: docker network create pandonline.You can access the code used in this demo any time in this GitHub repository.
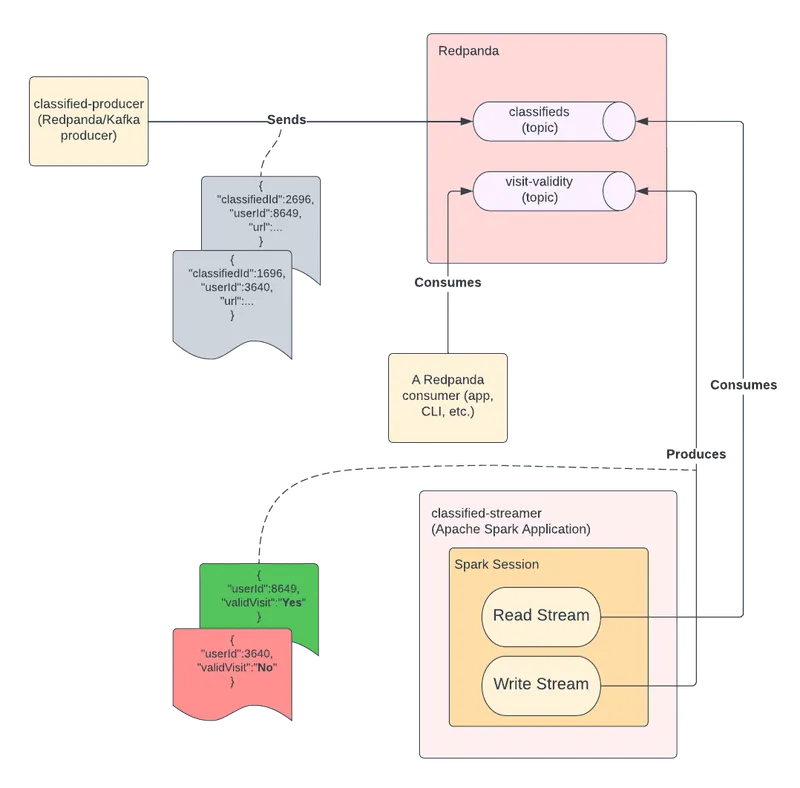
This tutorial explains how you can use Spark Streaming and Redpanda for real-time data analytics through the example of Pandonline Corp., a fictional classified ads company.
Pandonline Corp. tracks user behavior and stores the data of each user's classified ad visits. They send the classified ad visit data to Redpanda to feed any analytics tool from there. Pandonline recently decided to deprecate classified ads with an ID lower than 2000. They want to analyze the effect of this decision on classified ad visits and mark each visit as valid or not valid.
They want to use Apache Spark to create a real-time structured stream for analytics and read data from Redpanda, process it, and write it to Redpanda again, preferably to another topic.
You are a Pandonline engineer and must implement this solution.
The solution architecture diagram is as follows:
You have many options for preparing a Redpanda instance for this tutorial. You can refer to this documentation for information on installing or running Redpanda on a variety of platforms.
In this tutorial, Redpanda runs in a Docker container, which you can do by executing the following example command:
docker run -d --name=redpanda-1 --rm \
    --network pandonline \
    -p 9092:9092 \
    -p 9644:9644 \
    docker.vectorized.io/vectorized/redpanda:latest \
    redpanda start \
    --advertise-kafka-addr redpanda-1\
    --overprovisioned \
    --smp 1  \
    --memory 1G \
    --reserve-memory 500M \
    --node-id 0 \
    --check=false
Create topics called classifieds and visit-validity in the Redpanda cluster:
docker exec -it redpanda-1 \
    rpk topic create classifieds visit-validity
The output should be as follows:
TOPIC              STATUS
classifieds        OK
visit-validity OKIn your home directory, create a directory called pandonline_analytics and navigate to that directory.
Create a python file called classified_streamer.py in the pandonline_analytics directory. Open the file with an editor of your choice—preferably a Python-supporting editor—and add the following code to start a Spark session:
...imports omitted...
spark = SparkSession\
    .builder\
    .appName("Classified Streamer")\
    .getOrCreate()
To consume the messages from Redpanda, you must create a stream that reads from a specific Redpanda topic.
In this case, you should be consuming from the classifieds topic. Append the following code to create a readStream for Redpanda:
...code omitted...
df = spark\
    .readStream\
    .format("kafka")\
    .option("kafka.bootstrap.servers", "localhost:9092")\
    .option("subscribe", "classifieds")\
    .load()
Note: Make sure that thekafka.bootstrap.serversis set tolocalhost:9092, which is the Redpanda broker address.
The subscribe key indicates the topic that data will be consumed from.
To load the data from Redpanda in a structured way, you have to define a struct array with the three fields of the streamed data: classifiedId, userId, url.
...code omitted...
jsonschema = StructType([StructField("classifiedId", IntegerType()),
                         StructField("userId", IntegerType()),
                         StructField("url", StringType())])
This schema helps to use the loaded JSON data in a structured way.
Use the following code to add the data-frame transformation that gets the value column of the data and converts it to a list of struct, which is expanded by the field names:
...code omitted...
df = df\
    .select(from_json(col("value").cast(StringType()), jsonschema).alias("value"))\
    .select("value.*")\
    .withColumn('validVisit', when(col('classifiedId') > 2000, "Yes").otherwise("No"))\
    .withColumn("value", to_json(struct(col("userId"), col("validVisit"))))
You can see that a conditional column called validVisit is added. As per Pandonline's request, the code also specifies that any visits to old classified ads with an ID lower than 2000 will not be marked as valid.
Finally, add the code that sends the new data with the fields userId and validVisit to a new Redpanda topic called visit-validity:
query = df\
    .writeStream\
    .format('kafka')\
    .option('kafka.bootstrap.servers', 'localhost:9092')\
    .option('topic', 'visit-validity')\
    .option('checkpointLocation', 'chkpoint')\
    .start()
The classified_streamer.py file should look like the following:
from pyspark.sql import SparkSession
from pyspark.sql.functions import *
from pyspark.sql.types import *

spark = SparkSession\
    .builder\
    .appName("Classified Streamer")\
    .getOrCreate()

df = spark\
    .readStream\
    .format("kafka")\
    .option("kafka.bootstrap.servers", "localhost:9092")\
    .option("subscribe", "classifieds")\
    .load()

jsonschema = StructType([StructField("classifiedId", IntegerType()),
                         StructField("userId", IntegerType()),
                         StructField("url", StringType())])

df = df\
    .select(from_json(col("value").cast(StringType()), jsonschema).alias("value"))\
    .select("value.*")\
    .withColumn('validVisit', when(col('classifiedId') > 2000, "Yes").otherwise("No"))\
    .withColumn("value", to_json(struct(col("userId"), col("validVisit"))))

query = df\
    .writeStream\
    .format('kafka')\
    .option('kafka.bootstrap.servers', 'localhost:9092')\
    .option('topic', 'visit-validity')\
    .option('checkpointLocation', 'chkpoint')\
    .start()

query.awaitTermination()
Now that you have created the Spark streaming-application code, you should download this Dockerfile and save it in the same directory as the classified_streamer.py file. You will use this Dockerfile to run the application on Docker.
In this scenario, the Pandonline development team has shared a containerized classified producer application with you to test your Spark Streaming flow.
This application creates random classified ad records and sends them to your Redpanda instance in a five-second interval. The following is an example of one such classified ad record:
{
   "classifiedId":2696,
   "userId":8649,
   "url":"www.pandonline-classified-ads.com/adlgfxzccr"
}

You can run the producer application using the following command:

```shell
docker run -d -it --rm  \
--network pandonline \
quay.io/systemcraftsman/classified_producer
Verify that it sends data to the classifieds topic:
docker exec -it redpanda-1 \
rpk topic consume classifieds
The output should look like the following:
...output omitted...
{
  "topic": "classifieds",
  "value": "{\"classifiedId\": 1131, \"userId\": 2808, \"url\": \"www.pandonline-classified-ads.com/avlygdaqmb\"}",
  "timestamp": 1658243361634,
  "partition": 0,
  "offset": 1018
}
{
  "topic": "classifieds",
  "value": "{\"classifiedId\": 4689, \"userId\": 63, \"url\": \"www.pandonline-classified-ads.com/dufyvyqqgr\"}",
  "timestamp": 1658243366640,
  "partition": 0,
  "offset": 1019
}
{
  "topic": "classifieds",
  "value": "{\"classifiedId\": 2591, \"userId\": 5494, \"url\": \"www.pandonline-classified-ads.com/ubkdcomuvt\"}",
  "timestamp": 1658243371645,
  "partition": 0,
  "offset": 1020
}
...output omitted...
Exit the consumer and run it for the visit-validity topic, and leave the terminal open for upcoming logs:
docker exec -it redpanda-1 \
rpk topic consume visit-validity
In a new terminal window, run the following command to build and run the Spark Streaming application that you've created:
docker build -t classified_streamer . && \
docker run -d -it --network pandonline classified_streamer
This might take some time to start as it installs the relevant Spark packages.
Return to the terminal where the Redpanda consumer is running, and verify that Spark is sending the analyzed messages to the relevant topic.
The output should be as follows:
...output omitted...
{
  "topic": "visit-validity",
  "value": "{\"userId\":2808,\"validVisit\":\"No\"}",
  "timestamp": 1658243011928,
  "partition": 0,
  "offset": 2
}
{
  "topic": "visit-validity",
  "value": "{\"userId\":63,\"validVisit\":\"Yes\"}",
  "timestamp": 1658243016860,
  "partition": 0,
  "offset": 3
}
{
  "topic": "visit-validity",
  "value": "{\"userId\":5494,\"validVisit\":\"Yes\"}",
  "timestamp": 1658243021879,
  "partition": 0,
  "offset": 4
}
...output omitted...
Congratulations! Following this tutorial, you've used Apache Spark to read messages from Redpanda, performed stream processing on those messages, and then sent the processed results back to a Redpanda topic. Pandonline can use this implementation to analyze valid visits per user regarding the classified ad number.
As cloud-native environments are heavily data focused, the business agility needed for analytics and decision-making in these environments can only be provided by real-time processing. The closer to "real time" your data processing is, the faster and more accurate your decisions will be. Thus, real-time data processing is becoming the de facto standard for the cloud-native era. Now that you know how to achieve this using Apache Spark and Redpanda together, you can apply what you’ve learned to numerous future applications.
Check out Redpanda's source available code on GitHub and join the Redpanda Community on Slack.
For more information about how to integrate Redpanda with different technologies, check out the other tutorials on the blog. As a reminder, you can find the resources for this tutorial in this repository.
Subscribe to our VIP (very important panda) mailing list to pounce on the latest blogs, surprise announcements, and community events!
Opt out anytime.