Stream Oracle changes to ClickHouse in real time with Redpanda Connect
A hands-on walkthrough of our new Oracle CDC connector
Want to perform real-time analysis of your data stream? Here’s how to integrate Redpanda with Rockset so you can make business decisions based on your latest data.


About two decades ago, business intelligence usually came from stored data accumulated in relational database management systems over long periods of time. Businesses would make decisions for a year or so based on that data. However, there could be massive changes in market trends by the end of a year; and year-old data results in a business response cycle that’s simply too slow.
Companies today are increasingly relying on real-time data streaming to improve their business analysis, using low-latency technology to move data from one system into another as soon as it's available.
Streamed data that’s processed and analyzed in real time can have immediate positive impact on business events as they happen. That immediacy of response is particularly significant in industries like e-commerce, security monitoring, trading, fleet management, and anomaly detection, just to name a few. You might be hard-pressed to name an industry that real-time data analysis doesn’t help.
So, let’s take a look at how to use Redpanda, a streaming data platform, with Rockset, a real-time analytics platform, to build your own real-time streaming data analytics system.
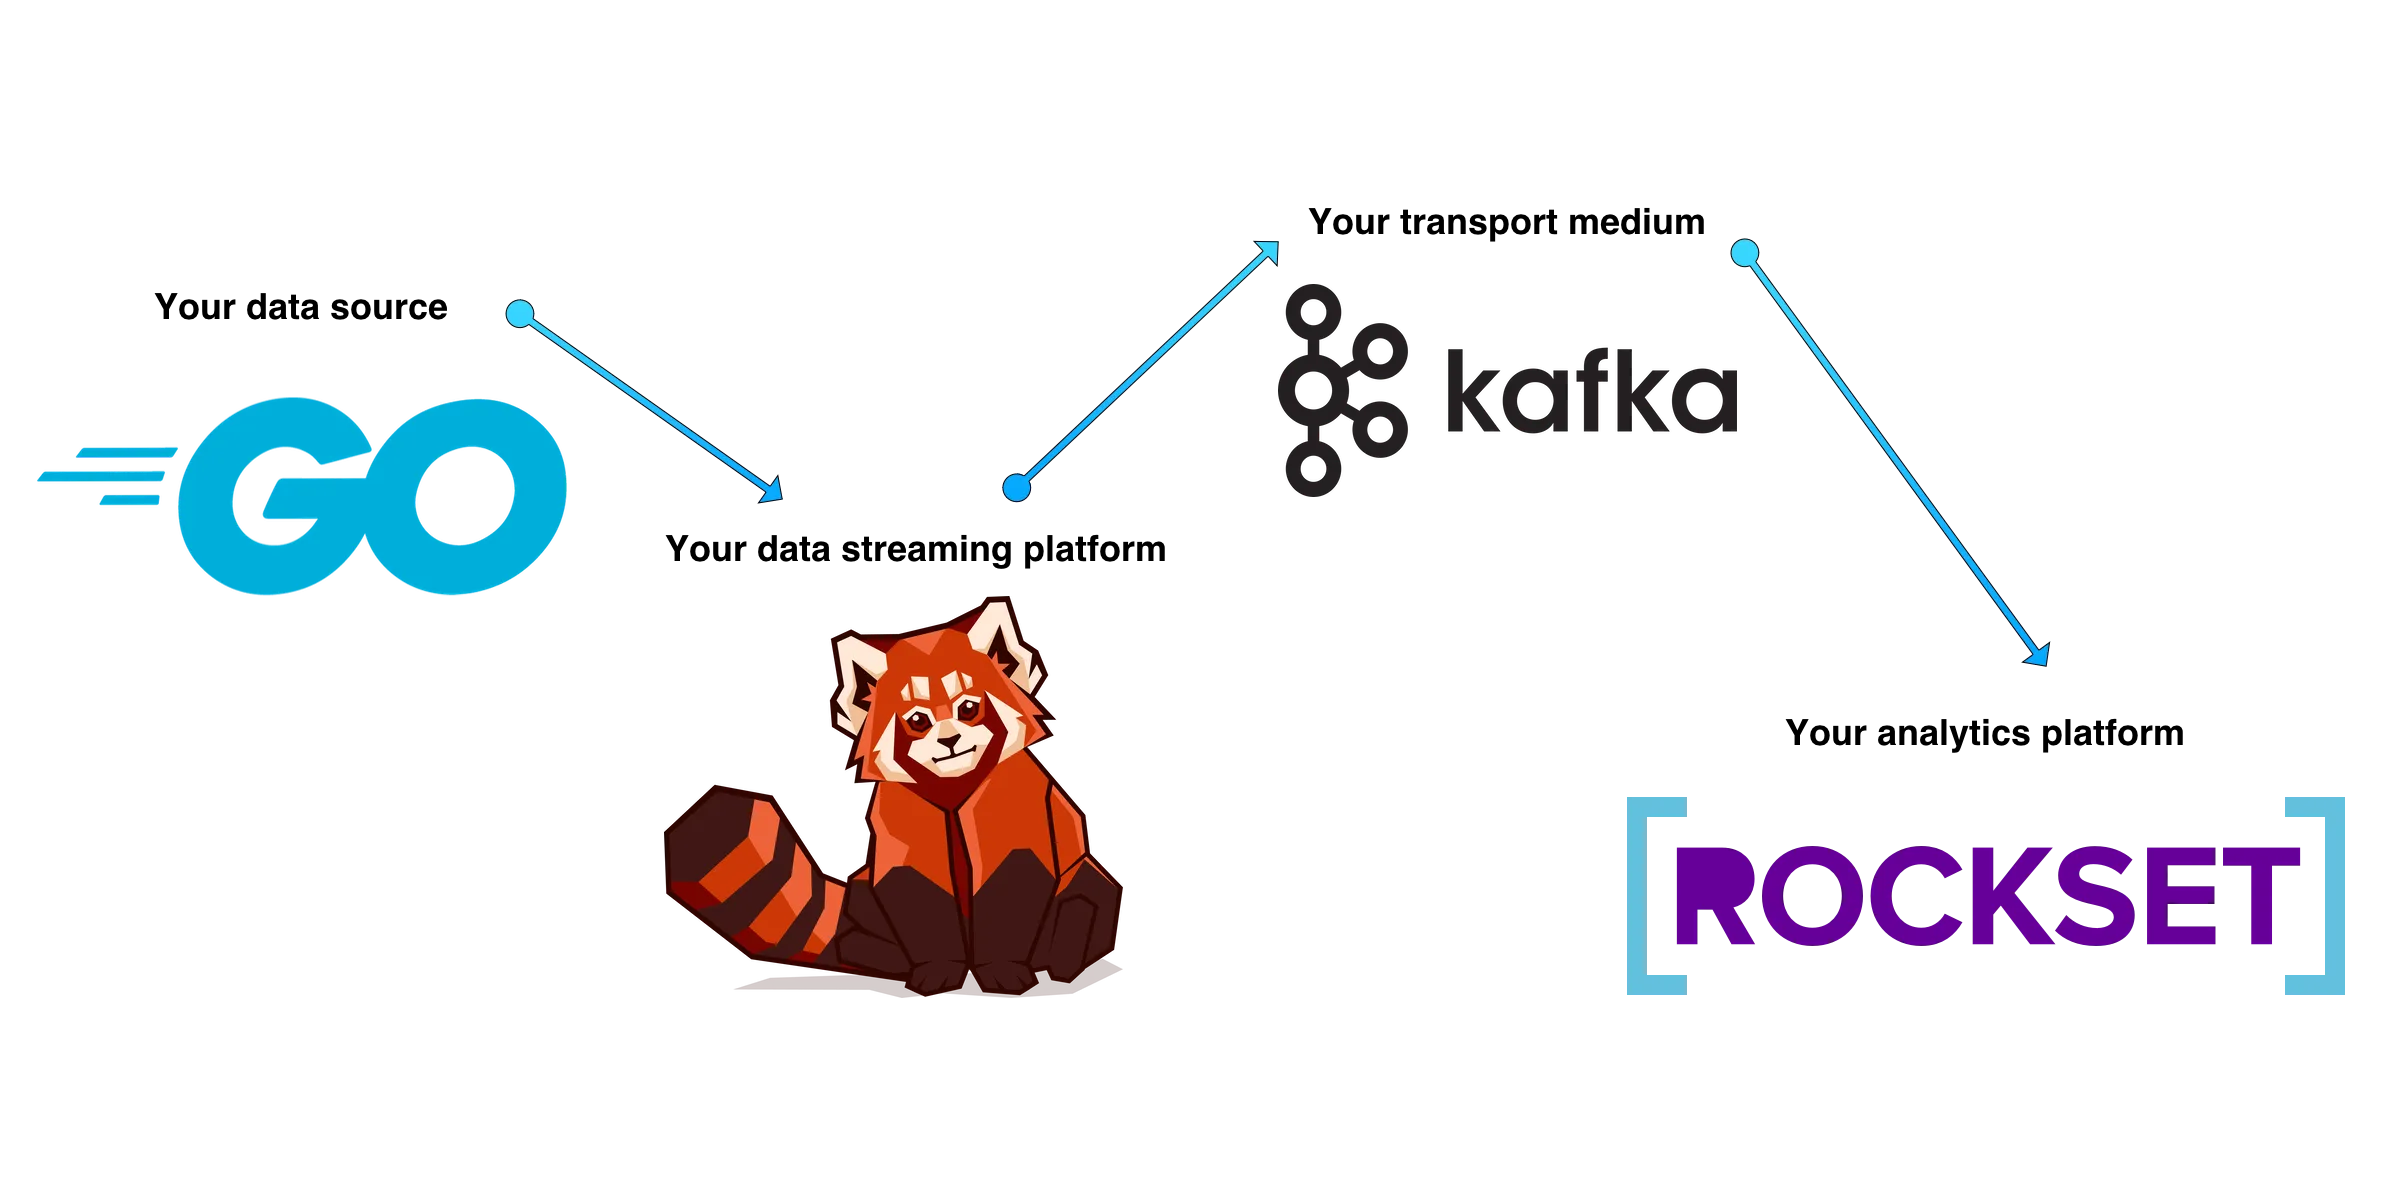
For this tutorial, imagine you’re implementing a streaming data analytics system for an on-demand delivery service. The company needs to deploy logistic resources like drivers and trucks to each state, according to demand and how much revenue each state produces. These decisions will be based on delivery request data received from the application when a user places their request.
The pipeline you need to build looks something like this:
Here's what you need to have in place before you start:
If you don’t already have Docker installed, follow the official Docker documentation to set up Docker on your operating system. Don't forget to reboot your system after the installation.
If you're using a Linux system running SELinux, you might want to temporarily disable it to avoid interference with some Docker tasks. You can do that by running # setenforce 0.
To install and set up Redpanda, check out the quick-start documentation. To complete this tutorial, make sure you've set up at least one single node cluster.
If your Redpanda cluster is running on Docker, enter the Bash shell of the main node as follows. If you're not on Docker, skip to the next command.
$ docker exec -it redpanda-1 /bin/bash
Make sure to replace redpanda-1 with the actual container name. You can check and get the container name by using the docker ps command.
Show that Redpanda is running via rpk CLI on the Docker container (cluster info):
$ rpk cluster info

CLUSTER
=======
redpanda.bdd93caa-ca27-4d81-b22b-e1c9210ea6c3

BROKERS
=======
ID    HOST     PORT
0*    0.0.0.0  9092
$ rpk topic create delivery-requests --brokers=localhost:9092
List topics to show the new topic:
redpanda@b977343076df:/$ rpk topic list
NAME                 PARTITIONS  REPLICAS
delivery-requests 1 1Now that your Redpanda instance is up and running, let’s integrate Rockset with Redpanda. Rockset is where the querying and analysis will happen in real time. To have Rockset receive data from your Redpanda instance, you need to set up a Kafka Connect instance to establish a connection between Redpanda and Rockset.
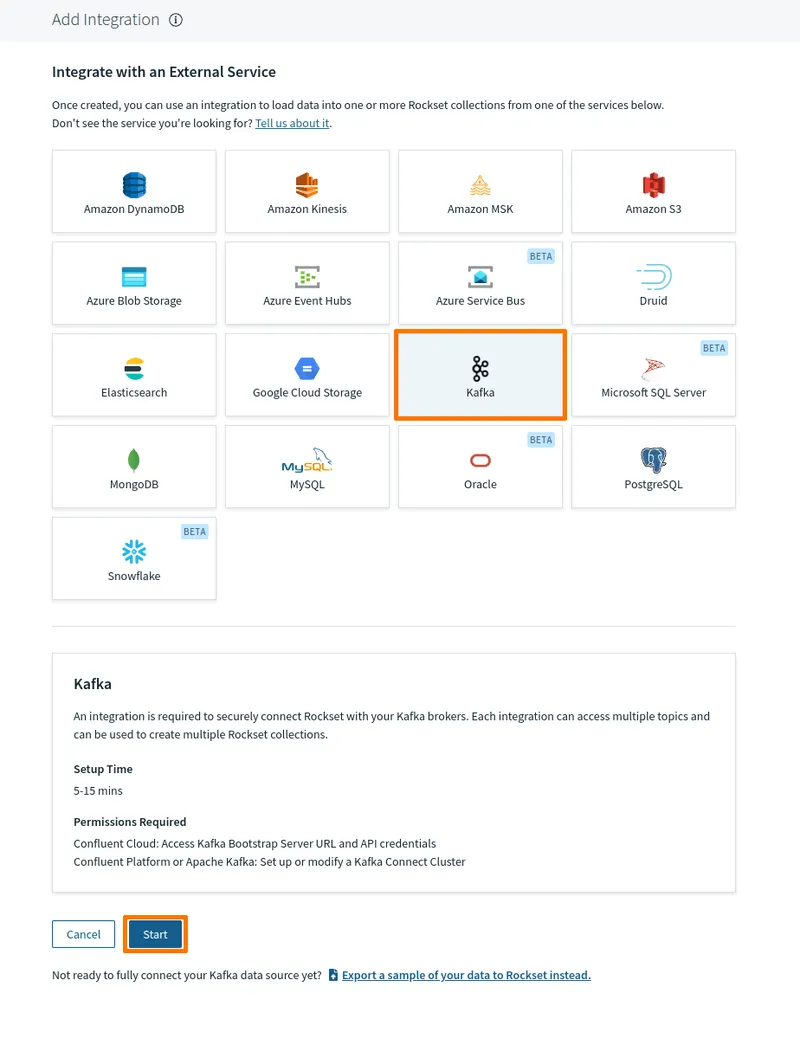
First, grab the Rockset sink connector plugin JAR file for your Kafka Connect instance from the Rockset dashboard. In the Rockset dashboard, click Integration, then either Create your first integration or Add integration.

An integration wizard presents you with a page of technologies you can integrate with Rockset. Select Kafka and click Start.
You’ll need to provide a few details to set up your Kafka instance:
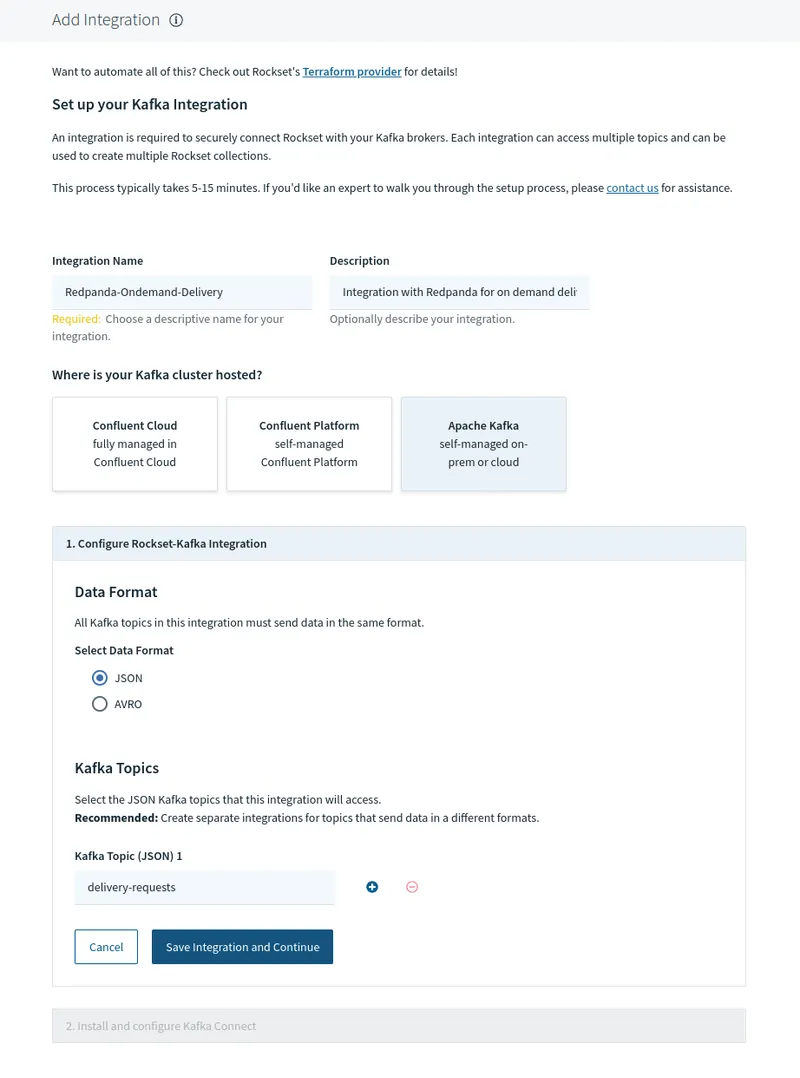
Click Save integration and continue.
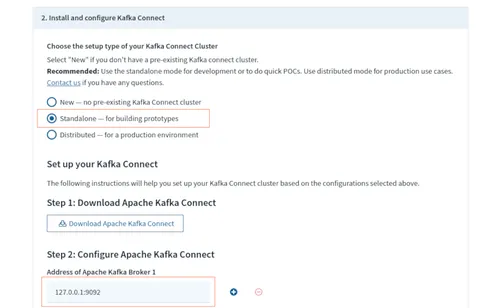
To generate and download the required files for configuring your Kafka Connect instance and the Rockset connector, select Standalone for setup type in the integration wizard. In the Address of Apache Kafka Connect field, enter 127.0.0.1:9092. This is where your Redpanda instance should be listening for connections from Kafka Connect.
Click the respective Download buttons to download two properties files—connect-standalone.properties and connect-rockset-sink.properties—and the Rockset Sink Connector plugin JAR file kafka-connect-rockset-1.4.1-jar-with-dependencies.jar.
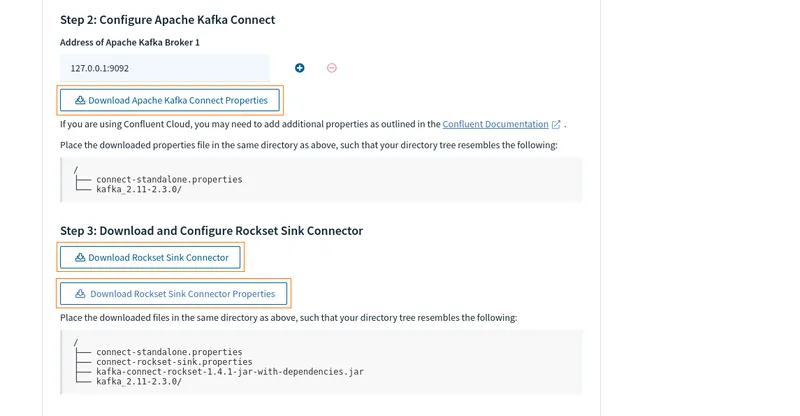
Modify the connect-standalone.properties file by replacing the plugin.path line with the following line:
plugin.path=/tmp/kafka-connect-rockset-1.4.1-jar-with-dependencies.jar
Set up your Connect instance by creating a folder or directory and moving the three files you downloaded into it. Create a file called Dockerfile in the same directory and paste the following into it:
FROM wurstmeister/kafka:latest

# Replace the default connect-standalone.properties so you can properly resolve to your local Kafka Docker development
COPY connect-standalone.properties /opt/kafka/config/
COPY connect-rockset-sink.properties /opt/kafka/config/

COPY kafka-connect-rockset-*-jar-with-dependencies.jar /tmp/

# Replace the start command creating a connector instead.
COPY start-kafka.sh /usr/bin/

# Set permissions to make script executable
RUN chmod a+x /usr/bin/start-kafka.shThe above Dockerfile pulls a Kafka Connect Docker image. It copies the various configuration files and Rockset plugin into accessible locations within the image.
Notice the command to copy the start-kafka.sh file and make it executable. This will be the script used to start the Connect instance, but it doesn’t exist yet. Create the start-kafka.sh file in the same directory as the previous files and paste the following content into it:
#!/bin/bash -e

exec "/opt/kafka/bin/connect-standalone.sh" "/opt/kafka/config/connect-standalone.properties" "/opt/kafka/config/connect-rockset-sink.properties"
This script starts Kafka Connect in Standalone mode, using the two .properties files to configure the Connect instance and the Rockset Sink Connector plugin.
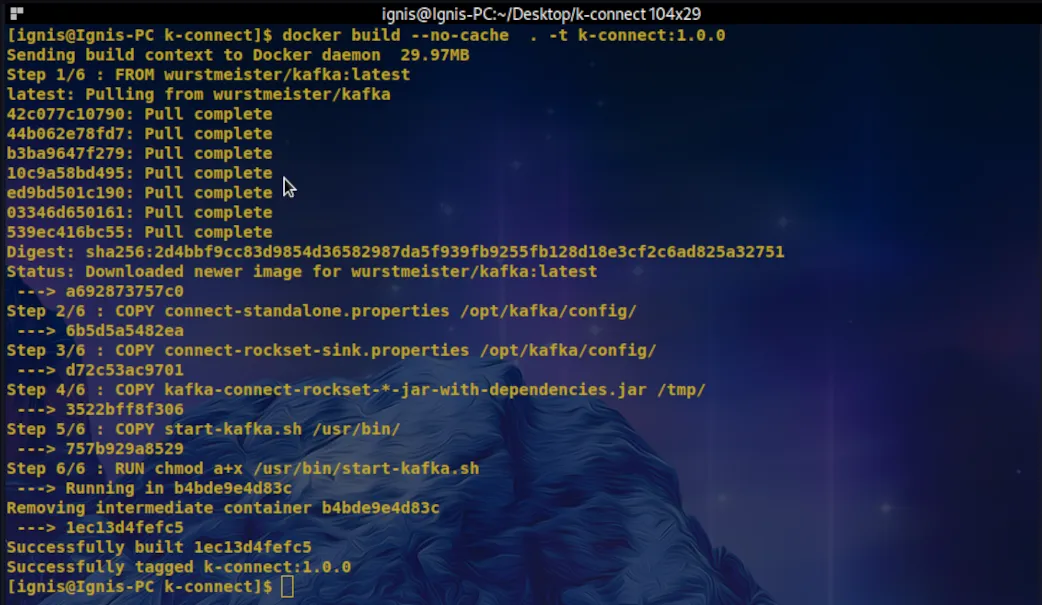
Run the following command to build a Kafka Connect image with the Rockset Sink Connector plugin installed and configured to interact with Rockset.
$ docker build --no-cache . -t k-connect:1.0.0
Your output should look similar to the following screenshot:
With the image created, start a Connect container attached to and listening on port 8083 of the host machine.
$ docker run -d --rm --name=k-connect --net=host -p 8083:8083 k-connect:1.0.0
Using the docker ps command, see if the Connect container is running successfully:

Once your Connect instance is running, check whether the Rockset Connector plugin is installed as expected by making an HTTP request to your Kafka Connector using the REST API.
$ curl -sS localhost:8083/connector-plugins | grep rockset.RocksetSinkConnector
In the following screenshot, the highlighted text indicates that the Rockset Sink Connector plugin is installed. If the command produces no output, check whether your filenames are correct in the respective files for the Connect image.

Check that the connector is configured by making another HTTP request to Connect's Restful API.
$ curl -H "Accept:application/json" localhost:8083/connectors/

###Output
["Redpanda-Ondemand-Delivery"]To make sure that Rockset can receive data from Redpanda, you’ll need to produce some data to the topic. Once the data hits the topic, it streams via the Kafka Connect instance to Rockset.
The following command uses the rpk CLI on your Redpanda Docker instance to produce data to the delivery-requests topic.
$ docker exec -it redpanda-1 rpk topic produce delivery-requests --brokers=localhost:9092
Paste in the following JSON object and click Enter.
{"id":"aa93f69d-51f0-4c4a-afa8-fa5874069eb7","sender_name":"Matthieu Whife","sender_phone":"+1 864 414 0193","origin_address":"531 Monica Pass","origin_city":"Anderson","origin_state":"South Carolina","destination_address":"62 Vernon Crossing","destination_city":"Baltimore","destination_state":"Maryland","recipient_name":"Giacinta Easum","recipient_phone":"+1 410 232 4240","weight":69,"height":12,"width":21,"length":11}
The output should be similar to this screenshot, telling you the offset at which the message was sent in the topic and the timestamp:

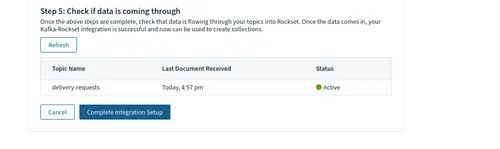
Back in the Rockset console, the status of the integration should have changed from No Docs Yet to Active. If that’s not the case, click Refresh. Finally, click Complete integration setup to finish.
Let’s cover how to create a Rockset collection using the Rockset–Redpanda integration you just created. Using a simple Golang program, you can send records to your collection in real time.
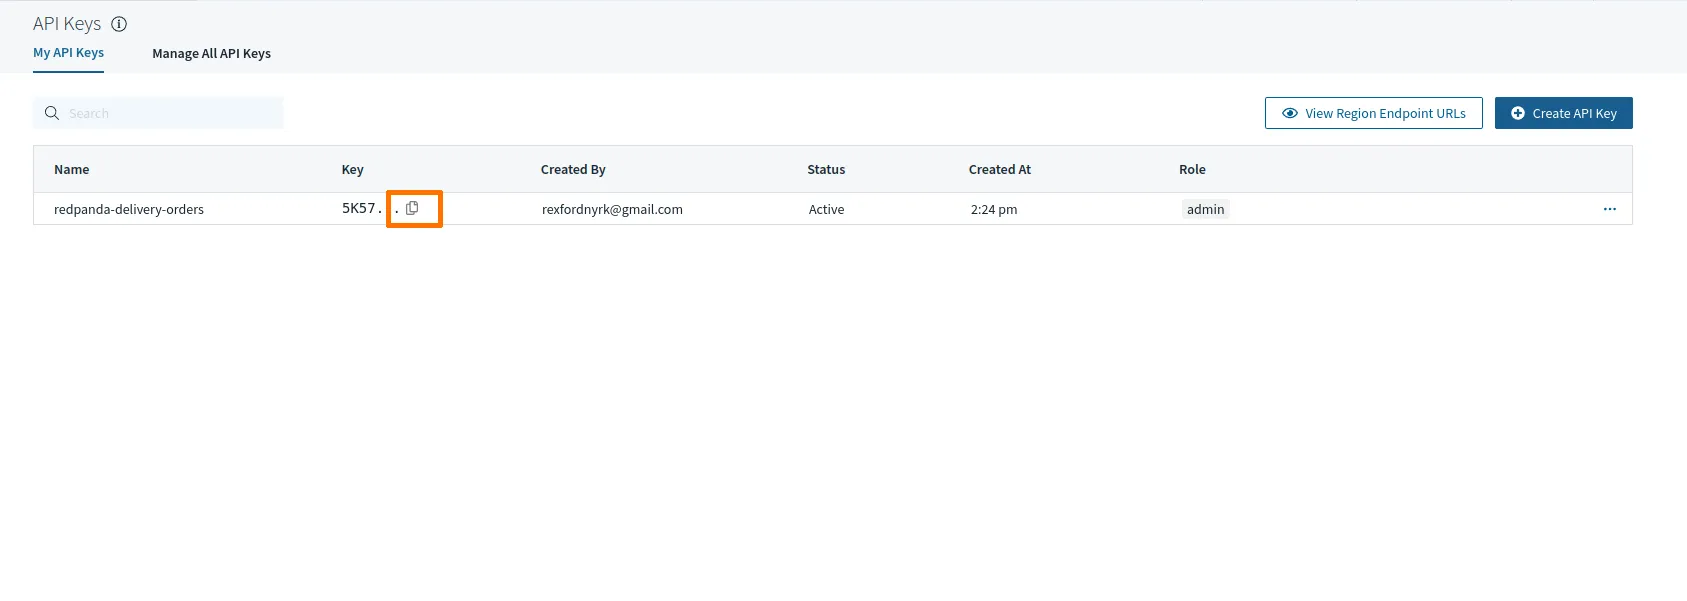
This tutorial creates a collection using the Rockset RESTful API, so you’ll need to obtain an API key. From your Rockset dashboard, click Create API key. Name your API key and select a role under which your API can operate. For this tutorial, you can use the options selected here:

Click Submit, and the API key you just created will be listed on the API keys page. Click the Copy icon next to the key, so it’s available for your next step.
Now you can make an HTTP call to Rockset's API endpoint to create a collection.
Make sure to replace the YOUR_API_KEY_HERE text with the key you just created and copied. Also, depending on your account's region, the base URL for making API calls can be different from the snippet below.
curl --request POST \
    --url https://api.euc1a1.rockset.com/v1/orgs/self/ws/commons/collections \
    -H 'Authorization: ApiKey YOUR_API_KEY_HERE' \
  -H 'Content-Type: application/json' \
    -d '{
    "name": "incoming_requests",
    "description": "All incoming delivery requests.",
    "sources": [
      {
        "integration_name": "Redpanda-Ondemand-Delivery",
        "kafka": {
			"kafka_topic_name": "delivery-requests",
			"use_v3": false,
			"offset_reset_policy": "LATEST",
			"status": {
				"state":"ACTIVE"
			}
		}
      }
    ],
    "retention_secs": 259200
  }'
If you’ve successfully created a Rockset collection, your output should look like something like this:
{
"data":{
"created_at":"2022-12-22T10:47:07Z",
"created_by":"rexfordnyrk@gmail.com",
"name":"incoming_requests",
"description":"All incoming delivery requests.",
"workspace":"commons",
"status":"CREATED",
"sources":[
{
"id":null,
"integration_name":"Redpanda-Ondemand-Delivery",
"s3":null,
"kinesis":null,
"gcs":null,
"azure_blob_storage":null,
"azure_service_bus":null,
"azure_event_hubs":null,
"dynamodb":null,
"file_upload":null,
"kafka":{
"kafka_topic_name":"delivery-requests",
"status":{
"state":"ACTIVE",
"last_consumed_time":null,
"num_documents_processed":null,
"kafka_partitions":null
},
"consumer_group_id":null,
"use_v3":false,
"offset_reset_policy":"EARLIEST",
"kafka_topic_names":null,
"num_workers":null,
"id":null
},
"mongodb":null,
"snowflake":null,
"status":null,
"format":null,
"format_params_csv":null,
"format_params":null,
"preview_source_id":null,
"integration_id":null,
"initial_dump_done":null,
"use_coordinator_v2":null,
"ingester_version":null
}
],
"field_mappings":[
],
"field_partitions":[
],
"clustering_key":[
],
"aliases":[
],
"field_schemas":[
],
"ingest_virtual_instance_id":"573c8daa-c5bf-46e1-b128-45ab5f239d13",
"read_only":false,
"storage_type":"HOT",
"insert_only":false,
"enable_exactly_once_writes":false
}
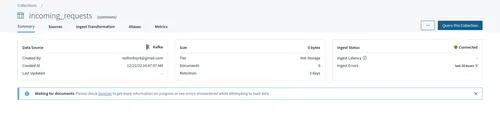
}The collection you just created should appear in the console with a status of Initializing. When the status changes to Connected, click the collection to view its details.
To simulate incoming delivery requests, this tutorial populates the Redpanda topic with data generated by the Mackaroo platform.
The project repository for this tutorial includes a directory called producer, which contains a simple program written in Golang. This program interacts with the Redpanda instance and produces records from the JSON file delivery-requests.json within the same directory.
The source code for the Golang program is here if you need it.
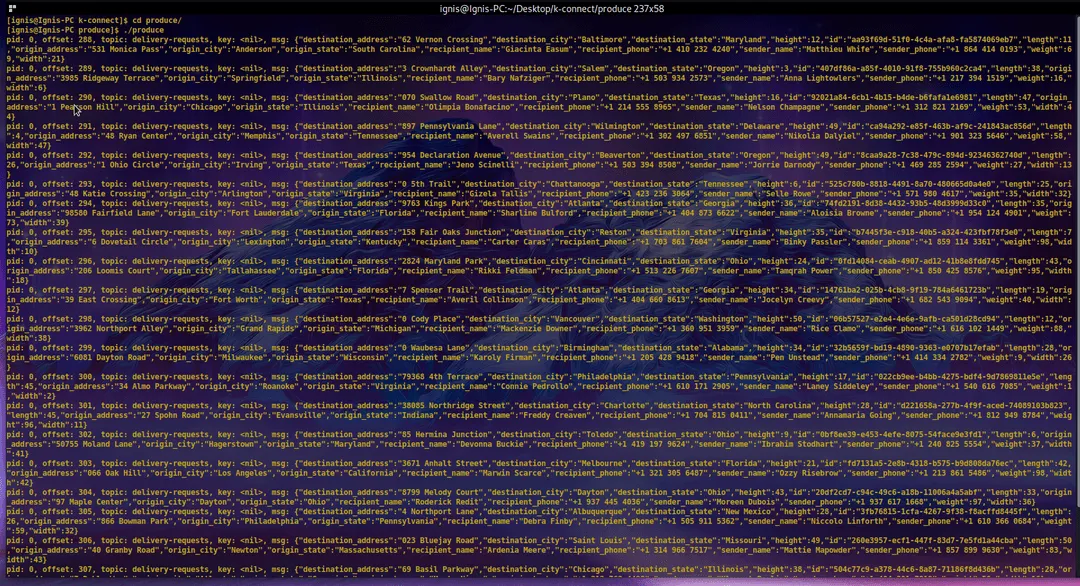
Change the directory into the producer directory and run the program:
$ cd produce
$ ./produce
Every three seconds, the program will publish a record to the delivery-requests topic on the Redpanda instance. Kafka Connect will then stream the data to your Rockset collection through the integration you created earlier.
The logs from this program will look something like this:
Back in your Rockset dashboard, you should see the records being populated into the incoming-requests collection page.

Notice that the various fields of the JSON objects are used as columns in an SQL-like table. All the column names available for this data are listed on the left of the table. These records will be queried in the next section.
With data ingested into your Rockset collection, you now need to be able to query that data for analysis. Take a look at the structure below of the JSON data objects coming for each delivery request:
{
   "id":"a92907e4-9439-4031-92da-1a5f9dcd92f3",
   "sender_name":"Sari Manuello",
   "sender_phone":"+1 213 255 4671",
   "origin_address":"45439 Red Cloud Junction",
   "origin_city":"Los Angeles",
   "origin_state":"California",
   "destination_address":"835 Doe Crossing Center",
   "destination_city":"San Francisco",
   "destination_state":"California",
   "recipient_name":"Sharity Jollie",
   "recipient_phone":"+1 415 281 5761",
   "weight":72,
   "height":23,
   "width":49,
   "length":16,
   "fee":"$111.95"
}
The origin_state field is where the request is being made from and where the package will be picked up for delivery. Also, notice the fee field, indicating how much the service costs.
To determine how much is earned in each state, you’ll need to sum up all the fees from each request according to state. You’ll also need to count the number of requests from each state to determine the state with the highest demand for the service.
Here’s the SQL query executed on this data to get the results you need:
SELECT
    origin_state,
    count(origin_state) as total_requests,
    ROUND (
        SUM(fee)
    ) AS state_income,
FROM
    commons.incoming_requests
GROUP BY
    origin_state
ORDER BY
    total_requests DESC
As you can see, the output data is sorted in descending order to make sure it’s arranged from the top with the highest number of requests.
To execute this query, click Query this collection on the _incoming\_requests_ collection page. The resulting query editor enables you to construct and execute queries on your collection. Paste the query above into the editor and click Run to receive an output similar to the image below:
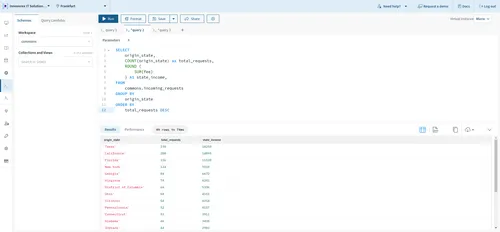
In this instance, the time taken to complete this query is just 74 ms. Of course, consistently running this or any query on the collected data will produce different results, as data would be coming in real time.
Streaming individual records in real time empowers a business to focus its resources appropriately and respond to events quickly, no matter the industry.
In this article, you learned how to use Redpanda and Rockset to analyze and query your company’s data as soon as a new record enters your system. You went over the necessary technologies and configurations needed to set up this integration, learned how to create a collection in Rockset using the Rockset RESTful API, and finally, you explored how to query streamed data using SQL for analysis right from the Rockset dashboard. Look at you go!
If you need to retrace the steps of this tutorial, you can find all the config files in this repository on GitHub.
What’s next? Keep the ball rolling and explore Redpanda's GitHub and the various clients and libraries you can use to further interact with your Redpanda topics from your applications.
Lastly, check out Redpanda’s blog to see all the integration possibilities. You can also join our buzzing Redpanda Community on Slack and chat directly with solution architects, core engineers, and other Redpanda users.
Subscribe to our VIP (very important panda) mailing list to pounce on the latest blogs, surprise announcements, and community events!
Opt out anytime.