Stream Oracle changes to ClickHouse in real time with Redpanda Connect
A hands-on walkthrough of our new Oracle CDC connector
Learn how to streamline real-time inventory operations with MongoDB change data streams and Redpanda.


With the fast pace of business across every industry these days, it's essential for companies to monitor, collect, and distribute data from one system to another in real time. Data streaming is becoming indispensable.
For example, a retail company wants to ensure that the availability of in-stock items is consistent across its warehouses as well as online. Whenever a customer buys an item, the ordering system must have the same data reflected in real time without having to do a refresh or direct read from the database. At all times, the company needs its inventory information to be current and accurate for its customers as well as its staff.
Or consider the operations analytics system of that same retail company. Streaming data points such as items sold, quantities, and geo origins and destinations of orders in real time enables decision-makers to analyze patterns that may affect business strategy: Which items are in highest demand in which locations? Which regions purchase more expensive items? How efficient is the company's delivery of goods sold?
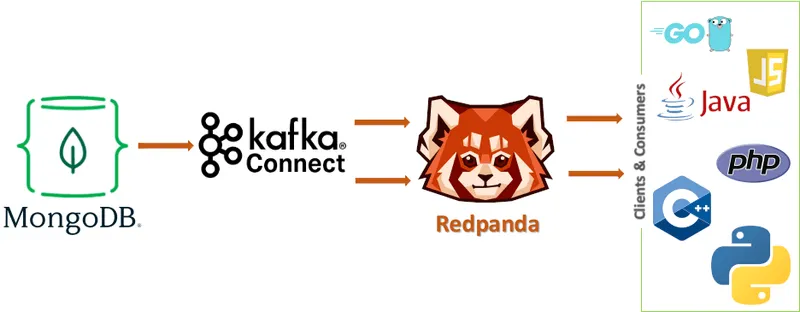
Obviously, real-time data is impactful to retail. But it's important to ensure that all necessary applications rely on the same data without giving them direct access to your database. To that end, platforms like Redpanda can be a unified engine of record for all your data.
As a source-available streaming platform, Redpanda supports data streaming from a wide range of data sources via their respective Kafka-compatible connectors and plugins. Such data sources include but are not limited to PostgreSQL, MySQL, and MongoDB. It's fast and simple and provides a Kafka-compatible API from a single binary, making it easy to scale with your data.
Let's delve into how to use Redpanda to stream data from a MongoDB database for various applications to consume in real time.
To implement a retail order streaming system in MongoDB, this article leverages the MongoDB Connector with Kafka Connect and Redpanda.
For this tutorial, you will need to install Docker, a Redpanda cluster, a MongoDB instance, and a Kafka Connect instance with MongoDB Connector.
Note: This tutorial was put together using Linux on a Fedora 36 Server Edition–powered machine.
You can find all the config files used in this tutorial in this repository. Feel free to clone the repository and use it to speed up your learning process and make modifications.
Feel free to skip this part if you're already familiar with Docker. But if you don't already have it installed, follow along with the official documentation to get Docker set up quickly on your operating system. Don't forget to reboot your system after the install.
Note: If you're using a Linux system running SELinux, you might want to temporarily disable it to avoid interference with some Docker tasks. You can do that by running the following command:
# setenforce 0To install and set up Redpanda, check out the quick-start documentation. To complete this tutorial, make sure you've set up at least a single node cluster.
If your Redpanda cluster is running on Docker, enter the Bash shell of the main node as follows. If you're not on Docker, skip to the next command.
$ docker exec -it redpanda-1 /bin/bash
Note: Make sure to replace redpanda-1 with the actual container name. You can check and get the container name by using the docker ps command.
Next, run the following command from the shell of the node so the Redpanda instance can allow the auto-creation of topics:
$ rpk redpanda config set auto_create_topics_enabled true
As mentioned earlier, MongoDB is your data source for this retail order streaming system tutorial. You'll use the official MongoDB Docker image but with a configuration file to enable the data-replication feature. Change your working directory into the cloned project directory to access to follow along with the files created for you.
Use the following command to create a virtual Docker network for the MongoDB container:
$ docker network create mongo-net
You can run the command below to start the MongoDB container and attach it to the host port 27017. Set the replication to rs0. Make sure you're running this command from the directory of the cloned project so that the data.json file is available to the container for future use.
$ docker run -d --name cdc-mongo -p 27017:27017 \
    --network mongo-net \
    -v "$PWD/data.json":/data.json \
    mongo:latest mongod \
    --replSet rs0 \
--bind_ip localhost,cdc-mongoYou can check that the container started successfully by running docker ps command.

Create a config.js file in your current directory with the following content:
db.disableFreeMonitoring(); //permanently disable reminder for free monitoring

rsconf = {
          _id: "rs0",   // the name of the replica set
          members: [{ _id: 0, host: "cdc-mongo:27017", priority: 1.0 }], //adding this instance to the set
};

rs.initiate(rsconf);  //initiating the replica set configured above

rs.status(); // returning the current status of the replication setNote: Remember that this file is available in the provided repository.
To enable and initialize replication, use the following command:
$ cat "$PWD/config.js" | docker exec -i cdc-mongo mongosh
Log in to MongoDB using the mongosh environment and create a database. Inside that database, create a collection and import a few records into it.
Execute the following command to create a database called e-shop and then create a retail-orders collection inside that database.
$ cat "$PWD/db.js" | docker exec -i cdc-mongo mongosh
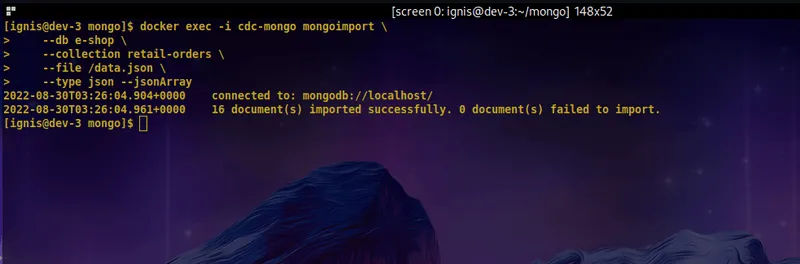
Run the command below to use the mongoimport tool to import the data from the data.json file provided in the retail-orders collection you just created.
$ docker exec -i cdc-mongo mongoimport \
    --db e-shop \
    --collection retail-orders \
    --file /data.json \
    --type json --jsonArray
The output of the command should look something like this:
Now that your database and data are ready, set up Kafka Connect with the MongoDB Connector to read changes from the MongoDB database to the Redpanda cluster.
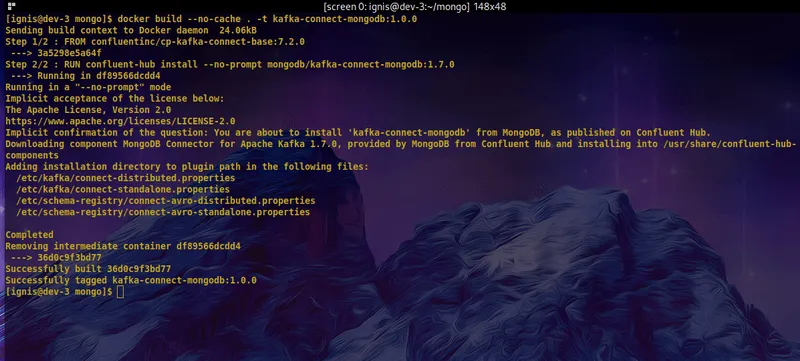
Create the file Dockerfile in your current directory and paste the following into it.
FROM confluentinc/cp-kafka-connect-base:7.2.0

RUN confluent-hub install --no-prompt mongodb/kafka-connect-mongodb:1.7.0
Note: This is already available if you're working with the project repo directory!
Running the command below would result in a Kafka Connect image with the MongoDB Connector plugin installed.
$ docker build --no-cache . -t kafka-connect-mongodb:1.0.0
You should have an output similar to this:
With the image created, you can now start a Connect container attached to and listening on port 8083 of the host machine.
Note: You can check out the various Connect options used in this command (among others) here.
$ docker run -d --name cdc-connect --rm --net=host -p 8083:8083 \
    -e CONNECT_BOOTSTRAP_SERVERS=localhost:9092 \
    -e CONNECT_REST_PORT=8082 \
    -e CONNECT_GROUP_ID="e-shop-01" \
    -e CONNECT_CONFIG_STORAGE_TOPIC="e-shop-config" \
    -e CONNECT_OFFSET_STORAGE_TOPIC="e-shop-offsets" \
    -e CONNECT_STATUS_STORAGE_TOPIC="e-shop-status" \
    -e CONNECT_KEY_CONVERTER_SCHEMAS_ENABLE=false \
    -e CONNECT_VALUE_CONVERTER_SCHEMAS_ENABLE=false \
    -e CONNECT_KEY_CONVERTER="org.apache.kafka.connect.storage.StringConverter" \
    -e CONNECT_VALUE_CONVERTER="org.apache.kafka.connect.storage.StringConverter" \
    -e CONNECT_INTERNAL_KEY_CONVERTER="org.apache.kafka.connect.storage.StringConverter" \
    -e CONNECT_INTERNAL_VALUE_CONVERTER="org.apache.kafka.connect.storage.StringConverter" \
    -e CONNECT_REST_ADVERTISED_HOST_NAME="cdc-connect" \
    -e CONNECT_TOPIC_CREATION_ENABLE=true \
    -e CONNECT_STATUS_STORAGE_REPLICATION_FACTOR=1 \
    -e CONNECT_OFFSET_STORAGE_REPLICATION_FACTOR=1 \
    -e CONNECT_CONFIG_STORAGE_REPLICATION_FACTOR=1  \
    kafka-connect-mongodb:1.0.0
Using the docker ps command, you can check to see if the Connect container is running successfully:

Check available plugins to ensure that the MongoDB Connector plugin is installed as expected:
$ curl -sS localhost:8083/connector-plugins

##Output
[{"class":"com.mongodb.kafka.connect.MongoSinkConnector","type":"sink","version":"1.7.0"},{"class":"com.mongodb.kafka.connect.MongoSourceConnector","type":"source","version":"1.7.0"},{"class":"org.apache.kafka.connect.mirror.MirrorCheckpointConnector","type":"source","version":"7.2.0-ccs"},{"class":"org.apache.kafka.connect.mirror.MirrorHeartbeatConnector","type":"source","version":"7.2.0-ccs"},{"class":"org.apache.kafka.connect.mirror.MirrorSourceConnector","type":"source","version":"7.2.0-ccs"}]Create a file called register-connector.json and paste the snippet below into it.
{
  "name": "mongo-source",
  "config": {
    "connector.class": "com.mongodb.kafka.connect.MongoSourceConnector",
    "connection.uri": "mongodb://127.0.0.1:27017",
    "database": "e-shop",
    "collection": "retail-orders",
    "copy.existing": true
  }
}
You'll use this file to configure the MongoDB Connector. It defines the various database options by which Kafka Connect will connect to the running MongoDB instance.
Note: You can find all configuration options here.
Register the connector with the configuration file you just created by making an HTTP request to the Connect's RESTful API:
$ curl -i -X POST -H "Accept:application/json" -H  "Content-Type:application/json" http://localhost:8083/connectors/ -d @register-connector.json

###Output
HTTP/1.1 201 Created
Date: Thu, 18 Aug 2022 18:29:43 GMT
Location: http://localhost:8083/connectors/mongo-source
Content-Type: application/json
Content-Length: 237
Server: Jetty(9.4.44.v20210927)

{"name":"mongo-source","config":{"connector.class":"com.mongodb.kafka.connect.MongoSourceConnector","connection.uri":"mongodb://127.0.0.1:27017","database":"e-shop","collection":"retail-orders","output.json.formatter":"com.mongodb.kafka.connect.source.json.formatter.ExtendedJson","name":"mongo-source"},"tasks":[],"type":"source"}
Check connector presence by making another HTTP request to Connect's RESTful API:
$ curl -H "Accept:application/json" localhost:8083/connectors/

###Output
["mongo-source"]Once the MongoDB Connector is running, you should expect it to create some topics on the Redpanda cluster.
If your Redpanda is running on Docker, first enter the shell of the main node as seen below. Do replace the redpanda-1 with the actual container name. If you're not running on Docker, you can skip to the next paragraph.
$ docker exec -it redpanda-1 /bin/bash
You can list created topics by executing the following command on the main node of the Redpanda cluster:
$ rpk topic list
You should see an output similar to this:
NAME                  PARTITIONS  REPLICAS
e-shop-config         1           1
e-shop-offsets        25          1
e-shop-status         5           1
e-shop.retail-orders 1 1Notice the topic with the name e-shop.retail-orders, which follows the format {database_name}.{collection_name}. That is the topic to consume in order to receive the data changes streamed from the retail-orders data collection. To consume the topic, execute the following command on the lead or main node of the Redpanda cluster:
$ rpk topic consume e-shop.retail-orders
Running this command may flash a whole lot of JSON items on your screen. This command continuously streams any changes made in the database to the standard output. Try it out by using a different terminal to update a record in the MongoDB database container.
Each item represents data feed on changes that occurred at a specific time in the respective table, as seen here:
{
  "topic": "e-shop.retail-orders",
  "key": "{\"_id\": {\"_id\": {\"$oid\": \"630d834c2709505365ded093\"}, \"copyingData\": true}}",
  "value": "{\"_id\": {\"_id\": {\"$oid\": \"630d834c2709505365ded093\"}, \"copyingData\": true}, \"operationType\": \"insert\", \"documentKey\": {\"_id\": {\"$oid\": \"630d834c2709505365ded093\"}}, \"fullDocument\": {\"_id\": {\"$oid\": \"630d834c2709505365ded093\"}, \"order_id\": \"8d54eecc-b45e-4fb6-a18b-cd86e923f76e\", \"customer_id\": \"e45cf0b9-41c3-4a28-bda0-980359979eb3\", \"item_id\": \"8096fe7f-76d2-41dc-95d3-7b142bc9f902\", \"item_name\": \"Syrup - Monin, Amaretta\", \"quantity\": {\"$numberInt\": \"10\"}, \"payment_id\": \"ba461981-25dd-485e-b216-11be0f30c8ea\", \"delivery_id\": \"1745b337-a84e-4500-9034-9670bf8fdb3b\", \"order_status\": \"processing\", \"discount\": {\"$numberInt\": \"34\"}}, \"ns\": {\"db\": \"e-shop\", \"coll\": \"retail-orders\"}}",
  "timestamp": 1661832774700,
  "partition": 0,
  "offset": 14
}
Note that Redpanda adds some metadata to the received data item:
Note: You can find an in-depth explanation of the values from the MongoDB Connector under the key and value keys here.
Since you are now able to consume data from the Redpanda topic for the customer\_addresses table using the rpk command, you can now test streaming data changes from MongoDB in real time.
To do this, have two terminals open. In the first terminal, execute the rpk topic consume command as seen in the previous section and keep it running. Do take notice of at least the offset number and timestamp value of the last record on this screen.
In the second terminal, connect to the MongoDB database. Execute an insert statement to add a record to the retail-orders collection:
$ docker exec -it cdc-mongo mongosh e-shop
Your terminal cursor should look something like this:
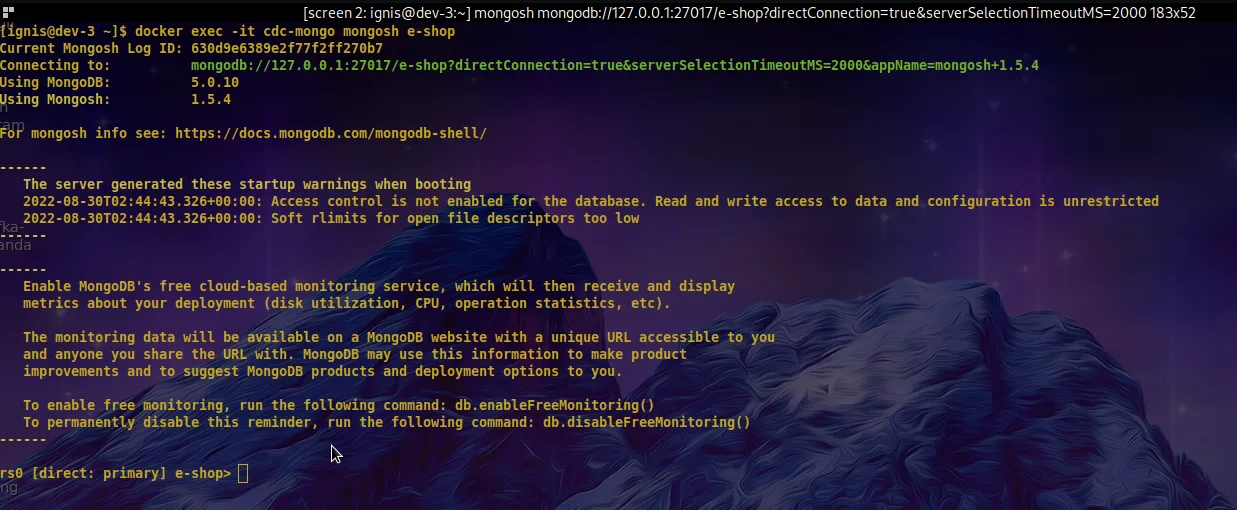
Paste and execute this insert statement to add a record to the existing data in the collection retail-orders:
db.getCollection('retail-orders').insertOne({'order_id':'8d54eecc-b45e-4fb6-a18b-cd86e923f76e','customer_id':'e45cf0b9-41c3-4a28-bda0-980359979eb3','item_id':'8096fe7f-76d2-41dc-95d3-7b142bc9f902','item_name':'Syrup - Monin, Amaretta','quantity':10,'payment_id':'ba461981-25dd-485e-b216-11be0f30c8ea','delivery_id':'1745b337-a84e-4500-9034-9670bf8fdb3b','order_status':'processing','discount':34})
Immediately, you should see the new change record streaming in the "consuming" terminal, as seen below.

Notice the different offset number and timestamp value. That means you can now stream database record changes in real time. Go ahead—update multiple records and examine the output.
Now with data streaming implemented in the retailer's ordering system, information delivery across the company's various departments happens in real time.
By subscribing to the change feed coming from MongoDB, the delivery team can move and ship items on time, and the operations and logistics teams can immediately determine what items need to be restocked or areas that need more staffing. That also enables users to get notified in real time about the status of their orders. Productivity and service efficiency improves, creating high levels of satisfaction among clients.
Understanding how data streaming works with MongoDB in particular opens you up to new possibilities, with MongoDB's replication feature and other technologies such as the MongoDB Connector and Redpanda.
Do you have specific use cases in mind where data streaming could help you? Explore Redpanda's GitHub repository and check out the various clients and libraries you can use to further interact with Redpanda topics from your applications. For example, consider Snowflake, Amazon S3, or Google Cloud Storage to facilitate the next set of solutions you need.
Become a member of the Redpanda developer community on Slack to learn more about the possibilities Redpanda presents to you.
Subscribe to our VIP (very important panda) mailing list to pounce on the latest blogs, surprise announcements, and community events!
Opt out anytime.