Full CDC semantics land in the Iceberg output for Redpanda Connect
Your lakehouse mirrors the database, instantly.

Run your own tests to evaluate the performance for a self-hosted Redpanda cluster.


You can run your own benchmark against a Redpanda cluster deployed on AWS EC2 instances using the guide provided in this blog. This benchmark is based on the Linux Foundation’s OpenMessaging Benchmark (OMB), along with a few other bug fixes that were applied.
Once the setup is complete, you can run the benchmark by connecting to a client machine of the cluster using SSH and start the benchmark process. You can extract the IP address of the client machine from the client_ssh_host variable in the output produced by Terraform. Once you SSH’d into the client machine, change into the benchmark directory and start the process.
Before running the benchmark, you need to ensure several prerequisites are met. The benchmark setup involves local environment preparation and provisioning a Redpanda cluster in AWS. You need to have certain tools installed in your local workstation, clone the Git repository, build local artifacts, configure the AWS account and SSH keys, provision a Redpanda cluster with Terraform, and run the Ansible playbook.
The OMB framework allows you to specify benchmark workloads as YAML configuration files. You can specify different configuration parameters for each workload such as number of topics, partitions per topic, producers per topic, and rate at which producers produce messages (per second), etc.
Redpanda is a streaming data platform, API compatible with Apache Kafka ®. Written in C++, Redpanda has been engineered to deliver at least 10x faster tail latencies than Apache Kafka and use significantly fewer nodes, depending on your throughput.
Whether you are evaluating Redpanda for a brand new project or planning to migrate from an existing streaming data platform such as Kafka, you might be interested in running tests to understand how Redpanda behaves when compared to your alternatives.
We put together this guide as a starting point to run your own benchmark against a Redpanda cluster deployed on AWS EC2 instances. This benchmark is based on the Linux Foundation’s OpenMessgaing Benchmark, along with a few other bug fixes that we applied.
This benchmark extends the OpenMessaging Benchmark Framework (OMB), a Linux Foundation project, providing a suite of tools that simplifies benchmarking distributed messaging systems in the cloud. OMB provides a strong foundation for running benchmarks with its YAML-based workload configurations, metrics collections for test results, and Terraform/Ansible resources for quick provisioning of messaging systems in the cloud.
However, we did some extra work on top of the OMB, including a number of changes that were introduced by Confluent two years ago and more recent improvements such as avoiding the Coordinated Omission problem of incorrect timestamp accounting. We also addressed an issue in the OMB Kafka driver that would repeatedly send async consumer offset requests without any coalescing. In addition to that, we also upgraded the benchmark to use the Kafka 3.2.0 client.
We have forked the OMB to include the above fixes and open-sourced it in this Git repository.
The OMB framework allows you to specify benchmark workloads as YAML configuration files. You can specify different configuration parameters for each workload such as number of topics, partitions per topic, producers per topic, and rate at which producers produce messages (per second), etc. When running your own benchmark, you should define different configurations as close as possible to your production workloads as benchmarks tend to be synthetic and may not always represent real-world scenarios.
Redpanda’s fork of OMB framework contains three major workload configurations as explained comprehensively in the Redpanda vs Apache Kafka performance comparison blog post. These configurations are using 50 MB/sec, 500 MB/sec, and 1 GB/sec as representative workloads to indicate the write throughput, assuming a 1:1 read-to-write ratio, so the total throughput of each workload can be effectively doubled.
This benchmark is configured to run on AWS by default, with instance types for each workload summarized as follows.
However, you can customize it further to reflect your production infrastructure. We will discuss that in the next section.
Before running the benchmark, we need to ensure several prerequisites are met. The benchmark setup involves local environment preparation and provisioning a Redpanda cluster in AWS.
The following diagram captures the whole process at a high level.
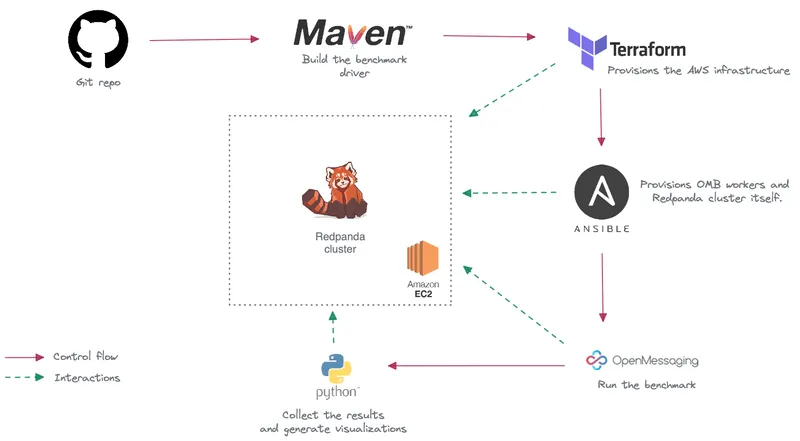
Let’s discuss each step in detail.
First, make sure you have the following tools installed in your local workstation.
Clone the Redpanda’s fork of the benchmark from the following Git repository.
git clone https://github.com/redpanda-data/openmessaging-benchmark
cd openmessaging-benchmark
This repository contains the benchmark drivers for different messaging systems. You can find the Redpanda driver located in the driver-redpanda directory. The current Kafka client version is set to 3.2.0. You can change it by editing the driver-redpanda/pom.xml file.
Once you have the repository cloned locally, run the following command from the root directory to build the benchmark client needed during deployment.
mvn clean install -Dlicense.skip=true
From the repository root directory, run the following command to install the ansible-galaxy requirements.
ansible-galaxy install -r requirements.yaml
The benchmark will provision a Redpanda cluster in the AWS cloud. So, you need to configure AWS credentials and SSH keys prior to the deployment.
First, make sure you have an AWS account, along with the AWS CLI installed and configured properly.
Next, you’ll need to create both a public and a private SSH key at ~/.ssh/redpanda_aws (private) and ~/.ssh/redpanda_aws.pub (public), respectively.
$ ssh-keygen -f ~/.ssh/redpanda_aws
When prompted to enter a passphrase, simply hit Enter twice to set a blank password. Then, make sure that the keys have been created:
$ ls ~/.ssh/redpanda_aws*
Once you have SSH keys in place, you can create the necessary AWS resources using Terraform.
If needed, you can set a few configuration parameters related to the Terraform deployment such as region, public_key_path, ami, and instance_types. The following shows the default values specified in the driver-redpanda/deploy/terraform.tfvars file.
public_key_path = "~/.ssh/redpanda_aws.pub"
region          = "us-west-2"
az		        = "us-west-2a"
ami             = "ami-0d31d7c9fc9503726"
profile         = "default"

instance_types = {
  "redpanda"      = "i3en.6xlarge"
  "client"        = "m5n.8xlarge"
  "prometheus"    = "c5.2xlarge"
}

num_instances = {
  "client"     = 4
  "redpanda"   = 3
  "prometheus" = 1
}
Next, run the following commands to initialize the Terraform deployment.
cd driver-redpanda/deploy
terraform init
terraform apply -auto-approve
terraform apply will prompt you for an owner name (var.owner) which will be used to tag all the cloud resources that will be created. Once the installation is complete, you will see a confirmation message listing the resources that have been installed.
Once you have the necessary infrastructure provisioned in AWS, you can install and start the Redpanda cluster using Ansible as follows:
ansible-playbook deploy.yaml
If you wish to configure Redpanda with TLS and SASL, you can configure this via extra-vars as follows:
ansible-playbook deploy.yaml -e "tls_enabled=true sasl_enabled=true"
If you’re using an SSH private key path different from ~/.ssh/redpanda_aws, you can specify that path using the --private-key flag, for example --private-key=~/.ssh/my_key.
Beginning with ansible 2.14, references to args: warn within ansible tasks will cause a fatal error and halt the execution of the playbook. These have been resolved in the Redpanda fork, but you may find instances of this in the components installed by ansible-galaxy, particularly in the cloudalchemy.grafana task dashboard.yml. Simply removing the warn line in the yaml will resolve the issue.
Benchmark is a distributed system, executed on a cluster of machines. In order to run the benchmark, you need to connect to a client machine of that cluster using SSH and start the benchmark process.
But how do we find out the IP address of the client machine? Well, you can extract it from the client_ssh_host variable in the output produced by Terraform. And then make a SSH connection like this:
ssh -i ~/.ssh/redpanda_aws ubuntu@$(terraform output --raw client_ssh_host)
Once you SSH’d into the client machine, change into the benchmark directory.
cd /opt/benchmark
Now you can run the benchmark executable from this directory, along with different workload configurations. In this example we will create our own workload file based on our usage scenario:
cat > workloads/1-topic-144-partitions-500mb-4p-4c.yaml << EOF
name: 500mb/sec rate; 4 producers 4 consumers; 1 topic with 144 partitions

topics: 1
partitionsPerTopic: 144

messageSize: 1024
useRandomizedPayloads: true
randomBytesRatio: 0.5
randomizedPayloadPoolSize: 1000

subscriptionsPerTopic: 1
consumerPerSubscription: 4
producersPerTopic: 4

producerRate: 500000

consumerBacklogSizeGB: 0
testDurationMinutes: 30
EOF
For example:
sudo bin/benchmark -d
driver-redpanda/redpanda-ack-all-group-linger-1ms.yaml \
workloads/1-topic-144-partitions-500mb-4p-4c.yaml
When running the benchmark command, it is recommended to run it in a tmux or screen so that if you lose connectivity you don't lose the output.
When the benchmark is running, you should observe the logs for errors and warnings that might indicate a workload is not being completed as expected. For example, you might observe this particular issue when the workload cannot keep up and the producer starts to throw WARN level messages on JDK 11 due to HdrHistogram/HdrHistogram#180. However, that has been fixed in the fork now. But you should pay attention to similar errors.
Once a benchmark run gets completed, JSON files will be generated in the /opt/benchmark directory. You can use bin/generate_charts.py to generate a visual representation from these files but it is recommended you bring the results files back to your local machine:
exit; # back to your local machine
mkdir ~/results
scp -i ~/.ssh/redpanda_aws ubuntu@$(terraform output --raw client_ssh_host):/opt/benchmark/*.json ~/results/
First, install the Python script's prerequisites:
cd ../../bin # The root directory of the git repository
python3 -m pip -r install bin/requirements.txt
The script has a few flags to say where the benchmark output file is, where the output will be stored, etc. Run the script with the help flag for more details (from the project's bin directory):
The following is an example of how you can run the Python script. It looks for benchmark files in ~/results and sends output to a folder called ~/output. Note that you need to create the output directory prior to running the script.
./bin/generate_charts.py --results ~/results --output ~/output
This will result in an HTML page with charts for throughput, publish latency, end-to-end latency, publish rate, and consume rate. You can view that file in a browser.
Once you are done, tear down the cluster with the following command:
In this guide, we discussed configuring and running your own benchmark against a Redpanda cluster deployed in the AWS cloud.
Redpanda’s fork of the OpenMessaging benchmarking suite provides a good starting point with its pre-built workload configurations, infrastructure provisioning templates, and results visualization. It comes with pre-built configurations for 50 MB/sec, 500 MB/sec, and 1 GB/sec as representative workloads to indicate the write throughput. You can always refer to our blog post on Kafka vs. Redpanda performance benchmark to study the specifics of the setup.
However, if you want to take this work further and customize it to suit your needs, talk to us for guidance and assistance. We always recommend you to define workloads as close as possible to your production use cases.
To learn more about Redpanda, check out our documentation and browse the Redpanda blog for tutorials on how to easily integrate with Redpanda. For a more hands-on approach, take Redpanda for a test drive!
If you get stuck, have a question, or just want to chat with our engineers and fellow Redpanda users, join our Redpanda Community on Slack.
Subscribe to our VIP (very important panda) mailing list to pounce on the latest blogs, surprise announcements, and community events!
Opt out anytime.