Full CDC semantics land in the Iceberg output for Redpanda Connect
Your lakehouse mirrors the database, instantly.
Learn how to stream your data to S3 and GCS using Redpanda and Kafka Connect.


To use Kafka Connect with Redpanda to feed data into S3 and GCS, you need to create a Kafka Connect cluster and configure it to use a Redpanda cluster. You then need to create Kafka topics for each branch of your business and configure and create Kafka Connect connectors for each branch to consume the data and save it to the relevant cloud storage.
To set up Amazon S3, log in to your AWS account, search for S3, and create a bucket. Enable Bucket Versioning and create an AWS access key and secret for your account. For Google Cloud Storage, log in to your GCP account, search for storage, and create a bucket. Enable Object versioning and create a service account and an access key.
You'll need an AWS account, a GCP account, a machine to install Redpanda and Kafka Connect, and Java 11 to run the producer application. The tutorial uses a Linux system, but any operating system or container services can be used to install Redpanda.
Object storage is a cost-effective type of data storage that treats data as objects. It is capable of storing large amounts of unstructured data, which are generally bundled with metadata and a unique identifier. APIs are used to facilitate easier access and retrieval of the data.
A growing number of companies are shifting their workload to cloud services to take advantage of their high scalability, security, availability, and performance. Amazon Web Services (AWS) and Google Cloud Platform (GCP), for example, can handle almost any use case, including object storage.
Object storage is a cost-effective data storage type that treats data as objects. It stores large amounts of unstructured data, generally bundled with metadata and a unique identifier. APIs provide easier data access and retrieval.
AWS Amazon Simple Storage Service (S3) and Google Cloud Storage (GCS) offer features such as versioning, replication, security or retention policies, and object lock. Redpanda integrates well with both. It is designed to be easily installed to get streaming up and running quickly.
In this tutorial, you will learn how to:
You can find the code to complete this demo in this GitHub repository.
You’ll need the following:
This tutorial uses a Linux system, but you can use any operating system or container services to install Redpanda. Check out Redpanda’s quick start documentation here for details.
Here we’ve created a fictitious scenario to demonstrate how you can use Kafka Connect with Redpanda to feed data into S3 and GCS. This scenario is for demonstration purposes only, and does not necessarily reflect a typical use case.
Suppose that you work for a bookstore company called PandaBooks LLC as an integration engineer. It has two branches, one in London and the other in New York. The company has a main inventory file in CSV format that’s updated daily by the book providers, and the company manually splits and distributes the relevant inventory data to the branches.
This process has many drawbacks, though. It’s vulnerable to human error. The split CSV files for the branch inventories can’t be versioned, and no history is available, so data that’s lost can’t be recovered. Additionally, there are no file or storage standards.
The company decides to automate the process, distributing the inventories automatically and storing them in cloud environments in a standard format. Your job is to create a Kafka Connect cluster that you’ll configure to use a Redpanda cluster.
The London branch already uses AWS for their other daily processes such as keeping the order records in S3, and using Simple Email Service (SES) for customer emails. Because choosing a service that they already use lowers the costs for them, you must integrate the Kafka Connect cluster with S3 for the London inventory.
The New York branch is bigger and they have loads of customer data, such as payments, book borrowings, and online book orders. This branch uses GCP to include machine learning in their processes by using their data pool. Their cloud provider of choice will be GCP for any further implementation, so you must integrate the Kafka Connect cluster with GCS for the New York inventory.
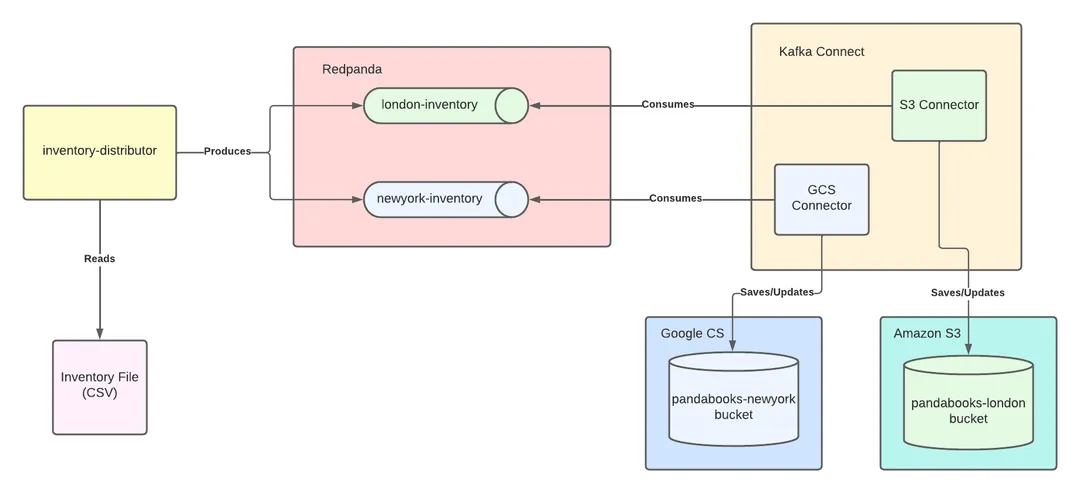
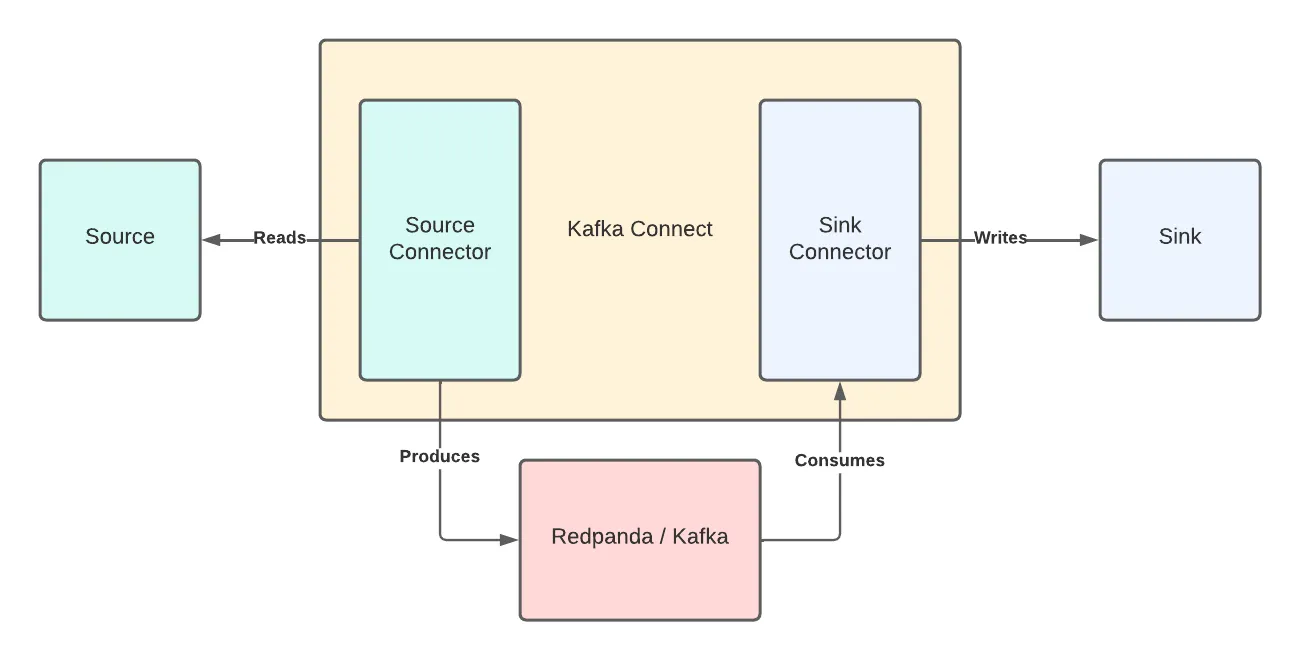
The developers have created an inventory-distributor application that produces the book data from the inventory file to relevant Kafka topics for bookstore branches. You must create the Kafka topics for each branch and then configure and create Kafka Connect connectors for each branch to consume the book data and save it to the relevant cloud storage.
The below image demonstrates what’s needed:
Run the following commands to install Redpanda:
Run the setup script to download and install the repo:
curl -1sLf 'https://packages.vectorized.io/nzc4ZYQK3WRGd9sy/redpanda/cfg/setup/bash.rpm.sh' | sudo -E bash && \Use yum to install Redpanda:
sudo yum install redpanda -yRun the setup script to download and install the repo:
curl -1sLf 'https://packages.vectorized.io/nzc4ZYQK3WRGd9sy/redpanda/cfg/setup/bash.deb.sh' | sudo -E bash && \Use apt to install Redpanda:
sudo apt install redpanda -yStart the Redpanda cluster with the following command:
sudo systemctl start redpandaVerify if it’s up and running:
sudo systemctl status redpandaYou should see this output:
redpanda.service - Redpanda, the fastest queue in the West.
     Loaded: loaded (/usr/lib/systemd/system/redpanda.service; enabled; vendor preset: enabled)
     Active: active (running) since Thu 2022-02-10 15:56:39 +03; 2 days ago
...output omitted...
Keep in mind that this is a single-node Redpanda cluster and not suitable for a production environment. To install Redpanda in a production environment, check the production documentation.
To enable the inventory-distributor application and the Kafka Connect cluster to work properly, you must define the Kafka topics for the London and New York inventories. You can use the Redpanda command-line interface (CLI) to create topics on the Redpanda cluster. Access the CLI by running the rpk command.
Run the following command to create a topic for the London branch inventory:
rpk topic create london-inventoryThen, run this command for the New York branch inventory:
rpk topic create newyork-inventoryVerify that you have created the topics:
rpk cluster infoYou will see the following output:
BROKERS
=======
ID    HOST         PORT
1*    localhost  9092

TOPICS
======
NAME               PARTITIONS  REPLICAS
london-inventory   1           1
newyork-inventory  1           1
Don’t specify a partition count or replication factor for the topics because this isn’t a production environment.
Next, you’ll set up Amazon S3 and Google Cloud Storage.
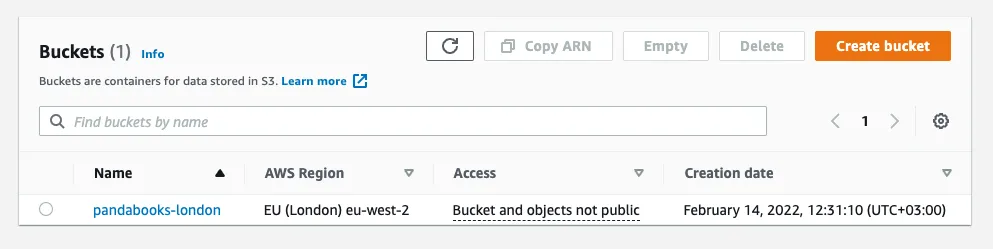
Log in to your AWS account and search for S3 in the search bar at the top. Click the S3 link and then the Create bucket button. Name the bucket pandabooks-london and select a region (eu-west-2 for London).
Scroll down to Bucket Versioning and enable it. Leave the other configurations as is and click Create bucket at the bottom of the page. If done correctly, you’ll see the following:
Next, create an AWS access key and secret for your account. Click your username on the top right and click the Security credentials link in the dropdown menu.
On the opened page, click the Access keys (access key ID and secret access key) section and then click the Create Access Key button. Save the access key ID and the secret key.
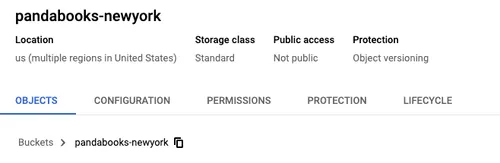
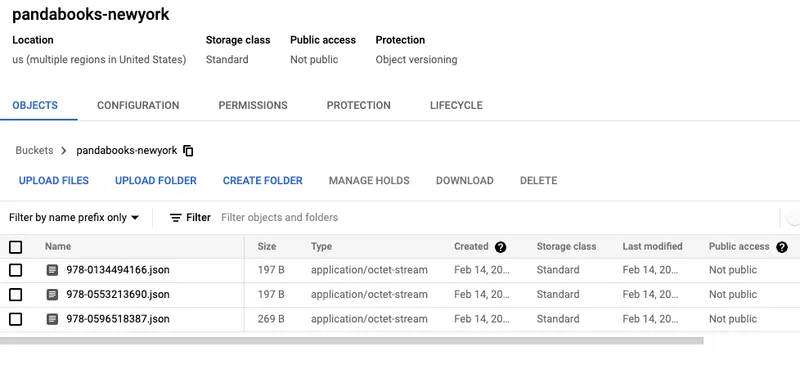
Log in to your GCP account and search for storage in the search bar at the top. Click the Cloud Storage link. On the opened page, click the Create Bucket button and enter the name pandabooks-newyork.
Keep clicking Continue, leaving the rest of the data as is, until the section Choose how to protect object data. Select the Object versioning (best for data recovery) option to enable bucket versioning. Click the Create button.
You should see the following:
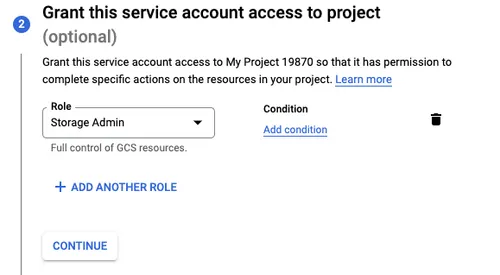
Create a service account and an access key. Search for a service account in the search bar at the top and click the Service Accounts link.
On the opened page, click the + Create Service Account button. Name the account gcs-storage-account and click the Create and Continue button. Select the Storage Admin role and click the Done button at the bottom.
On the redirected Service accounts page, click the three dots to open the Actions menu. Click the Manage keys link.
On the opened page, click the Add Key menu button and then click Create new key. Click Create on the pop-up page. This will trigger a download for the credentials JSON file. Copy the file to your home directory by renaming it to google_credentials.json.
Kafka Connect is an integration tool released with the Apache KafkaⓇ project. It’s scalable and flexible, and it provides reliable data streaming between Apache Kafka and external systems. You can use it to integrate with any system, including databases, search indexes, and cloud storage providers. Redpanda is fully compatible with the Kafka API.
Kafka Connect uses source and sink connectors for integration. Source connectors stream data from an external system to Kafka, while sink connectors stream from Kafka to an external system.
You’ll need to download the Apache Kafka package to get Kafka Connect. Navigate to the Apache downloads page for Kafka and click the suggested download link for the Kafka 3.1.0 binary package.
Create a folder called pandabooks_integration in your home directory and extract the Kafka binaries file to this directory. You can use the following commands by changing the paths if necessary:
mkdir pandabooks_integration && \
mv ~/Downloads/kafka_2.13-3.1.0.tgz pandabooks_integration && \
cd pandabooks_integration && \
tar xzvf kafka_2.13-3.1.0.tgzTo run a Kafka Connect cluster, you’ll need to configure a file in the properties format.
In pandabooks_integration, create a folder called configuration. Create a connect.properties file in this directory with the following content:
#Kafka broker addresses
bootstrap.servers=

#Cluster level converters
#These apply when the connectors don’t define any converter
key.converter=org.apache.kafka.connect.json.JsonConverter
value.converter=org.apache.kafka.connect.json.JsonConverter

#JSON schemas enabled to false in cluster level
key.converter.schemas.enable=true
value.converter.schemas.enable=true

#Where to keep the Connect topic offset configurations
offset.storage.file.filename=/tmp/connect.offsets
offset.flush.interval.ms=10000

#Plugin path to put the connector binaries
plugin.path=
Set the bootstrap.servers value to localhost:9092. This configures the Connect cluster to use the Redpanda cluster.
Next, configure plugin.path for the connector binaries. Create a folder called plugins in the pandabooks_integration directory and put the connector binaries in the plugins directory.
To download the S3 sink connector, navigate to the Aiven S3 sink connector for Apache Kafka download page and click the download link for v2.12.0. Use the following commands, changing the paths if necessary:
mv ~/Downloads/aiven-kafka-connect-s3-2.12.0.tar plugins && \
cd plugins && \
tar xvf aiven-kafka-connect-s3-2.12.0.tar
The final folder structure for pandabooks_integration should look like this:
pandabooks_integration
├── configuration
│   ├── connect.properties
├── plugins
│   ├── aiven-kafka-connect-gcs-0.9.0
│   └── aiven-kafka-connect-s3-2.12.0
└── kafka_2.13-3.1.0
Change the plugin.path value to /home/_YOUR_USER_NAME_/pandabooks_integration/plugins. This configures the Connect cluster to use the Redpanda cluster.
The final connect.properties file should look like this:
#Kafka broker addresses
bootstrap.servers=localhost:9092

#Cluster level converters
#These apply when the connectors don’t define any converter
key.converter=org.apache.kafka.connect.json.JsonConverter
value.converter=org.apache.kafka.connect.json.JsonConverter

#JSON schemas enabled to false in cluster level
key.converter.schemas.enable=true
value.converter.schemas.enable=true

#Where to keep the Connect topic offset configurations
offset.storage.file.filename=/tmp/connect.offsets
offset.flush.interval.ms=10000

#Plugin path to put the connector binaries
plugin.path=/home/_YOUR_USER_NAME_/pandabooks_integration/pluginsSetting up the connector plugins in a Kafka Connect cluster to integrate with external systems isn’t enough because the cluster needs the connectors configured for integration. You’ll need to configure the sink connectors for S3 and GCS.
To configure the S3 sink connector, create a file called s3-sink-connector.properties in the ~/pandabooks_integration/configuration directory with the following content:
# Connector name
name=s3-sink-connector

# The Java class for the connector
connector.class=

# The key converter for this connector
key.converter=org.apache.kafka.connect.storage.StringConverter

# The value converter for this connector
value.converter=org.apache.kafka.connect.json.JsonConverter

# Identify, if value contains a schema.
# Required value converter is `org.apache.kafka.connect.json.JsonConverter`.
value.converter.schemas.enable=false

# The type of data format used to write data to the GCS output files.
# The supported values are: `csv`, `json`, `jsonl` and `parquet`.
# Optional, the default is `csv`.
format.output.type=jsonl

# A comma-separated list of topics to use as input for this connector
# Also, a regular expression version `topics.regex` is supported.
# See https://kafka.apache.org/documentation/#connect_configuring
topics=

# AWS Access Key ID
aws.access.key.id=

# AWS Access Secret Key
aws.secret.access.key=

#AWS Region
aws.s3.region=

#File name template
file.name.template={{key}}.json

#The name of the S3 bucket to use
#Required.
aws.s3.bucket.name=

# The set of the fields that are to be output, comma separated.
# Supported values are: `key`, `value`, `offset`, `timestamp` and `headers`.
# Optional, the default is `value`.
format.output.fields=key,value

# The compression type used for files put on GCS.
file.compression.type=none
Some of the values are already configured, but some are left blank. Set the following values for the keys in the s3-sink-connector.properties file:
Key                             Value

connector.class                 io.aiven.kafka.connect.s3.AivenKafkaConnectS3SinkConnector
topics                          london-inventory
aws.access.key.id                _YOUR_AWS_ACCESS_KEYID
aws.secret.access.key           _YOUR_AWS_ACCESS_SECRETKEY
aws.s3.region                   _YOUR_AWS_BUCKETREGION
aws.s3.bucket.name              pandabooks-london
The London branch uses Amazon S3 for book inventory, so the above configuration specifies topics as london-inventory and bucket name as pandabooks-london.
To configure the GCS sink connector, create a file called gcs-sink-connector.properties in the ~/pandabooks_integration/configuration directory with the following content:
# Connector name
name=gcs-sink-connector

# The Java class for the connector
connector.class=

# The key converter for this connector
key.converter=org.apache.kafka.connect.storage.StringConverter

# The value converter for this connector
value.converter=org.apache.kafka.connect.json.JsonConverter

# Identify, if value contains a schema.
# Required value converter is `org.apache.kafka.connect.json.JsonConverter`.
value.converter.schemas.enable=false

# The type of data format used to write data to the GCS output files.
# The supported values are: `csv`, `json`, `jsonl` and `parquet`.
# Optional, the default is `csv`.
format.output.type=jsonl

# A comma-separated list of topics to use as input for this connector
# Also, a regular expression version `topics.regex` is supported.
# See https://kafka.apache.org/documentation/#connect_configuring
topics=

# The file name template.
file.name.template={{key}}.json

# The name of the GCS bucket to use
# Required.
gcs.bucket.name=

## The following two options are used to specify GCP credentials.
## See the overview of GCP authentication:
##  - https://cloud.google.com/docs/authentication/
##  - https://cloud.google.com/docs/authentication/production
## If they both are not present, the connector will try to detect
## the credentials automatically.
## If only one is present, the connector will use it to get the credentials.
## If both are present, this is an error.
gcs.credentials.path=

# The set of the fields that are to be output, comma separated.
# Supported values are: `key`, `value`, `offset`, `timestamp`, and `headers`.
# Optional, the default is `value`.
format.output.fields=key,value

# The compression type used for files put on GCS.
file.compression.type=none
Again, some of the values are already configured, but some are left blank. Set the following values for the keys in the gcs-sink-connector.properties file:
Key                             Value

connector.class                 io.aiven.kafka.connect.gcs.GcsSinkConnector
topics                          newyork-inventory
gcs.credentials.path            /home/_YOUR_USERNAME/google_credentials.json
gcs.bucket.name                 pandabooks-newyork
The New York branch uses GCS for book inventory, so the above configuration specifies topics as newyork-inventory and bucket name as pandabooks-newyork.
For both connectors, you configure the name of the file to be saved in the cloud storage as file.name.template={{key}}.json. The file name must be the Kafka message key that the producer sets. The inventory-distributor application is pre-configured to set the keys as the ISBN of the books.
You also set the format.output.fields key with the value key,value. The files saved to cloud storage have the key and the value of the Kafka message.
To run the cluster with the configurations that you applied, open a new terminal window and navigate to the ~/pandabooks_integration/configuration directory. Run the following command:
../kafka_2.13-3.1.0/bin/connect-standalone.sh connect.properties s3-sink-connector.properties gcs-sink-connector.propertiesIf done correctly, the output will look like this:
...output omitted...
[2022-02-12 23:06:57,865] INFO [my-gcs-connector|task-0] [Consumer clientId=connector-consumer-my-gcs-connector-0, groupId=connect-my-gcs-connector] Adding newly assigned partitions: newyork-inventory-0 (org.apache.kafka.clients.consumer.internals.ConsumerCoordinator:291)
[2022-02-12 23:06:57,867] INFO [my-gcs-connector|task-0] [Consumer clientId=connector-consumer-my-gcs-connector-0, groupId=connect-my-gcs-connector] Setting offset for partition newyork-inventory-0 to the committed offset FetchPosition{offset=34, offsetEpoch=Optional.empty, currentLeader=LeaderAndEpoch{leader=Optional[localhost:9092 (id: 1 rack: null)], epoch=absent}} (org.apache.kafka.clients.consumer.internals.ConsumerCoordinator:844)
...output omitted...
[2022-02-12 23:06:57,886] INFO [s3-sink-connector|task-0] [Consumer clientId=connector-consumer-s3-sink-connector-0, groupId=connect-s3-sink-connector] Setting offset for partition london-inventory-0 to the committed offset FetchPosition{offset=27, offsetEpoch=Optional.empty, currentLeader=LeaderAndEpoch{leader=Optional[localhost:9092 (id: 1 rack: null)], epoch=absent}} (org.apache.kafka.clients.consumer.internals.ConsumerCoordinator:844)
[2022-02-12 23:07:05,994] INFO [s3-sink-connector|task-0] Processing 0 records (io.aiven.kafka.connect.s3.AivenKafkaConnectS3SinkConnector:116)
[2022-02-12 23:07:15,997] INFO [s3-sink-connector|task-0] Processing 0 records (io.aiven.kafka.connect.s3.AivenKafkaConnectS3SinkConnector:116)
...output omitted...
Note that you’re running the Kafka Connect cluster in standalone mode. Kafka Connect also offers a distributed mode, but standalone is a better fit for this architecture. For more on distributed mode, check Kafka’s documentation.
Download the inventory-distributor application binary by clicking this link in the ~/pandabooks_integration directory.
Download the main inventory file book-inventory.csv in the ~/pandabooks_integration directory with the following command:
curl -o book-inventory.csv https://raw.githubusercontent.com/systemcraftsman/redpanda-kafka-connect-s3-gcs-demo/main/resources/data/book-inventory.csvThe book-inventory.csv file will have six book records to be sent to the London and New York inventories, each tagged as either london or new york. The inventory-distributor application uses these tags to sort the records.
Run the application with the following command in a new terminal window and keep it running:
java -jar -Dpath=. inventory-distributor-1.0.1-SNAPSHOT-runner.jarThe output should be as follows:
...output omitted...
2022-02-14 14:57:00,691 INFO  [route1] (Camel (camel-1) thread #6 - Split) Message sent: {"isbn":"978-0596518387","name":"Apprenticeship Patterns: Guidance for the Aspiring Software Craftsman","author":"Dave Hoover & Adewale Oshineye","year":"2009","publisher":"O'Reilly Media","language":"English","storeLocation":"newyork"}
2022-02-14 14:57:00,691 INFO  [route1] (Camel (camel-1) thread #8 - Split) Message sent: {"isbn":"978-1492043089","name":"Kafka: The Definitive Guide","author":"Gwen Shapira & Todd Palino & Rajini Sivaram & Krit Petty","year":"2021","publisher":"O'Reilly Media","language":"English","storeLocation":"london"}
2022-02-14 14:57:00,691 INFO  [route1] (Camel (camel-1) thread #4 - Split) Message sent: {"isbn":"978-0553213690","name":"The Metamorphosis","author":"Franz Kafka","year":"2009","publisher":"Classix Press","language":"German","storeLocation":"newyork"}
2022-02-14 14:57:00,691 INFO  [route1] (Camel (camel-1) thread #10 - Split) Message sent: {"isbn":"978-0134494166","name":"Clean Architecture","author":"Robert C. Martin","year":"2017","publisher":"Pearson","language":"English","storeLocation":"newyork"}
2022-02-14 14:57:00,691 INFO  [route1] (Camel (camel-1) thread #9 - Split) Message sent: {"isbn":"978-0201616224","name":"The Pragmatic Programmer: From Journeyman to Master","author":"Andrew Hunt & David Thomas","year":"1999","publisher":"Addison-Wesley Professional","language":"English","storeLocation":"london"}
2022-02-14 14:57:00,691 INFO  [route1] (Camel (camel-1) thread #2 - Split) Message sent: {"isbn":"978-0134052502","name":"The Software Craftsman","author":"Sandro Mancuso","year":"2014","publisher":"Pearson","language":"English","storeLocation":"london"}
...output omitted...
The inventory-distributor application scans the changes in the book-inventory.csv file continuously and sends them to the relevant Kafka topics for each inventory. Kafka Connect connectors consume the book data from these topics and save them to Amazon S3 for the London inventory and GCS for the New York inventory.
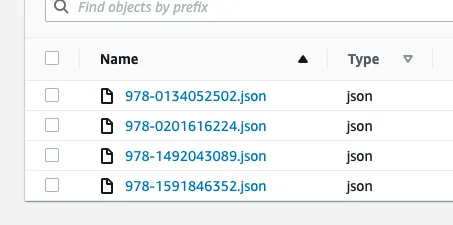
In your web browser, navigate to your S3 bucket pandabooks-london to verify the objects are created. You’ll see three bucket objects created for each book data in the London inventory.

Click one of the object names and click the Download button to verify the file data. For example, the contents of the 978-0134052502.json object should be as follows:
{
  "value": {
    "storeLocation": "london",
    "year": "2014",
    "author": "Sandro Mancuso",
    "isbn": "978-0134052502",
    "name": "The Software Craftsman",
    "publisher": "Pearson",
    "language": "English"
  },
  "key": "978-0134052502"
}
Now, do the same for your GCS bucket pandabooks-newyork.
This time, though, the book data 978-0553213690.json is wrong. The Metamorphosis is in English, but the providers set it as German:
{
  "value": {
    "storeLocation": "newyork",
    "year": "2009",
    "author": "Franz Kafka",
    "isbn": "978-0553213690",
    "name": "The Metamorphosis",
    "publisher": "Classix Press",
    "language": "German"
  },
  "key": "978-0553213690"
}
Open the book-inventory.csv file in the ~/pandabooks_integration directory and replace the German field with English, then save. Be sure that the inventory-distributor application is still running.
In your web browser, verify that you have updated the 978-0553213690.json object by downloading it.
It should have the following content:
{
  "value": {
    "storeLocation": "newyork",
    "year": "2009",
    "author": "Franz Kafka",
    "isbn": "978-0553213690",
    "name": "The Metamorphosis",
    "publisher": "Classix Press",
    "language": "English"
  },
  "key": "978-0553213690"
}
Because you configured the connectors to send the files with the book ISBNs as the keys, the object names won’t change. S3 and GCS update the object data and keep the old version because you enabled versioning.
Now, add a book record in the book-inventory.csv file for the London inventory. Add the following line in the book-inventory.csvfile:
978-1591846352,The Obstacle Is the Way,Ryan
Holiday,2014,Portfolio,English,london
It should appear in the inventory:
The content of the object should be the following:
{
  "value": {
    "storeLocation": "london",
    "year": "2014",
    "author": "Ryan Holiday",
    "isbn": "978-1591846352",
    "name": "The Obstacle Is the Way",
    "publisher": "Portfolio",
    "language": "English"
  },
  "key": "978-1591846352"
}Congratulations! You’ve accomplished the bookstore’s project requirements. You’ve created storage buckets for your London and New York inventories, created a Redpanda cluster and topics for connector configurations, and created a Kafka Connect cluster to use Redpanda and stream book data to your inventory buckets.
By using Kafka Connect and Redpanda, you can help a variety of businesses to better manage and store their vital data. This improves your workflow as well as business operations.
Remember, you can find the code for this tutorial in this GitHub repository. Join Redpanda's Slack community to share what you build with Redpanda.
Subscribe to our VIP (very important panda) mailing list to pounce on the latest blogs, surprise announcements, and community events!
Opt out anytime.