.png)

BYOC: Secure by design, proper controls by default
NOTE: Redpanda Connect now has a Snowflake connector with 2X higher throughput than Kafka Connect. Updated tutorial coming soon! In the meantime, check out our new Snowflake connector.
We are in the era of cloud computing. While scalability, high availability, and other nonfunctional requirements can be obtained successfully in the cloud, the operational burden might still be a problem. Using your own middleware or your own relational database in the cloud might require heavy operational efforts that consume a lot of energy and introduce errors into the process.
As a software-as-a-service (SaaS) data warehouse, Snowflake provides solutions to data processing and analytics that are faster, easier to use, and more flexible than traditional offerings, and it integrates well with Apache Kafka®.
You can ingest data into Snowflake in multiple ways. For instance, you could use Kafka to create a data pipeline for user-behavior data from a platform and run analytics on a Snowflake database in real time. Or you could capture data changes from a platform, produce them through Kafka, and save them as time-stamped archive data.
In both examples, you would need a fast, reliable data-streaming platform and a flexible, easy-to-manage platform for data storage and analytics.
Redpanda is a Kafka-compatible streaming data platform that is dramatically simpler to use, with 10x faster (and stable) average latencies, and is safe by default. So when building data pipelines for mission critical workloads, particularly when you’re moving towards real-time data processing, pairing Redpanda with Snowflake is advantageous for these types of use cases.
In this tutorial, you will learn how to do the following:
You can follow along with the tutorial using this repository.
You’ll need the following for this tutorial:
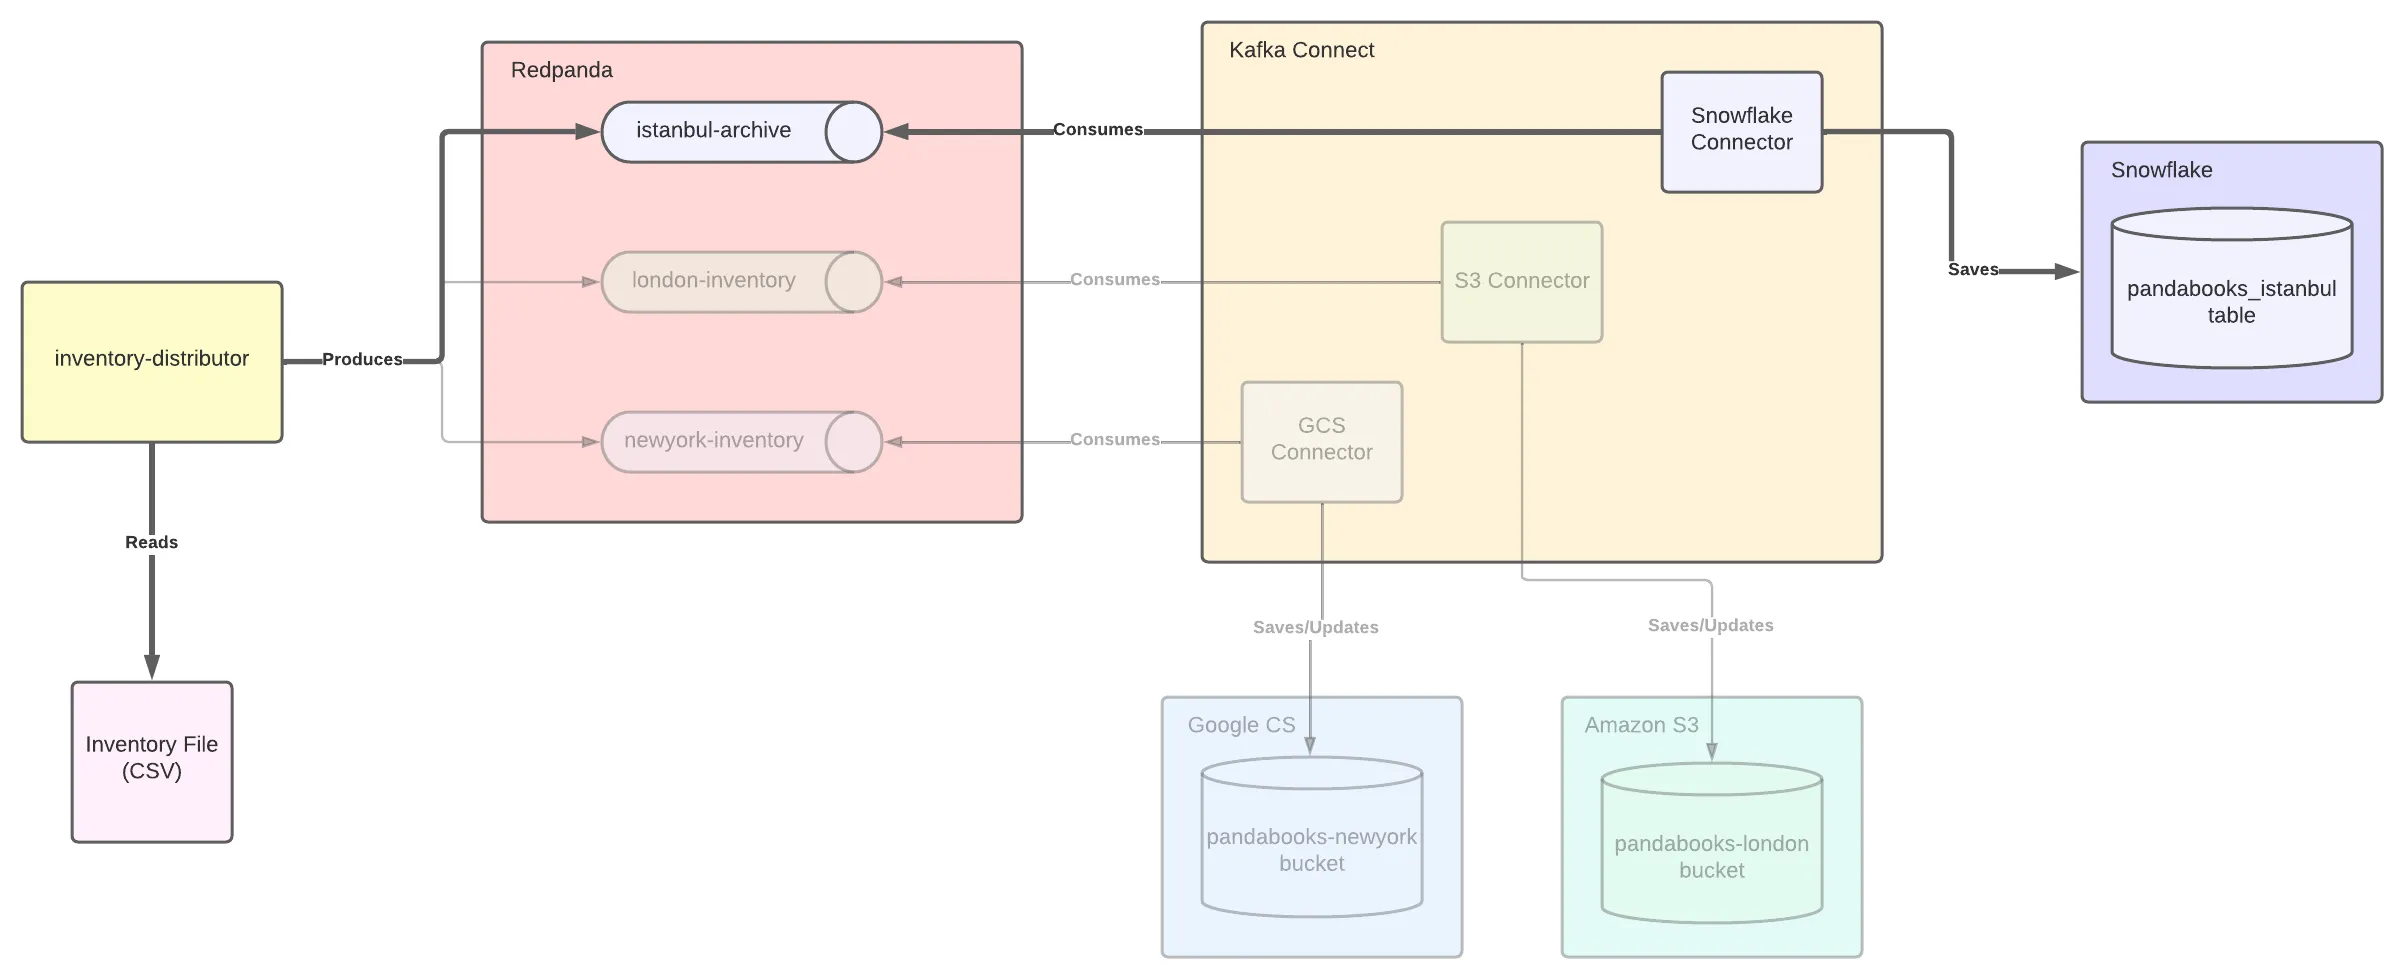
PandaBooks LLC is a fictional bookstore that has two main branches worldwide, London and New York. In my previous Kafka Connect tutorial, you created an inventory-feeding mechanism for each branch.
Now you need to archive changes in the main inventory file, which is in CSV format. While the inventory-distributor mechanism sends the data to two different branch inventories, it must also send any data change to the archive. The company wants to keep the archive in Istanbul and use Snowflake as the archive database.
The following image is a high-level diagram of PandaBooks LLC, including the new requirements highlighted:
If you have already gone through the previous tutorial, you can skip some steps, such as setting up Redpanda or creating a Kafka Connect cluster. If this is your first time in this series, you must follow all the steps.
On a Linux environment, run the following commands to install Redpanda as a system service:
Run the setup script to download and install the repo
curl -1sLf 'https://packages.vectorized.io/nzc4ZYQK3WRGd9sy/redpanda/cfg/setup/bash.rpm.sh' | sudo -E bash && \
Use yum to install redpanda
sudo yum install redpanda -y
Run the setup script to download and install the repo
curl -1sLf 'https://packages.vectorized.io/nzc4ZYQK3WRGd9sy/redpanda/cfg/setup/bash.deb.sh' | sudo -E bash && \
Use apt to install redpanda
sudo apt install redpanda -y
Start the Redpanda cluster with the following command:
sudo systemctl start redpanda
You can verify if Redpanda is up and running:
sudo systemctl status redpanda
The output should look like the following:
redpanda.service - Redpanda, the fastest queue in the West.
     Loaded: loaded (/usr/lib/systemd/system/redpanda.service; enabled; vendor preset: enabled)
     Active: active (running) since Thu 2022-02-10 15:56:39 +03; 2 days ago
...output omitted...
In this tutorial, you’ll create a single-node Redpanda cluster that is not suitable for a production environment.
To enable the inventory-distributor application and the Kafka Connect cluster to work properly, you must define the Kafka topic for the Istanbul archive. You can use Redpanda Keeper (rpk), Redpanda’s command-line interface (CLI) to create topics on the Redpanda cluster.
You can access the CLI by running the rpk command. (View the rpk documentation for more available commands.)
Run the following command to create a topic for the Istanbul archive:
rpk topic create istanbul-archive
Verify that you have the topics created:
rpk cluster info
This should return the following output:
BROKERS
=======
ID    HOST         PORT
1*    localhost  9092

TOPICS
======
NAME               PARTITIONS  REPLICAS
istanbul-archive   1           1
Notice that you do not specify a partition count or replication factor for the topics. For a production environment, you would need to create topics with suitable configuration for the cluster structure and the designed architecture.
In your browser, log in to your Snowflake account and click Organization on the left menu to get your generated organization name and account name.
In your terminal window, log in to your Snowflake account by using SnowSQL.
snowsql -a YOUR_ORGANIZATION-YOUR_ACCOUNT_NAME -u YOUR_USER_NAME
After entering your prompted password, you ought to see this output:
* SnowSQL * v1.2.21
Type SQL statements or !help
YOUR_USER_NAME#COMPUTE_WH@(no database).(no schema)>
Create a database called inventory_archive in the public schema:
YOUR_USER_NAME#COMPUTE_WH@(no database).(no schema)>CREATE DATABASE INVENTORY_ARCHIVE;
+----------------------------------------+
| status                                 |
|----------------------------------------|
| Database INVENTORY_ARCHIVE successfully created. |
+----------------------------------------+
1 Row(s) produced. Time Elapsed: 0.385s
Create a table called pandabooks_istanbul in the inventory_archive database.
The table must have record_metadata and record_content with the type variantbecause it is the compatible format with the JSON type of the Snowflake connector.
YOUR_USER_NAME#COMPUTE_WH@ARCHIVE.PUBLIC>CREATE TABLE PANDABOOKS_ISTANBUL (RECORD_METADATA VARIANT, RECORD_CONTENT VARIANT);
+-------------------------------------------------+
| status                                          |
|-------------------------------------------------|
| Table PANDABOOKS_ISTANBUL successfully created. |
+-------------------------------------------------+
1 Row(s) produced. Time Elapsed: 0.943sThe Snowflake Kafka connector uses key pair authentication, so you must define a private and public key pair and configure them for your user. Optionally, you can use another user with different privileges.
For more information, refer to the documentation on configuring the Kafka connector.
In your terminal, run the following command to create a private key:
openssl genrsa 2048 | openssl pkcs8 -topk8 -v2 aes256 -inform PEM -out rsa_key.p8
Enter 1234567 for the passphrase when it is prompted.
In the same directory, create a public key with the following command:
openssl rsa -in rsa_key.p8 -pubout -out rsa_key.pub
Print the public key in the single line format:
cat rsa_key.pub | awk '{print}' ORS=''
-----BEGIN PUBLIC KEY-----MIIBIjANBgkqhkiG9w0BAQEFAAOCAQ8AMIIBCgKCAQEA6aquC6si...
Copy the public key without the header and footer that begins and ends with -----, and set it as the public key of your Snowflake user. To do this, open your SnowSQL session and run the following command to alter your user:
YOUR_USER_NAME#COMPUTE_WH@ARCHIVE.PUBLIC>ALTER USER YOUR_USER_NAME SET rsa_public_key='YOUR_SNOWFLAKE_PUBLIC_KEY';
You can describe your user to validate that it has the updated key.
YOUR_USER_NAME#COMPUTE_WH@ARCHIVE.PUBLIC>DESC USER YOUR_USER_NAME;
You’ll need your private key while setting up the Snowflake connector.
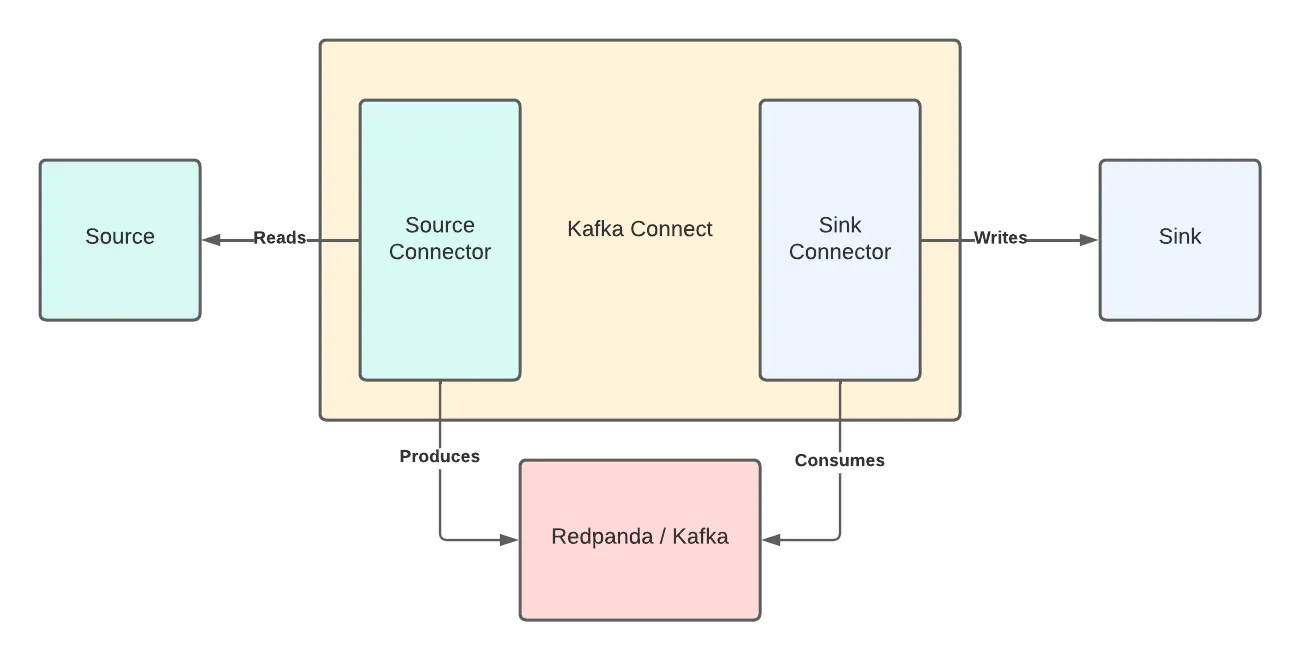
Kafka Connect is an integration tool released with the Apache Kafka project. It provides reliable data streaming between Apache Kafka and external systems. It is both scalable and flexible, and you can use it to integrate with any system, including databases, search indexes, and cloud storage providers.
Redpanda is fully compatible with the Kafka API. This means that Redpanda gives you seamless integration with the Kafka ecosystem so your existing investments work right out of the box.
Kafka Connect uses source and sink connectors for integration. Source connectors stream data from an external system to Kafka. Sink connectors stream data from Kafka to an external system.
To get Kafka Connect, you must download the Apache Kafka package. Navigate to the Apache downloads page for Kafka, and click the suggested download link for the Kafka 3.1.0 binary package.
Create a folder called pandabooks_integration in your home directory, and extract the Kafka binaries file in this directory. You can use the following commands by changing the paths if necessary.
mkdir pandabooks_integration && \
mv ~/Downloads/kafka_2.13-3.1.0.tgz pandabooks_integration && \
cd pandabooks_integration && \
tar xzvf kafka_2.13-3.1.0.tgzTo run a Kafka Connect cluster, set up a configuration file in the properties format.
In the pandabooks_integration folder, create a folder called configuration. Create a file in this directory called connect.properties, and add the following content:
#Kafka broker addresses
bootstrap.servers=

#Cluster level converters
#These apply when the connectors don't define any converter
key.converter=org.apache.kafka.connect.json.JsonConverter
value.converter=org.apache.kafka.connect.json.JsonConverter

#JSON schemas enabled to false in cluster level
key.converter.schemas.enable=true
value.converter.schemas.enable=true

#Where to keep the Connect topic offset configurations
offset.storage.file.filename=/tmp/connect.offsets
offset.flush.interval.ms=10000

#Plugin path to put the connector binaries
plugin.path=
Set the bootstrap.servers value to localhost:9092. This configures the Connect cluster to use the Redpanda cluster.
Configure the plugin.path, which you’ll use to put the connector binaries. Create a folder called plugins in the pandabooks_integration directory. In the plugins directory, create a folder called snowflake. You’ll add the connector binaries in the plugins/snowflake directory.
Download the binaries by running the following command set:
curl -o snowflake-kafka-connector-1.7.1.jar https://repo1.maven.org/maven2/com/snowflake/snowflake-kafka-connector/1.7.1/snowflake-kafka-connector-1.7.1.jar && \
curl -o bc-fips-1.0.2.3.jar https://repo1.maven.org/maven2/org/bouncycastle/bc-fips/1.0.2.3/bc-fips-1.0.2.3.jar && \
curl -o bcpkix-fips-1.0.5.jar https://repo1.maven.org/maven2/org/bouncycastle/bcpkix-fips/1.0.5/bcpkix-fips-1.0.5.jar
Copy the binaries into the plugins directory:
cp snowflake-kafka-connector-1.7.1.jar ~/pandabooks_integration/plugins/snowflake && \
cp bc-fips-1.0.2.3.jar ~/pandabooks_integration/plugins/snowflake && \
cp bcpkix-fips-1.0.5.jar ~/pandabooks_integration/plugins/snowflake
The final folder structure for pandabooks_integration will be as follows:
pandabooks_integration
├── configuration
│   ├── connect.properties
├── plugins
│   ├── snowflake
│   │   ├── snowflake-kafka-connector-1.7.1.jar
│   │   ├── bcpkix-fips-1.0.5.jar
│   │   └── bc-fips-1.0.2.3.jar
└── kafka_2.13-3.1.0
Change the plugin.path value to /home/YOUR_USER_NAME/pandabooks_integration/plugins. This configures the Connect cluster to use the Redpanda cluster.
The final connect.properties file will be as follows:
#Kafka broker addresses
bootstrap.servers=localhost:9092

#Cluster level converters
#These apply when the connectors don't define any converter
key.converter=org.apache.kafka.connect.json.JsonConverter
value.converter=org.apache.kafka.connect.json.JsonConverter

#JSON schemas enabled to false in cluster level
key.converter.schemas.enable=true
value.converter.schemas.enable=true

#Where to keep the Connect topic offset configurations
offset.storage.file.filename=/tmp/connect.offsets
offset.flush.interval.ms=10000

#Plugin path to put the connector binaries
plugin.path=/home/YOUR_USER_NAME/pandabooks_integration/pluginsSetting up the connector plugins in a Kafka Connect cluster for achieving integration with external systems is not enough. The cluster needs connectors configured to execute the integration, so next you’ll configure the sink connectors for Snowflake.
Create a file called snowflake-sink-connector.properties in the ~/pandabooks_integration/configuration directory with the following content:
# Connector name
name=snowflake-sink-connector

# The Java class for the connector
connector.class=

# The key converter for this connector
key.converter=org.apache.kafka.connect.storage.StringConverter

# The value converter for this connector
value.converter=

# Number of tasks
tasks.max=8

# Topic to consume messages from
topics=

# Kafka topic and Snowflake table mapping
snowflake.topic2table.map=

# Number of records buffered in memory per Kafka partition
buffer.count.records=10000

# Number of seconds between buffer flushes
buffer.flush.time=60

# Cumulative size in bytes of records buffered in memory per the Kafka partition
buffer.size.bytes=5000000

# The URL for accessing your Snowflake account
snowflake.url.name=

# User login name for the Snowflake account
snowflake.user.name=

# The private key to authenticate the user
snowflake.private.key=

# If the value of this parameter is not empty, Kafka uses this phrase to try to decrypt the private key
snowflake.private.key.passphrase=1234567

# The name of the database that contains the table to insert rows into
snowflake.database.name=

# The name of the schema that contains the table to insert rows into
snowflake.schema.name=public
Some of the values are already set, but some are left blank. Set the following values for the keys in the snowflake-sink-connector.properties file:
KeyValueconnector.classcom.snowflake.kafka.connector.SnowflakeSinkConnectorvalue.convertercom.snowflake.kafka.connector.records.SnowflakeJsonConvertertopicsistanbul-archivesnowflake.topic2table.mapistanbul-archive:pandabooks_istanbulsnowflake.url.name_YOURORGANIZATION-_YOUR_ACCOUNTNAME.snowflakecomputing.com:443snowflake.user.name_YOUR_SNOWFLAKEUSERsnowflake.private.key_YOUR_SNOWFLAKE_PRIVATEKEYsnowflake.database.nameinventory_archive
To get _YOUR_SNOWFLAKE_PRIVATEKEY, navigate to the directory of your private key and print out your private key in the single line format. You must set it in the propertiesfile as a value for snowflake.private.key.
cat rsa_key.p8 | awk '{print}' ORS=''
-----BEGIN ENCRYPTED PRIVATE KEY-----MIIFHzBJBgkqhkiG9w0BBQ0wPDAbBgkqhkiG9...To run the cluster with the configurations that you applied, open a new terminal window and navigate to the ~/pandabooks_integration/configuration directory.
Run the following command in the directory:
../kafka_2.13-3.1.0/bin/connect-standalone.sh connect.properties snowflake-sink-connector.propertiesThe output should look like the following:
...output omitted...
[2022-03-03 00:08:33,127] INFO [snowflake-sink-connector|task-0] Created new JWT (net.snowflake.ingest.connection.SecurityManager:178)
[2022-03-03 00:08:33,128] INFO [snowflake-sink-connector|task-0] Creating a RequestBuilder with arguments : Account : YOUR_ORGANIZATION-YOUR_ACCOUNT_NAME, User : YOUR_USER_NAME, Scheme : https, Host : YOUR_ORGANIZATION-YOUR_ACCOUNT_NAME.snowflakecomputing.com, Port : 443, userAgentSuffix: SFKafkaConnector/1.7.1 provider/UNKNOWN (net.snowflake.ingest.connection.RequestBuilder:216)
[2022-03-03 00:08:33,128] INFO [snowflake-sink-connector|task-0]
[SF_KAFKA_CONNECTOR] initialized the pipe connector for pipe archive.public.SNOWFLAKE_KAFKA_CONNECTOR_snowflake_sink_connector_225951378_PIPE_pandabooks_istanbul_0 (com.snowflake.kafka.connector.internal.SnowflakeIngestionServiceV1:63)
[2022-03-03 00:08:33,128] INFO [snowflake-sink-connector|task-0]
[SF_KAFKA_CONNECTOR] Registered 14 metrics for pipeName:SNOWFLAKE_KAFKA_CONNECTOR_snowflake_sink_connector_225951378_PIPE_pandabooks_istanbul_0 (com.snowflake.kafka.connector.internal.SnowflakeSinkServiceV1:485)
...output omitted...
Note that you’re running the Kafka Connect cluster in standalone mode. Kafka Connect also has a distributed mode that accepts connector configurations via its REST API. The standalone mode fits the proposed architecture better because you are working on a lightweight integration scenario.
For more information about distributed mode, check the running Kafka Connect section of the Kafka documentation.
Download the inventory-distributor application binary by clicking this link in the ~/pandabooks_integration directory.
Download the main inventory file book-inventory.csv in the ~/pandabooks_integration directory with the following command:
curl -o book-inventory.csv https://raw.githubusercontent.com/systemcraftsman/redpanda-kafka-connect-snowflake-demo/main/resources/data/book-inventory.csv
Check the book-inventory.cs file. It has five book records to be sent to the london and newyork inventories. The inventory-distributor application distributes book data to these inventories and sends any change on these records to the Istanbul archive.
Run the application with the following command in a new terminal window and keep it running:
java -jar -Dpath=. inventory-distributor-1.2.1-SNAPSHOT-runner.jar
You should see the following output:
...output omitted...
2022-03-03 00:31:39,482 INFO  [io.quarkus] (main) Installed features: [camel-bean, camel-bindy, camel-core, camel-direct, camel-file, camel-jackson, camel-kafka, cdi, kafka-client]
2022-03-03 00:31:40,584 INFO  [route1] (Camel (camel-1) thread #10 - Split) Message sent: {"isbn":"978-0134494166","name":"Clean Architecture","author":"Robert C. Martin","year":"2017",
...output omitted...
2022-03-03 00:31:40,585 INFO  [route2] (Camel (camel-1) thread #15 - WireTap) Message sent to archive: {"isbn":"978-0201616224","name":"The Pragmatic Programmer: From Journeyman to Master","author":"Andrew Hunt & David Thomas","year":"1999","publisher":"Addison-Wesley Professional","language":"English","storeLocation":"london"}
2022-03-03 00:31:40,585 INFO  [route1] (Camel (camel-1) thread #4 - Split) Message sent: {"isbn":"978-0553213690","name":"The Metamorphosis","author":"Franz Kafka","year":"2009","publisher":"Classix Press","language":"German","storeLocation":"newyork"}
2022-03-03 00:31:40,584 INFO  [route2] (Camel (camel-1) thread #12 - WireTap) Message sent to archive: {"isbn":"978-0134494166","name":"Clean Architecture","author":"Robert C. Martin","year":"2017","publisher":"Pearson","language":"English","storeLocation":"newyork"}
...output omitted...
The inventory-distributor application scans the changes in the book-inventory.csv file continuously and sends them to the relevant Kafka topic. The Snowflake Sink Kafka Connect connector consumes the book data from the istanbul-archive topic and saves it to Snowflake for archiving.
In your Snowflake session, run a select query to check if the content is saved in the Snowflake database. Sending the data to Snowflake might take some time because of the connector configuration, so you might need to run the query a few times until you see the listed data.
YOUR_USER_NAME#COMPUTE_WH@INVENTORY_ARCHIVE.PUBLIC>SELECT * FROM PANDABOOKS_ISTANBUL;
+----------------------------------------+------------------------------------------------------------------------------------+
| RECORD_METADATA                        | RECORD_CONTENT                                                                     |
|----------------------------------------+------------------------------------------------------------------------------------|
| {                                      | {                                                                                  |
|   "CreateTime": 1646342490231,         |   "author": "Franz Kafka",                                                         |
|   "headers": {                         |   "isbn": "978-0553213690",                                                        |
|     "Content-Type": "application/json" |   "language": "German",                                                            |
|   },                                   |   "name": "The Metamorphosis",                                                     |
|   "key": "978-0553213690",             |   "publisher": "Classix Press",                                                    |
|   "offset": 0,                         |   "storeLocation": "newyork",                                                      |
|   "partition": 0,                      |   "year": "2009"                                                                   |
|   "topic": "istanbul-archive"          | }                                                                                  |
| }                                      |                                                                                    |
| {                                      | {                                                                                  |
|   "CreateTime": 1646342490231,         |   "author": "Gwen Shapira & Todd Palino & Rajini Sivaram & Krit Petty",            |
|   "headers": {                         |   "isbn": "978-1492043089",                                                        |
|     "Content-Type": "application/json" |   "language": "English",                                                           |
|   },                                   |   "name": "Kafka: The Definitive Guide",                                           |
|   "key": "978-1492043089",             |   "publisher": "O'Reilly Media",                                                   |
|   "offset": 1,                         |   "storeLocation": "london",                                                       |
|   "partition": 0,                      |   "year": "2021"                                                                   |
|   "topic": "istanbul-archive"          | }                                                                                  |
| }                                      |                                                                                    |
...output omitted...
When you examine the contents of the book-inventory.csv file, you realize that part of the book data is wrong. The book The Metamorphosis is in English, but the providers set it as German:
978-0553213690,The Metamorphosis,Franz Kafka,2009,Classix Press,German,newyork
978-0553213690,The Metamorphosis,Franz Kafka,2009,Classix Press,German,newyork
Fix this record by replacing the German field with English, and save the file. Be sure that the inventory-distributor application is still running.
Query the Snowflake table again to see if the change is archived:
YOUR_USER_NAME#COMPUTE_WH@INVENTORY_ARCHIVE.PUBLIC>SELECT * FROM PANDABOOKS_ISTANBUL;
+----------------------------------------+------------------------------------------------------------------------------------+
| RECORD_METADATA                        | RECORD_CONTENT                                                                     |
|----------------------------------------+------------------------------------------------------------------------------------|
| {                                      | {                                                                                  |
|   "CreateTime": 1646342490231,         |   "author": "Franz Kafka",                                                         |
|   "headers": {                         |   "isbn": "978-0553213690",                                                        |
|     "Content-Type": "application/json" |   "language": "German",                                                            |
|   },                                   |   "name": "The Metamorphosis",                                                     |
|   "key": "978-0553213690",             |   "publisher": "Classix Press",                                                    |
|   "offset": 0,                         |   "storeLocation": "newyork",                                                      |
|   "partition": 0,                      |   "year": "2009"                                                                   |
|   "topic": "istanbul-archive"          | }                                                                                  |
| }                                      |                                                                                    |
...output omitted...
| {                                      | {                                                                                  |
|   "CreateTime": 1646343131638,         |   "author": "Franz Kafka",                                                         |
|   "headers": {                         |   "isbn": "978-0553213690",                                                        |
|     "Content-Type": "application/json" |   "language": "English",                                                           |
|   },                                   |   "name": "The Metamorphosis",                                                     |
|   "key": "978-0553213690",             |   "publisher": "Classix Press",                                                    |
|   "offset": 13,                        |   "storeLocation": "newyork",                                                      |
|   "partition": 0,                      |   "year": "2009"                                                                   |
|   "topic": "istanbul-archive"          | }                                                                                  |
| }                                      |                                                                                    |
...output omitted...
Notice that both records belong to the same book data from the inventory, but the second corrected record has a bigger CreateTime.
Finally, add a new book record in the book-inventory.csv file for the London inventory. Add the following line in the book-inventory.csv file:
978-1591846352,The Obstacle Is the Way,Ryan Holiday,2014,Portfolio,English,london
978-1591846352,The Obstacle Is the Way,Ryan Holiday,2014,Portfolio,English,london
You should see the following output:
YOUR_USER_NAME#COMPUTE_WH@INVENTORY_ARCHIVE.PUBLIC>SELECT * FROM PANDABOOKS_ISTANBUL;
+----------------------------------------+------------------------------------------------------------------------------------+
| RECORD_METADATA                        | RECORD_CONTENT                                                                     |
|----------------------------------------+------------------------------------------------------------------------------------|
...output omitted...
| {                                      | {                                                                                  |
|   "CreateTime": 1646343572312,         |   "author": "Ryan Holiday",                                                        |
|   "headers": {                         |   "isbn": "978-1591846352",                                                        |
|     "Content-Type": "application/json" |   "language": "English",                                                           |
|   },                                   |   "name": "The Obstacle Is the Way",                                               |
|   "key": "978-1591846352",             |   "publisher": "Portfolio",                                                        |
|   "offset": 19,                        |   "storeLocation": "london",                                                       |
|   "partition": 0,                      |   "year": "2014"                                                                   |
|   "topic": "istanbul-archive"          | }                                                                                  |
| }                                      |                                                                                    |
...output omitted...
Congratulations! You have successfully set up an archival mechanism for the bookstore.
In this tutorial, you created a Snowflake database and a table for keeping the bookstore’s inventory archive. You created a Redpanda cluster and a topic for the archive to use in your connector configurations. You also created and configured a Kafka Connect cluster to use Redpanda and configured a connector to stream book data to the Istanbul archive.
By using Kafka Connect, you can integrate Redpanda with Snowflake, which helps reduce the cost of operations and the operational burden while providing scaling with all the benefits of cloud. This can help a variety of businesses to better operate, store, and analyze their vital data.
You can find the entire code for this tutorial in this repository. You can also join Redpanda’s Slack community, and contribute to Redpanda’s GitHub.
Subscribe and never miss another blog post, announcement, or community event. We hate spam and will never sell your contact information.