Build a real-time lakehouse architecture with Redpanda and Databricks
One architecture for real-time and analytics workloads. Easy to access, governed, and immediately queryable
Learn how to build a simple streaming ETL pipeline for clickstream processing using Apache Flink and Redpanda.
Apache Flink® is an open-source, distributed stream processing framework designed to process large-scale datasets in streaming or batch mode. With built-in fault tolerance mechanisms, Flink ensures the reliability and continuity of data processing even in the case of failures, making it ideal for mission-critical workloads.
Redpanda is a streaming data platform designed for low-latency, high-throughput data processing while providing fault tolerance and data durability, ensuring that data is not lost in the case of failures.
Flink and Redpanda go hand in hand when building operational and analytical use cases at scale, including event-driven applications, real-time analytics, and streaming ETL pipelines. In a typical streaming data pipeline, Redpanda acts as both the source and sink while Flink does stateless or stateful processing on streams coming in and out of Redpanda.
In this tutorial, we'll build a simple streaming ETL pipeline from scratch, while teaching you the essentials of both technologies. This is the first installment of the article series that features several use cases you can build using Redpanda and Flink.
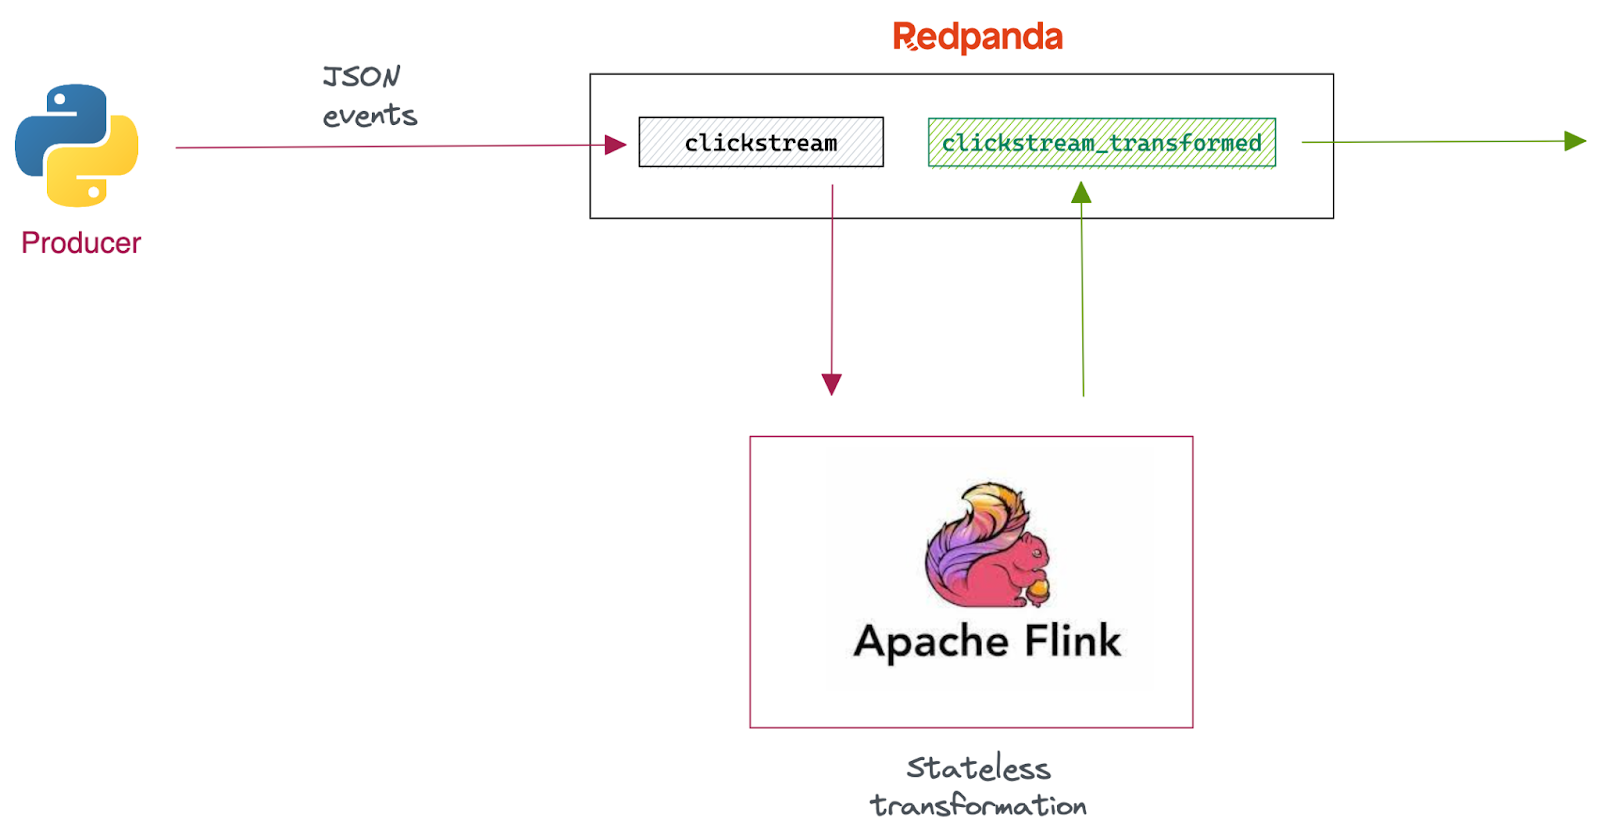
In short, we’re going to build a simple stateless streaming ETL pipeline for clickstream processing.

First, we'll use a Python producer to hydrate the source Redpanda topic with clickstream events. The events in the stream are JSON-formatted and have the following format:
{
   "id":1,
   "event_type":"add_to_cart",
   "ts":"2022-03-31 05:13:01"
}
Next, we'll write a Flink pipeline with Flink SQL to ingest these events, transform each event’s event_type field value to uppercase and write the resulting stream back to another Redpanda topic.
The events in the destination topic will look like this:
{
   "id":1,
   "event_type":"ADD_TO_CART",
   "ts":"2022-03-31 05:13:01"
}
Finally, we'll deploy the pipeline to the Flink cluster and let it run continuously.
Now that we understand the use case, let’s set up a Redpanda and a Flink cluster locally.
We'll use Docker to spin up both Redpanda and Flink clusters and make the setup simple and portable. For this, make sure you install Docker on your local machine first.
This tutorial has its own GitHub repository with everything you need to run the development environment.
Clone it to your local machine by running:
git clone https://github.com/redpanda-data/2023-stream-processing-apache-flink-redpanda
cd 2023-stream-processing-apache-flink-redpandaIn a production environment, Flink and Redpanda will be deployed on dedicated runtimes. But for the scope of this tutorial, we'll use a containerized version of both clusters to make things simpler.
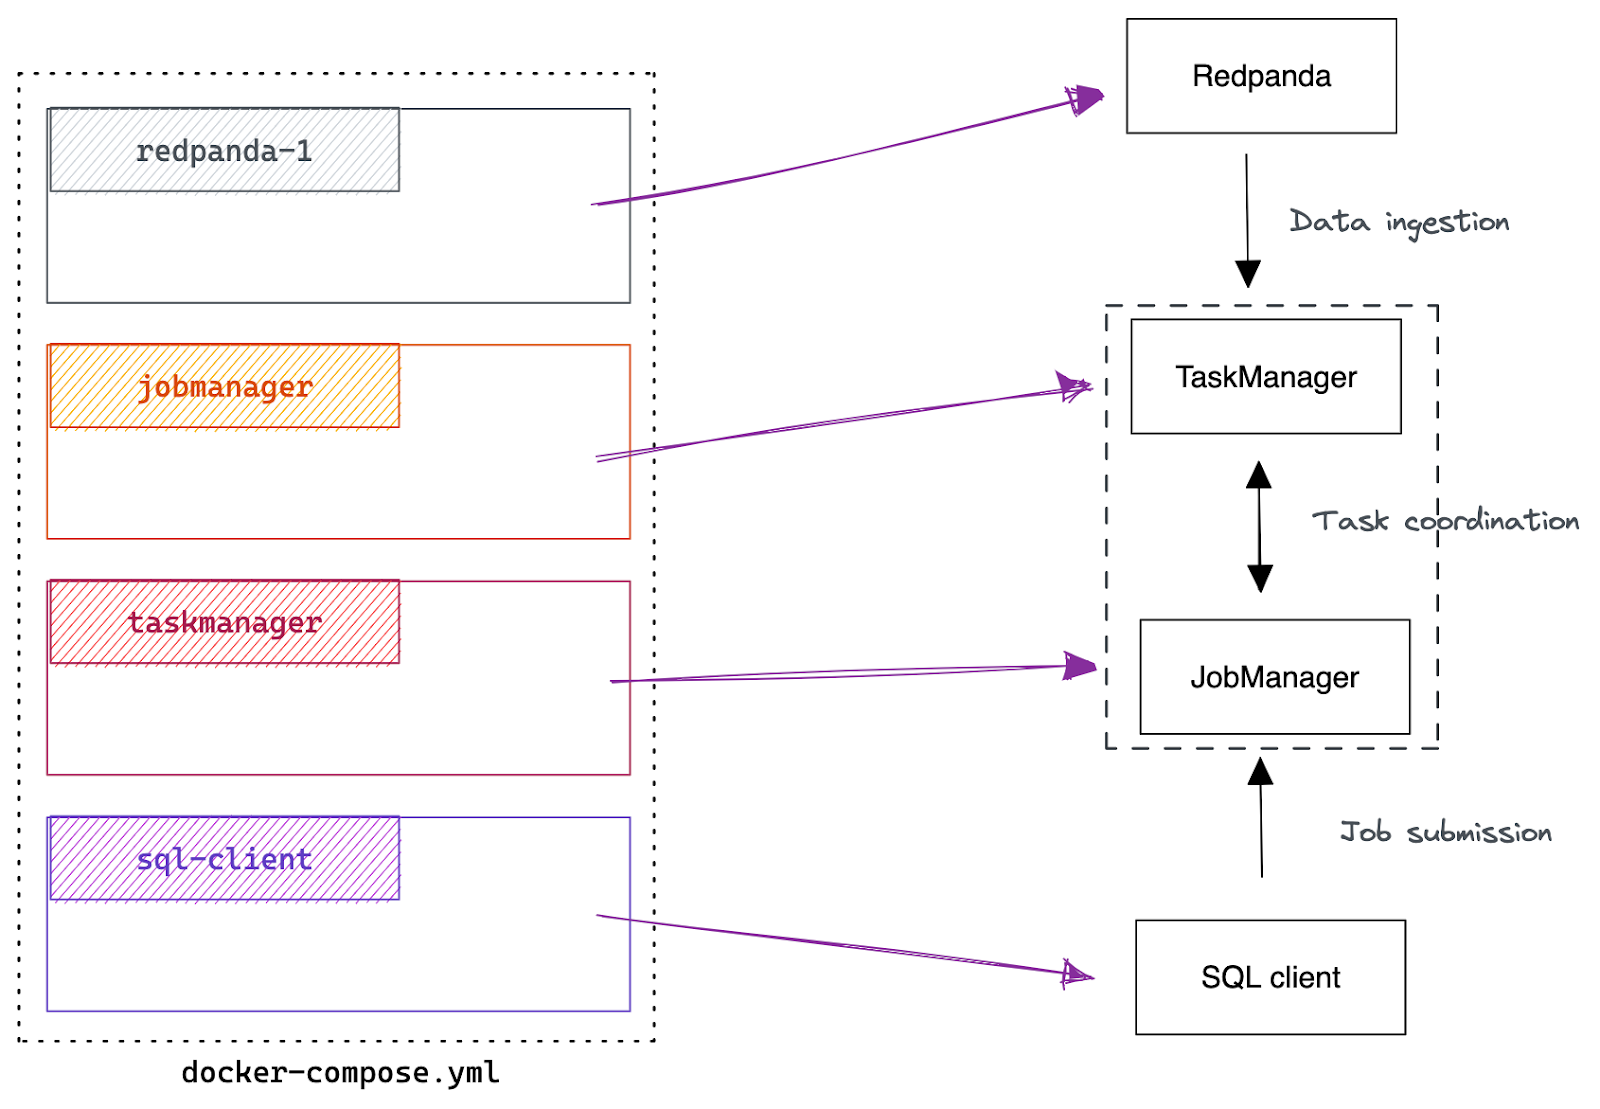
Once you have cloned the repository; you'll find the docker-compose.yml file at the root level. That contains all the dependencies needed to run the development environment, including a single-node Redpanda cluster, Flink Job Manager, Flink Task Manager, and a SQL client that submits jobs to the Flink cluster.
The following figure illustrates how each Docker container in the YAML file maps to the components.

The primary motivation for this tutorial is to integrate Flink with Redpanda so that it can read from and write data to Redpanda topics. Flink achieves this type of integration with Connectors.
A Flink connector is a component that provides an interface for reading and writing data from and to external systems, such as databases and messaging systems. They’re used to source and sink data into Flink pipelines, allowing Flink to process the data in real-time or batch mode.
Flink provides an Apache Kafka® connector for reading data from and writing data to Kafka topics with exactly-once guarantees. Since Redpanda has a Kafka-compatible API, you can use the Flink Kafka Connector to integrate with Redpanda.
Flink distribution doesn’t ship with any connectors. So, you need to install the Kafka connector in both the Flink cluster and the client machines.
The simplest way to do that is by creating a custom Dockerfile, which we have done in this tutorial. The Dockerfile at the project's root has instructions to download the connectors and formats from the Maven Flink repository.
FROM flink:1.16.0-scala_2.12-java11

# Download the connector libraries
RUN wget -P /opt/sql-client/lib/ ${FLINK_REPO}/flink-sql-connector-kafka/1.16.0/flink-sql-connector-kafka-1.16.0.jar; \
    wget -P /opt/sql-client/lib/ ${FLINK_REPO}/flink-json/1.16.0/flink-json-1.16.0.jar;
If you looked closely at the docker-compose.yaml file we shared earlier, you'll notice that the Flink-related components reference this Dockerfile:That means you must build the Docker project before running it. That will download the Kafka connector artifacts and save them to the /opt/sql-client/lib/ directory of all generated images.
  sql-client:
    build:
      context: .
      dockerfile: Dockerfile
Kick off the build by running the following:
docker-compose build --no-cache
Once the Docker image has been created, you can verify that the Kafka JAR is located in the image by running:
docker-compose run -- sql-client ls /opt/sql-client/lib
You’ll then see the following output:
flink-json-1.16.0.jar flink-sql-connector-kafka-1.16.0.jar
We'll use a Python-based producer client (producer.py) for publishing mock clickstream data to Redpanda. For that, you’ll need Python 3.x installed on your machine, along with the kafka-python package.
Once you have Python installed, install kafka-python by running:
pip install kafka-python
Although this will speed up the process, this step is optional as you can always use rpk for data publishing.
Now that we have completed setting up the environment, let’s verify everything works. Start the setup by running the following:
CLUSTER
=======
redpanda.b0d514c4-3028-42c2-b0f6-a2163247e283

BROKERS
=======
ID    HOST        PORT
1*    redpanda-1  29092
That will start both Redpanda and Flink clusters as Docker containers.
You can verify whether the Redpanda cluster is operational by running the following:
docker exec -ti redpanda-1 rpk cluster info
That will produce an output like this:
CLUSTER
=======
redpanda.b0d514c4-3028-42c2-b0f6-a2163247e283

BROKERS
=======
ID    HOST        PORT
1*    redpanda-1  29092
We'll be using the rpk command more frequently. So, let’s add an alias for the above command for convenience.
alias rpk="docker exec -ti redpanda-1 rpk"
Then, running rpk cluster info will produce the same output as the above.
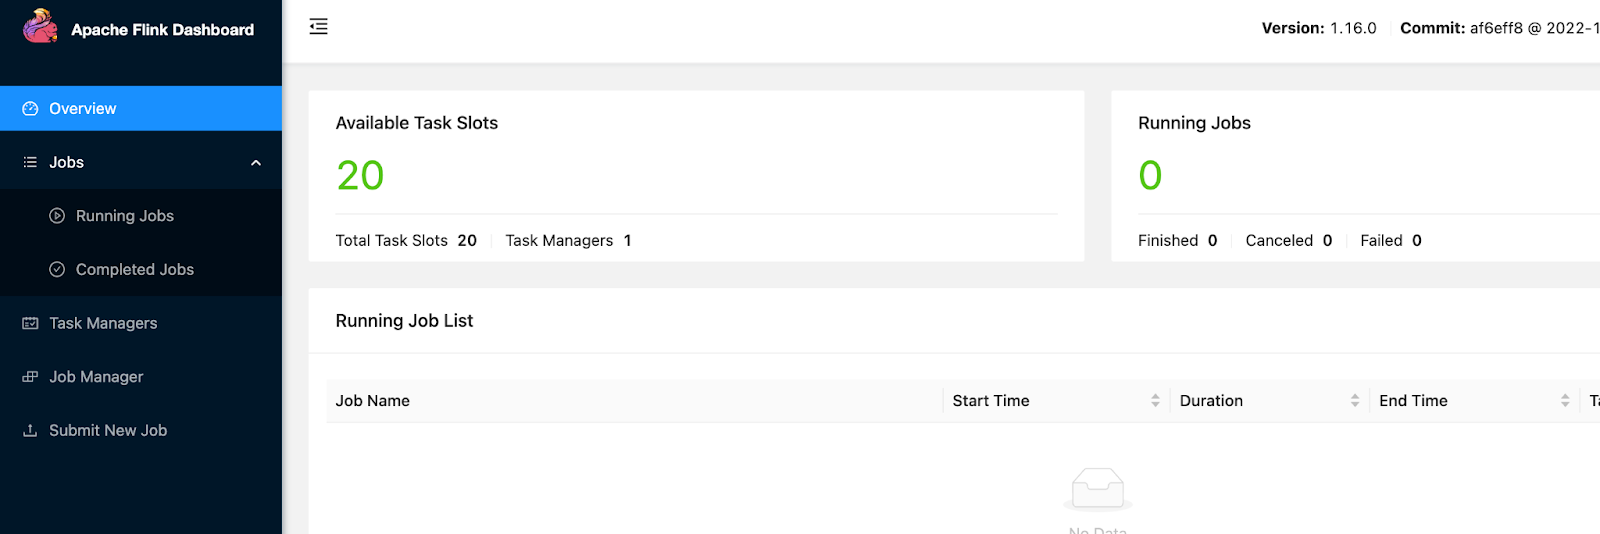
Next; you can verify the Flink installation by accessing its web UI at http://localhost:8081. If you get a screen like the one below, that indicates that the Flink cluster is operational.

Finally, let’s verify whether the SQL client can connect to the Job Manager and submit jobs. We can do that by creating a simple Flink pipeline.
While Flink offers several levels of API abstractions for programming stream processing applications, we'll use Flink SQL to write this pipeline as we can enjoy the benefits of its declarative nature.
First, run the following command to initiate a Flink SQL client.
docker-compose run sql-client
That will bring up a shell with a giant squirrel and a prompt for entering SQL statements:

Copy and paste the following query to the prompt and press “Enter” to execute it.
SET 'sql-client.execution.result-mode' = 'tableau';
SET 'execution.runtime-mode' = 'batch';

SELECT
  name,
  COUNT(*) AS cnt
FROM
  (VALUES ('Bob'), ('Alice'), ('Greg'), ('Bob')) AS NameTable(name)
GROUP BY name;
The SQL client will retrieve the results from the cluster and visualize them as follows:
+-------+-----+
|  name | cnt |
+-------+-----+
| Alice |   1 |
|   Bob |   2 |
|  Greg |   1 |
+-------+-----+
You can close the result view by pressing the Q key. That indicates that the SQL client can communicate with the Job manager and submit jobs.
If you have made it to this point, congratulations! Now you have a development environment in operational state. Let’s keep going and build the pipeline.
Let’s start by creating source and destination topics in Redpanda.
Run the following command to create two topics in Redpanda; clickstream and clickstream_transformed, that will hold raw JSON events and transformed JSON events respectively.
rpk topic create clickstream clickstream_transformed
You can provide the number of partitions for this topic by passing the -p flag. More partitions mean more parallelism at the Flink level. But, for now, let’s proceed with the default partition count, 1.
Next, hydrate the clickstream topic by running the producer.py script that you can find at the root level of the project.
python producer.py
This script will publish 10 events to the clickstream topic.
Let’s launch a new instance of SQL Client to create the new pipeline. Before that, type QUIT; to exit the client container you created a while ago.
Then run a new instance of SQL client by running:
docker-compose run sql-client
Give this pipeline a name.
SET 'pipeline.name' = 'clickstream-processing';
Next, create the clickstream table to represent the JSON events coming from the clickstream topic. Although we used the same name, A Flink table name can be anything you want.
Copy and paste the following CREATE TABLE statement into the SQL prompt:
CREATE TABLE clickstream (
    id VARCHAR,
    event_type VARCHAR,
    ts TIMESTAMP(3)
) WITH (
    'connector' = 'kafka',
    'topic' = 'clickstream',
    'properties.bootstrap.servers' = 'redpanda-1:29092',
    'properties.group.id' = 'test-group',
    'properties.auto.offset.reset' = 'earliest',
    'format' = 'json'
);
Behind the scenes, that will create a Redpanda consumer that reads data from the clickstream topic.
The WITH clause contains all of the information that Flink needs to connect the Redpanda cluster (including the bootstrap.servers, which in a Docker Compose environment, are accessed using the container names, e.g. redpanda-1). You can also specify the consumer client configurations, including the consumer group (properties.group.id) and offset reset strategy (offset.reset). The last configuration, 'format' = 'json', specifies the data format.
After creating the table, you can execute a SELECT statement to read records from the underlying Redpanda topic. Go ahead and try it!
Once you create the clickstream table, let’s write a SELECT statement to query the table and transform the event_type field’s value to uppercase.
SELECT id,
       Upper(event_type),
       ts
FROM   clickstream;
You’ll get a result like this:

Congratulations! You just built a Flink pipeline that can ingest and transform JSON-formatted events from Redpanda.
Typically, the processed output of a streaming ETL pipeline will be written to an external system, such as a database, file system, or back to the streaming data platform itself. Let’s take this pipeline to next level by writing the above output to the clickstream_transformed topic.
For that, we need to create another table – clickstream_transformed to represent the destination topic. You can do that with a CREATE TABLE AS SELECT (aka CTAS) statement, which creates the new table by transforming the source table. Hit Ctrl^C on your keyboard to exit the previous query, and then copy and paste the following query.
CREATE TABLE clickstream_transformed WITH (
    'connector' = 'kafka',
    'topic' = 'clickstream_transformed',
    'properties.bootstrap.servers' = 'redpanda-1:29092',
    'format' = 'json'
) AS
SELECT
  id,
  UPPER(event_type) as event_type,
  ts
FROM clickstream;
The WITH clause in a CTAS statement configures a Redpanda producer, so any valid producer configurations can be provided using the properties.<PRODUCER_CONFIG_NAME> = <PRODUCER_CONFIG_VALUE> format.
The Flink engine executes the query and returns a Job ID.
[INFO] SQL update statement has been successfully submitted to the cluster:
Job ID: 95192912436e97bb403a88a14b3d654b
Meaning, the query will continuously run in the cluster, looking for new events in the input stream (clickstream), and produce the transformed events to the output stream (clickstream_transformed). In the meantime, you can observe the running Flink job (clickstream-processing) by accessing the Flink web UI at http://localhost:8081/#/job/running.

Did the pipeline produce an output in the desired format? Let’s find out by consuming the clickstream_transformed topic with rpk.
Run the following in a new terminal session.
rpk topic consume clickstream_transformed -f '%v\n'
If you look closely, you’ll notice that the values of the event_type have been transformed to contain all uppercase letters.
{"id":"b187b8ea-5bb7-4a1e-90b2-5d3530deb708","event_type":"AD_CLICK","ts":"2023-02-03 19:08:52.396675"}
{"id":"8d063683-4d81-4bf8-aec9-4cde7ea24bcb","event_type":"AD_CLICK","ts":"2023-02-03 19:08:52.400509"}
{"id":"6c8c2af8-bca3-4d97-ab55-833cbe49d339","event_type":"BUTTON_CLICK","ts":"2023-02-03 19:08:52.400595"}
.
.
.Congratulations! You now have a minimal viable streaming ETL pipeline in operation.
Although this pipeline seems straightforward, it lays the foundation for many stateless data massaging use cases commonly found in data engineering, such as redacting passwords, filtering records, renaming fields, etc. Moreover, Flink SQL allowed us to write our transformation logic in a declarative manner, without needing to understand the complexities of Flink underneath. Above all, Redpanda ensured fast delivery of clickstream events without losing them in the middle.
In the rest of this series, we'll explore more advanced Flink operations, including stateful aggregations, window queries, and change data capture (CDC).
To understand the full potential of Redpanda, take it for a test drive here! Check out our documentation to understand the nuts and bolts of how the platform works, or read our blogs to see the plethora of ways to integrate with Redpanda. To chat with our Solution Architects, Core Engineers, and fellow Redpanda users, join our Redpanda Community on Slack.
Chat with our team, ask industry experts, and meet fellow data streaming enthusiasts.


One architecture for real-time and analytics workloads. Easy to access, governed, and immediately queryable

Everything you need to move agentic AI initiatives to production — safely
Subscribe to our VIP (very important panda) mailing list to pounce on the latest blogs, surprise announcements, and community events!
Opt out anytime.