
Building with Redpanda Connect: Bloblang and Claude plugin
A workshop on building and debugging real-world streaming pipelines
Learn how to integrate Apache Pinot with Redpanda using a practical use case scenario.


Today’s businesses process petabytes of data per day, and have been doing so as far back as 2008. Google, for example, processed over 20 petabytes of data per day through an average of one hundred thousand MapReduce jobs distributed across its computing resources. Now, it’s estimated that as of 2025, people will generate 463 exabytes of data each day. Currently, in 2022, over 2.5 quintillion data bytes are created daily.
Data is everywhere and, as the numbers grow, the volume of data causes problems with streaming, processing, storage, and querying for data analysis and data retrieval. Finding an efficient way to manage these tasks with such huge amounts of data is a challenge.
Luckily, the data streaming world has solutions for such problems, thanks to some cool technologies.
Apache PinotⓇ is an open source software from Apache Foundation that is designed to answer online analytical processing queries (OLAP) with low latency. Pinot is fast, supports many indexing technologies, and contains near-real-time ingestion capabilities with many streaming platforms such as Apache KafkaⓇ, Apache PulsarⓇ, and Amazon KinesisⓇ.
With Pinot, you consume data from any of these systems and push it directly into a Pinot real-time database using a process known as stream ingestion. Stream ingestion makes it possible to query data within seconds of publication. This is very important in terms of preserving the “data freshness,” as Pinot offers fast queries on fresh data—that’s what makes it unique from other data warehouses.
Enter Redpanda, a modern and fast streaming platform that is compatible with the Kafka API. It comes as an alternative to Kafka and is faster, more reliable, and simpler—not requiring a ZooKeeperⓇ instance. (This also means that if you have existing code that connects Pinot to Kafka, it should work with Redpanda without change!)
In this article, you’ll learn more about ingesting data into Pinot from Redpanda by completing a tutorial that will walk through the following steps:
rpk CLIrpk CLI and then feed the data into the Pinot tableLet’s get started! To follow along in your own editor, access all the resources for this tutorial in this repository.
To complete this tutorial, you’ll need a recent version of Docker installed on your machine. You can use Podman as an alternative, but this article will make use of Docker commands.
Let’s say that you’ve recently applied for a job at a company called Panda Airlines to work on their data engineering team. They got back to you with an email that requires you to complete the attached assignment before the job interview. Here’s what the assignment says:
We would like you to analyze one of our flight datasets from 2014.
The data is now in a JSON file, so we want you to create a mechanism that streams these records to a Pinot instance where you can analyze and get the data we want.
We want you to use Redpanda, a Kafka API–compatible platform, for streaming the data. Pinot has a built-in integration mechanism for Kafka, so we would like you to integrate it with Redpanda.
The analysis result we would like from you is as follows: Find the number of flights that occurred in January 2014 that have air time of more than 300 minutes and that are from JFK airport to any airport in the state of California.
You can find the JSON data file attached in the email.
Here at Panda Airlines, we use Redpanda and Pinot in a containerized way using Docker, so we recommend that you run them in Docker for this assignment.
In this tutorial, you don’t need to install Redpanda on your system. Redpanda can be run in many ways, including using a container runtime such as Docker.
Before doing so, though, you must set up a few things. First, set up a Docker network to ensure Redpanda cluster accessibility from other containers. This network is necessary for the following steps in the tutorial, so this is important.
Create a Docker network called panda-airlines with the following command:
docker network create panda-airlines
Then create a folder calledpanda_airlines in your home directory. You’ll use this directory as a shared volume for the Redpanda container for future steps.
docker network create panda-airlines
Replace the_YOUR_HOME_DIRECTORY_ with your own home directory in the following command and run it:
docker run -d --pull=always --name=redpanda-1 --rm \
    --network panda-airlines \
    -v _YOUR_HOME_DIRECTORY_/panda_airlines:/tmp/panda_airlines \
    -p 9092:9092 \
    -p 9644:9644 \
    docker.vectorized.io/vectorized/redpanda:latest \
    redpanda start \
    --advertise-kafka-addr redpanda-1 \
    --overprovisioned \
    --smp 1  \
    --memory 2G \
    --reserve-memory 1G \
    --node-id 0 \
    --check=false
The output will look like this:
Trying to pull docker.vectorized.io/vectorized/redpanda:latest...
Getting image source signatures
Copying blob sha256:245fe2b3f0d6b107b818db25affc44bb96daf57d56d7d90568a1f2f10839ec46
...output omitted...
Copying blob sha256:245fe2b3f0d6b107b818db25affc44bb96daf57d56d7d90568a1f2f10839ec46
Copying config sha256:fdaf68707351dda9ede29650f4df501b78b77a501ef4cfb5e2e9a03208f29068
Writing manifest to image destination
Storing signatures
105c7802c5a46fa691687d9f20c8b42cd461ce38d625f285cec7d6678af90a59
The preceding command pulls the latest Redpanda image from thedocker.vectorized.iorepository and runs the container with the exposed ports9092 and 9644. In this tutorial, you will use the9092 port for accessing Redpanda.
Notice also that you have the--advertise-kafka-addr flag value as redpanda-1. This configuration sets the advertised listeners of Redpanda for external accessibility in the network. In this case, it is the Docker networkpanda-airlines.
For more information on how to run Redpanda using Docker, please refer to this documentation.
Validate your Redpanda container by running the following command:
docker ps
The output will look like this:
CONTAINER ID  IMAGE                                            COMMAND               CREATED        STATUS            PORTS                                           NAMES
105c7802c5a4  docker.vectorized.io/vectorized/redpanda:latest  redpanda start --...  3 seconds ago  Up 3 seconds ago  0.0.0.0:9092->9092/tcp, 0.0.0.0:9644->9644/tcp  redpanda-1
Validate the cluster with the following command:
docker exec -it redpanda-1 \
`rpk cluster info`
This returns the following output:
BROKERS
=======
ID    HOST        PORT
0*    redpanda-1  9092
BROKERS
=======
ID HOST PORT
0* redpanda-1 9092
Your Redpanda cluster is now ready to use!
In this tutorial, you will run Pinot as a Docker container as well. Run the following command to run Pinot with the port 9000. Notice that you use the same directory path with Redpanda as a mounted volume for the Pinot container:
docker run --name=apachepinot-1 --rm \
--network panda-airlines \
-v _YOUR_HOME_DIRECTORY_/panda_airlines:/tmp/panda_airlines \
-p 9000:9000 \
docker.io/apachepinot/pinot:0.9.3 QuickStart \
-type batchYou should see the following output:
Trying to pull docker.io/apachepinot/pinot:0.9.3...
Getting image source signatures
Copying blob sha256:9335053f1957447097ccb4fd86b10488901ff111775495093e9cc4b860cfcbdc
...output omitted...
***** Starting Zookeeper, controller, broker and server *****
2022/03/17 12:27:54.980 INFO [QuickstartRunner] [main] Registered PinotFS for scheme: s3
2022/03/17 12:27:54.985 INFO [StartZookeeperCommand] [main] Executing command: StartZookeeper -zkPort 2123 -dataDir /tmp/1647520074512/baseballStats/rawdata/PinotZkDir
...output omitted...
You can always go to http://localhost:9000 to play around in the query consoleThe preceding command starts Pinot in QuickStart mode, so you might observe some example data import logs in the output as well.
In your browser, navigate to http://localhost:9000 to see the Pinot web interface.
The UI will look like this:
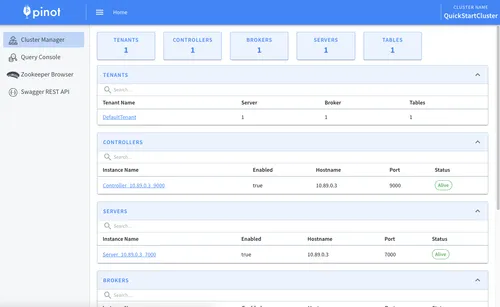
To create a data flow from Redpanda to Pinot, you must create a topic in Redpanda. Create a topic called flights in the Redpanda cluster using the following command:
docker exec -it redpanda-1 \
rpk topic create flightsThen validate the flights topic with this command:
docker exec -it redpanda-1 \
rpk cluster infoThis will return the following output:
BROKERS
=======
ID    HOST        PORT
0*    redpanda-1  9092
TOPICS
======
NAME PARTITIONS REPLICAS
flights 1 1Next, you’ll create a schema and a table in Pinot, which you will configure with the Redpanda connection and topic information.
Tables can be thought of as a logical abstraction that represents a collection of related data, while schemas define the fields and data types for the tables that are present within them. For more information both, you can refer to Pinot’s schema and table documentation.
Navigate to the_YOUR_HOME_DIRECTORY_/panda_airlines directory and create a JSON file calledflights-schema.json with the following content:
{
  "dimensionFieldSpecs": [
    {
      "dataType": "INT",
      "name": "ActualElapsedTime"
    },
    {
      "dataType": "INT",
      "name": "AirTime"
    },
    {
      "dataType": "INT",
      "name": "AirlineID"
    },
    {
      "dataType": "INT",
      "name": "ArrDel15"
    },
    {
      "dataType": "INT",
      "name": "ArrDelay"
    },
    {
      "dataType": "INT",
      "name": "ArrDelayMinutes"
    },
    {
      "dataType": "INT",
      "name": "ArrTime"
    },
    {
      "dataType": "STRING",
      "name": "ArrTimeBlk"
    },
    {
      "dataType": "INT",
      "name": "ArrivalDelayGroups"
    },
    {
      "dataType": "INT",
      "name": "CRSArrTime"
    },
    {
      "dataType": "INT",
      "name": "CRSDepTime"
    },
    {
      "dataType": "INT",
      "name": "CRSElapsedTime"
    },
    {
      "dataType": "STRING",
      "name": "CancellationCode"
    },
    {
      "dataType": "INT",
      "name": "Cancelled"
    },
    {
      "dataType": "STRING",
      "name": "Carrier"
    },
    {
      "dataType": "INT",
      "name": "CarrierDelay"
    },
    {
      "dataType": "INT",
      "name": "DayOfWeek"
    },
    {
      "dataType": "INT",
      "name": "DayofMonth"
    },
    {
      "dataType": "INT",
      "name": "DepDel15"
    },
    {
      "dataType": "INT",
      "name": "DepDelay"
    },
    {
      "dataType": "INT",
      "name": "DepDelayMinutes"
    },
    {
      "dataType": "INT",
      "name": "DepTime"
    },
    {
      "dataType": "STRING",
      "name": "DepTimeBlk"
    },
    {
      "dataType": "INT",
      "name": "DepartureDelayGroups"
    },
    {
      "dataType": "STRING",
      "name": "Dest"
    },
    {
      "dataType": "INT",
      "name": "DestAirportID"
    },
    {
      "dataType": "INT",
      "name": "DestAirportSeqID"
    },
    {
      "dataType": "INT",
      "name": "DestCityMarketID"
    },
    {
      "dataType": "STRING",
      "name": "DestCityName"
    },
    {
      "dataType": "STRING",
      "name": "DestState"
    },
    {
      "dataType": "INT",
      "name": "DestStateFips"
    },
    {
      "dataType": "STRING",
      "name": "DestStateName"
    },
    {
      "dataType": "INT",
      "name": "DestWac"
    },
    {
      "dataType": "INT",
      "name": "Distance"
    },
    {
      "dataType": "INT",
      "name": "DistanceGroup"
    },
    {
      "dataType": "INT",
      "name": "DivActualElapsedTime"
    },
    {
      "dataType": "INT",
      "name": "DivAirportIDs",
      "singleValueField": false
    },
    {
      "dataType": "INT",
      "name": "DivAirportLandings"
    },
    {
      "dataType": "INT",
      "name": "DivAirportSeqIDs",
      "singleValueField": false
    },
    {
      "dataType": "STRING",
      "name": "DivAirports",
      "singleValueField": false
    },
    {
      "dataType": "INT",
      "name": "DivArrDelay"
    },
    {
      "dataType": "INT",
      "name": "DivDistance"
    },
    {
      "dataType": "INT",
      "name": "DivLongestGTimes",
      "singleValueField": false
    },
    {
      "dataType": "INT",
      "name": "DivReachedDest"
    },
    {
      "dataType": "STRING",
      "name": "DivTailNums",
      "singleValueField": false
    },
    {
      "dataType": "INT",
      "name": "DivTotalGTimes",
      "singleValueField": false
    },
    {
      "dataType": "INT",
      "name": "DivWheelsOffs",
      "singleValueField": false
    },
    {
      "dataType": "INT",
      "name": "DivWheelsOns",
      "singleValueField": false
    },
    {
      "dataType": "INT",
      "name": "Diverted"
    },
    {
      "dataType": "INT",
      "name": "FirstDepTime"
    },
    {
      "dataType": "STRING",
      "name": "FlightDate"
    },
    {
      "dataType": "INT",
      "name": "FlightNum"
    },
    {
      "dataType": "INT",
      "name": "Flights"
    },
    {
      "dataType": "INT",
      "name": "LateAircraftDelay"
    },
    {
      "dataType": "INT",
      "name": "LongestAddGTime"
    },
    {
      "dataType": "INT",
      "name": "Month"
    },
    {
      "dataType": "INT",
      "name": "NASDelay"
    },
    {
      "dataType": "STRING",
      "name": "Origin"
    },
    {
      "dataType": "INT",
      "name": "OriginAirportID"
    },
    {
      "dataType": "INT",
      "name": "OriginAirportSeqID"
    },
    {
      "dataType": "INT",
      "name": "OriginCityMarketID"
    },
    {
      "dataType": "STRING",
      "name": "OriginCityName"
    },
    {
      "dataType": "STRING",
      "name": "OriginState"
    },
    {
      "dataType": "INT",
      "name": "OriginStateFips"
    },
    {
      "dataType": "STRING",
      "name": "OriginStateName"
    },
    {
      "dataType": "INT",
      "name": "OriginWac"
    },
    {
      "dataType": "INT",
      "name": "Quarter"
    },
    {
      "dataType": "STRING",
      "name": "RandomAirports",
      "singleValueField": false
    },
    {
      "dataType": "INT",
      "name": "SecurityDelay"
    },
    {
      "dataType": "STRING",
      "name": "TailNum"
    },
    {
      "dataType": "INT",
      "name": "TaxiIn"
    },
    {
      "dataType": "INT",
      "name": "TaxiOut"
    },
    {
      "dataType": "INT",
      "name": "Year"
    },
    {
      "dataType": "INT",
      "name": "WheelsOn"
    },
    {
      "dataType": "INT",
      "name": "WheelsOff"
    },
    {
      "dataType": "INT",
      "name": "WeatherDelay"
    },
    {
      "dataType": "STRING",
      "name": "UniqueCarrier"
    },
    {
      "dataType": "INT",
      "name": "TotalAddGTime"
    }
  ],
  "dateTimeFieldSpecs": [
    {
      "name": "DaysSinceEpoch",
      "dataType": "INT",
      "format": "1:DAYS:EPOCH",
      "granularity": "1:DAYS"
    }
  ],
  "schemaName": "flights"
}
Notice that theschemaName is set toflights in this file. This is the schema name that you must use while adding a table to Pinot. The other values define the field structure that the table must have.
While a dataType defines a data type for each field, name defines each field’s name. Datetime fields are a bit different in Pinot, so you must define them with adateTimeFieldSpec, which enables you to configure the datetime field.
Ordinary fields are all defined indimensionFieldSpec. For more information on these categories, refer to the Pinot schema documentation.
Create another file calledflights-table-realtime.json in the same directory with the following content, this time for the table:
{
  "tableName": "flights",
  "tableType": "REALTIME",
  "segmentsConfig": {
    "timeColumnName": "DaysSinceEpoch",
    "timeType": "DAYS",
    "retentionTimeUnit": "DAYS",
    "retentionTimeValue": "5",
    "segmentPushType": "APPEND",
    "segmentAssignmentStrategy": "BalanceNumSegmentAssignmentStrategy",
    "schemaName": "flights",
    "replication": "1",
    "replicasPerPartition": "1"
    },
    "tenants": {},
    "tableIndexConfig": {
      "loadMode": "MMAP",
      "streamConfigs": {
        "streamType": "kafka",
        "stream.kafka.consumer.type": "simple",
        "stream.kafka.topic.name": TOPIC_NAME,
        "stream.kafka.decoder.class.name": "org.apache.pinot.plugin.stream.kafka.KafkaJSONMessageDecoder",
        "stream.kafka.consumer.factory.class.name": "org.apache.pinot.plugin.stream.kafka20.KafkaConsumerFactory",
        "stream.kafka.broker.list": BROKER_ADDRESS,
        "realtime.segment.flush.threshold.time": "3600000",
        "realtime.segment.flush.threshold.rows": "50000",
        "stream.kafka.consumer.prop.auto.offset.reset": "smallest"
      }
    },
    "metadata": {
      "customConfigs": {}
    }
  }
Notice here that thetableName field isflights, which stands for the table name. In this tutorial, it is the same name as the schema, but you can define any name you choose—it is not mandatory to use the same name.
For the TOPIC_NAME, setflights as a string value, which stands for the topic you created in Redpanda. You must also change theBROKER_ADDRESS to redpanda-1:9092 for Redpanda-Pinot communication for this table. This configuration enables the data ingestion from the Redpanda topic to thePinot table.
You might notice that theflights table is aREALTIME table.REALTIME type tables ingest data from technologies like Redpanda or Kafka and build segments from the consumed data. Pinot has two other table types: OFFLINE and HYBRID. For more information, refer to this web page.
Run the following command to apply the schema and the table to Pinot:
docker exec -it apachepinot-1 \
    bin/pinot-admin.sh AddTable \
    -schemaFile /tmp/panda_airlines/flights-schema.json \
    -tableConfigFile /tmp/panda_airlines/flights-table-realtime.json \
    -exec
This command includes the AddTable command of Pinot that needs the schema file and the table configuration file you created.
The output will look like this:
SLF4J: Class path contains multiple SLF4J bindings.
SLF4J: Found binding in [jar:file:/opt/pinot/lib/pinot-all-0.9.3-jar-with-dependencies.jar!/org/slf4j/impl/StaticLoggerBinder.class]
...output omitted...
flights-table-realtime.json -schemaFile /tmp/resources/flights-schema.json -controllerProtocol http -controllerHost 10.89.0.3 -controllerPort 9000 -user null -password [hidden] -exec
2022/03/17 21:46:02.975 INFO [AddTableCommand] [main] {"status":"Table flights_REALTIME succesfully added"}At this point, you have the Redpanda cluster with a topic calledflights and you’ve configured your Pinot instance with theflights real-time table.
Now let’s download the JSON file that has the Panda Airlines flight data that belongs to 2014. To download the flight data, navigate to this link and click Download. The file name is flights-data.json.
Move the file to your_YOUR_HOME_DIRECTORY_/panda_airlines directory and run the following command to produce the messages to Redpanda. This is accomplished with ease using therpk CLI, which you run inside the Redpanda container.
docker exec -it redpanda-1 /bin/sh -c \
'rpk topic produce flights < /tmp/panda_airlines/flights-data.json'
docker exec -it redpanda-1 /bin/sh -c \
'rpk topic produce flights < /tmp/panda_airlines/flights-data.json'
The following output confirms that you have successfully sent 19492 records to Redpanda in a few seconds:
...output omitted...
Produced to partition 0 at offset 19485 with timestamp 1647554565169.
Produced to partition 0 at offset 19486 with timestamp 1647554565169.
Produced to partition 0 at offset 19487 with timestamp 1647554565170.
Produced to partition 0 at offset 19488 with timestamp 1647554565170.
Produced to partition 0 at offset 19489 with timestamp 1647554565170.
Produced to partition 0 at offset 19490 with timestamp 1647554565170.
Produced to partition 0 at offset 19491 with timestamp 1647554565170.
The same number of records must be sent to Pinot. To verify this, navigate back to your Pinot tab in your browser and click Query Console on the left menu. Click on the flights link under the Tables section on the opened page.
You should see anSQL EDITOR section at the top of the page with the select * from flights limit 10 query, as well as aQUERY RESULTS section listing the query results that belong to the data you imported using Redpanda and its CLI-based producer:
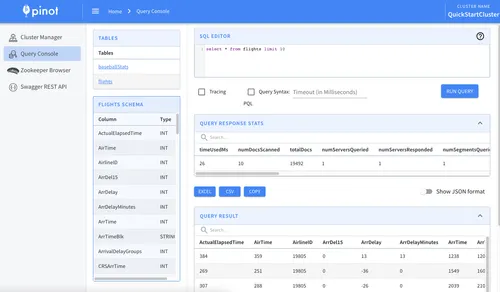
In order to find the flight-record count that Panda Airlines requires from you, use the keys and values in the following chart and write the SQL command. Each key stands for a field in the flights table.
Table FieldValueDestJFKAirTime> 300Month1Year2014OriginStateNameCalifornia
The SQL command should look like this:
select count(*) from flights
where Dest='JFK'
  and AirTime > 300
  and OriginStateName='California'
  and Month=1
  and Year=2014
When you run the SQL command, if you find the number 12 as the record count, then you can congratulate yourself—you’ve completed the assignment successfully and are ready to send the results to Panda Airlines!
Using Redpanda and its rpk CLI, you can stream any data to a Pinot table with the help of Pinot’s embedded capabilities for data-ingestion with any Kafka API–compatible streaming platform. Knowing how to do this allows you to integrate, stream, and analyze huge amounts of data in a fast and efficient way.
Go to this repository to find all the resources associated with this demo. Interact with Redpanda’s developers directly in the Slack community, or contribute to Redpanda’s source-available GitHub repo.
A workshop on building and debugging real-world streaming pipelines

One architecture for real-time and analytics workloads. Easy to access, governed, and immediately queryable
Subscribe to our VIP (very important panda) mailing list to pounce on the latest blogs, surprise announcements, and community events!
Opt out anytime.