Full CDC semantics land in the Iceberg output for Redpanda Connect
Your lakehouse mirrors the database, instantly.

Learn how to use Redpanda and Kafka Connect to feed data into BigQuery in real time.


As the volume of big data companies work with continues to increase, so do the problems involved in streaming, processing, storing, retrieving, and querying this data for analysis. One solution to meet this challenge is BigQuery, which Google launched in 2010 to provide external access to one of its internal technologies, Dremel.
BigQuery is a serverless, cost-effective, multi-cloud data warehouse that enables scalable analysis over petabytes of data. It provides the core set of features available in Dremel to third-party developers via a REST API, a command-line interface, a web UI, access control, and other functionalities, all while maintaining the unprecedented query performance of Dremel. You can use BigQuery to create complex queries for data analysis, or even create and execute machine learning models using SQL queries.
While BigQuery solves the problem of big data storage, what about data in the form of events flowing through Apache KafkaⓇ-based streaming platforms? The savior here is Redpanda, a data streaming platform that is API-compatible with the Kafka ecosystem. It offers a faster, more reliable, and simpler alternative to Kafka because it does not require a ZooKeeperⓇ instance or JVM.
Redpanda can be connected to BigQuery easily via Kafka ConnectⓇ. You can stream any structured data via Redpanda and write it in a BigQuery table in real time. BigQuery will keep your data ready to be analyzed for use cases including interactive analytics, business intelligence, or predictive analytics with machine learning.
In this tutorial, you will:
rpk CLIrpk CLI and feed data into the BigQuery tableYou can follow along with this repository.
You’ll need the following for this tutorial:
Let’s use the following scenario to demonstrate how you can stream data to BigQuery using Kafka Connect and Redpanda.
A data analytics company called PandaQ organizes a hackathon. Participants must achieve a set of tasks containing topics such as:
You have joined the hackathon and decided to use GCP BigQuery for storing the data for analytics, Redpanda for fast data streaming, and Kafka Connect for integrating both.
You also have a small analysis task to complete after accomplishing the integration. The organizer has provided a JSON data file of an imaginary classified ad company. The file contains the data of user visits for different classified ads on various dates and times.
The following is an example of the data:
...output omitted...
{"userId": 6130, "classifiedId": 6626, "visitCount": 7273, "lastVisitDate": "2019-12-05T16:13:36"}
{"userId": 6065, "classifiedId": 2128, "visitCount": 8234, "lastVisitDate": "2020-11-10T03:35:26"}
{"userId": 79, "classifiedId": 4056, "visitCount": 7608, "lastVisitDate": "2018-06-01T05:17:58"}
...output omitted...
PandaQ requires you to find the ID of the user who visited a classified ad more than 5,000 times after January 1, 2020. Multiple users visited these ads, so you must pick the classified ad with the maximum ID.
This table explains all the criteria needed to find the matching user ID:
CriteriaVisit Count > 5000Last Visit Date > January 1, 2020Max. Classified Ad ID
And this diagram demonstrates the high-level architecture:

In this tutorial, you will run Redpanda in a container via Docker. (For more information on installing Redpanda on other platforms, refer to this guide.)
Make sure that you installed Docker and started the Docker daemon in your MacOS environment.
Create a folder called pandaq_integration in your home directory. You will use this directory as a shared volume for the Redpanda container for future steps.
Replace _YOUR_HOME_DIRECTORY_ with your home directory in the following command and run it:
docker run -d --pull=always --name=redpanda-1 --rm \
    -v _YOUR_HOME_DIRECTORY_/pandaq_integration:/tmp/pandaq_integration \
    -p 9092:9092 \
    -p 9644:9644 \
    docker.vectorized.io/vectorized/redpanda:latest \
    redpanda start \
    --overprovisioned \
    --smp 1  \
    --memory 2G \
    --reserve-memory 1G \
    --node-id 0 \
    --check=false
You should see the following output:
Trying to pull docker.vectorized.io/vectorized/redpanda:latest...
Getting image source signatures
Copying blob sha256:245fe2b3f0d6b107b818db25affc44bb96daf57d56d7d90568a1f2f10839ec46
...output omitted...
Copying blob sha256:245fe2b3f0d6b107b818db25affc44bb96daf57d56d7d90568a1f2f10839ec46
Copying config sha256:fdaf68707351dda9ede29650f4df501b78b77a501ef4cfb5e2e9a03208f29068
Writing manifest to image destination
Storing signatures
105c7802c5a46fa691687d9f20c8b42cd461ce38d625f285cec7d6678af90a59
The preceding command pulls the latest Redpanda image from the docker.vectorized.io repository and runs the container with the exposed ports 9092 and 9644. You will use the 9092 port for accessing Redpanda.
For more information on how to run Redpanda by using Docker, refer to this webpage.
Validate your Redpanda container by running the following command:
docker ps
You should see the following output:
CONTAINER ID  IMAGE                                            COMMAND               CREATED        STATUS            PORTS                                           NAMES
105c7802c5a4  docker.vectorized.io/vectorized/redpanda:latest  redpanda start --...  3 seconds ago  Up 3 seconds ago  0.0.0.0:9092->9092/tcp, 0.0.0.0:9644->9644/tcp  redpanda-1
Validate the cluster by using the Redpanda command line interface (CLI) rpk in the container:
docker exec -it redpanda-1 \
    rpk cluster info
You should see the following output:
BROKERS
=======
ID    HOST        PORT
0*    0.0.0.0  9092
Your Redpanda cluster is ready to use.
To enable the Kafka producer and the Kafka Connect cluster to work properly, you must define a Kafka topic. You can use rpk to create topics on the Redpanda cluster.
Run rpk to create a topic called classified-ad-visits in the Docker container:
docker exec -it redpanda-1 \
rpk topic create classified-ad-visits
Verify that you have the topics created:
docker exec -it redpanda-1 \
rpk cluster info
This should return the following output:
BROKERS
=======
ID    HOST         PORT
1*    0.0.0.0  9092

TOPICS
======
NAME                   PARTITIONS  REPLICAS
classified-ad-visits       1           1
Redpanda must be accessible via localhost:9092 on your computer for the rest of this tutorial.
Open your GCP home page and click the dropdown that shows the currently selected project next to the search box.
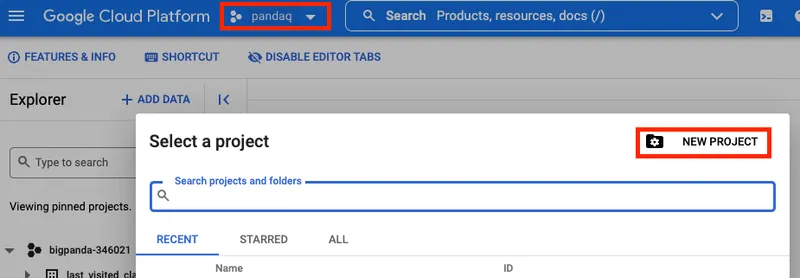
On the opened dialog box, click the New Project button, which redirects you to the New Project page. Type “pandaq” in the “Project name” field. Click the Create button, which redirects you to the dashboard page.
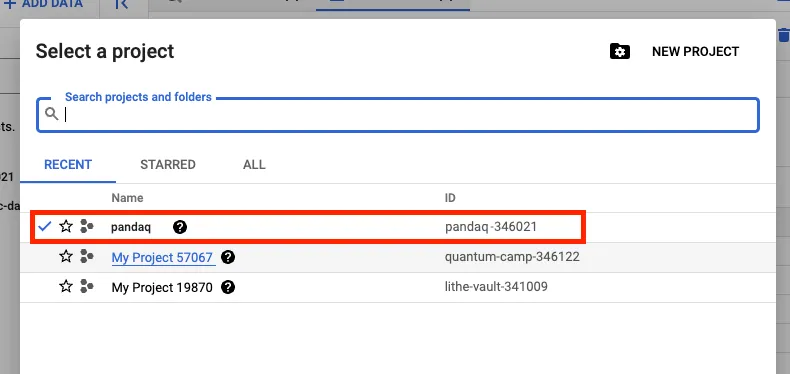
Use the same project selection dropdown near the search box to select your new pandaq project. Note your project ID, which has a pandaq- prefix and ends with a six-digit number.
Use the left menu of GCP to navigate to the BigQuery page. Make sure that you have selected the project as pandaq.
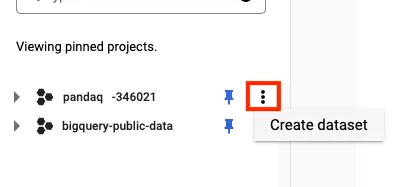
On the Explorer section of the page, you must see your project ID listed. Click the three dots menu near it and select Create Dataset to create a new data set in your project.
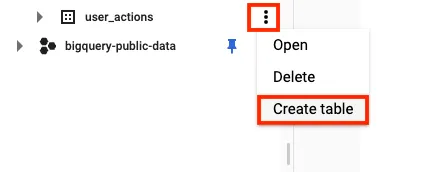
Enter user_actions in the Dataset ID field and click the Create Dataset button.
Once you create the data set, click the three dots menu near it and select Create Table to create a new table for the classified ad visits.
On the opened Create table page, enter the table name as classified-ad-visits.
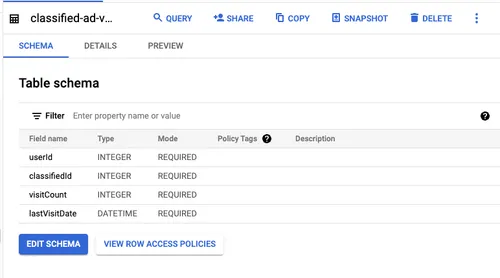
To set a structure for the table, you must enter some values in the schema. For this, enable text editing of the schemas by clicking Edit as text and copy and paste the following JSON array:
[
    {
        "name": "userId",
        "type": "INTEGER",
        "mode": "REQUIRED"
    },
    {
        "name": "classifiedId",
        "type": "INTEGER",
        "mode": "REQUIRED"
    },
    {
        "name": "visitCount",
        "type": "INTEGER",
        "mode": "REQUIRED"
    },
    {
        "name": "lastVisitDate",
        "type": "DATETIME",
        "mode": "REQUIRED"
    }
]
Once you paste, click the Create Table button. Click the created table classified-ad-visits on the Explorer section to see its details. You should see the following image:
You need to set up credentials to access the schema and the table programmatically. First, create a Service Account with the appropriate access and create an access key for it. To do this, search for service account in the search bar at the top and click the Service Accounts link.
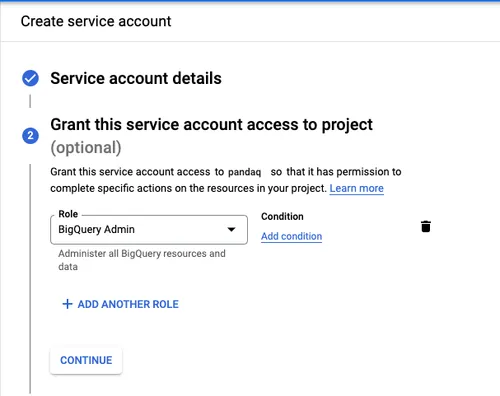
On the opened page, click the + Create Service Account button.
Enter the service account name as bigquery-account and click the Create and Continue button.
Next, search and select the BigQuery Admin role and click the Done button at the bottom.
On the redirected Service accounts page, click the three dots to open the Actions menu. Click the Manage keys link.
On the opened page, click the Add Key menu button and click the Create New Key link. Click Create on the opened popup page. It triggers a download for the credentials JSON file.
Copy the file in your home directory by renaming it to gcp-pandaq-admin.json. This is required for further configurations.
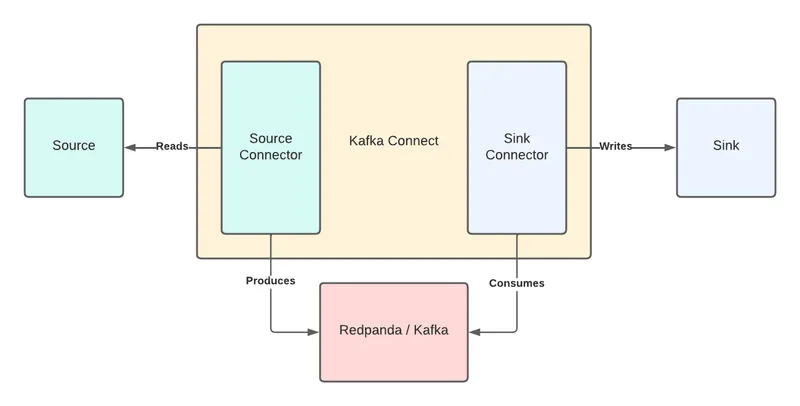
Kafka Connect, an integration tool released with Apache Kafka, provides reliable data streaming between Kafka and external systems. It is both scalable and flexible.
You can use Kafka Connect to integrate with any system, including databases, search indexes, and cloud storage providers. You can also use it with Redpanda.
Kafka Connect uses source and sink connectors for integration. Source connectors stream data from an external system to Kafka, while sink connectors stream data from Kafka to an external system.
To download Kafka Connect, you must download the Apache Kafka package. Navigate to the Apache downloads page for Kafka and click the suggested download link for the Kafka 3.1.0 binary package.
Extract the Kafka binaries folder in the_YOUR_HOME_DIRECTORY_/pandaq_integrationdirectory you have already created.
To run a Kafka Connect cluster, you must set up a configuration file in the properties format.
In the pandaq_integration folder, create a folder called configuration. Create a file in this directory called connect.properties with the following content:
# Kafka broker addresses
bootstrap.servers=

# Cluster level converters
# These apply when the connectors don't define any converter
key.converter=org.apache.kafka.connect.json.JsonConverter
value.converter=org.apache.kafka.connect.json.JsonConverter

# JSON schemas enabled to false in cluster level
key.converter.schemas.enable=true
value.converter.schemas.enable=true

# Where to keep the Connect topic offset configurations
offset.storage.file.filename=/tmp/connect.offsets
offset.flush.interval.ms=10000

# Plugin path to put the connector binaries
plugin.path=
Set the bootstrap.servers value to localhost:9092. This configures the Connect cluster to use the Redpanda cluster.
Next, you configure plugin.path for the connector binaries. Create a folder called plugins in the pandaq_integration directory. Download the connector binaries and move them to the plugins directory.
Download the archived binaries by navigating to this webpage and clicking the Download button. Unzip the file into a folder called kafka-connect-bigquery and copy the folder into the plugins directory.
The final folder structure for pandaq_integration is as follows:
pandaq_integration
├── configuration
│   ├── connect.properties
├── plugins
│   ├── kafka-connect-bigquery
│   │   ├── api-common-1.10.0.jar
│   │   ├── ...
│   │   └── threetenbp-1.4.4.jar
└── kafka_2.13-3.1.0
Change the plugin.path value to _YOUR_HOME_DIRECTORY_/pandaq_integration/plugins. This configures the Kafka Connect cluster to use the Redpanda cluster.
The final connect.properties file is as follows:
# Kafka broker addresses
bootstrap.servers=localhost:9092

# Cluster level converters
# These apply when the connectors don't define any converter
key.converter=org.apache.kafka.connect.json.JsonConverter
value.converter=org.apache.kafka.connect.json.JsonConverter

# JSON schemas enabled to false in cluster level
key.converter.schemas.enable=true
value.converter.schemas.enable=true

# Where to keep the Connect topic offset configurations
offset.storage.file.filename=/tmp/connect.offsets
offset.flush.interval.ms=10000

# Plugin path to put the connector binariesSetting up the connector plugins in a Kafka Connect cluster to integrate with external systems is not enough. The cluster needs connectors configured to execute the integration.
To configure the sink connector for BigQuery, create a file called bigquery-sink-connector.properties in the _YOUR_HOME_DIRECTORY_/pandaq_integration/configuration directory with the following content:
name=bigquery-sink-connector

connector.class=

# The key converter for this connector
key.converter=org.apache.kafka.connect.storage.StringConverter

# The value converter for this connector
value.converter=org.apache.kafka.connect.json.JsonConverter

# Identify, if value contains a schema
# Required value converter is `org.apache.kafka.connect.json.JsonConverter`.
value.converter.schemas.enable=false

topics=

# The name of the BigQuery project to write to
project=

# The name of the BigQuery dataset to write to (leave the '.*=' at the beginning, enter your
# dataset after it)
datasets=.*=

# The location of a BigQuery service account or user JSON credentials file
# or service account credentials or user credentials in JSON format (non-escaped JSON blob)
defaultDataset=

keyfile=

# 'FILE' if keyfile is a credentials file, 'JSON' if it's a credentials JSON
keySource=FILE

# Whether to automatically sanitize topic names before using them as table names; if not enabled, topic names will be used directly as table names
sanitizeTopics=false

# Automatically create BigQuery tables if they don't already exist
autoCreateTables=false

# Whether or not to automatically update BigQuery schemas
autoUpdateSchemas=false

schemaRetriever=com.wepay.kafka.connect.bigquery.retrieve.IdentitySchemaRetriever

# The maximum number of records to buffer per table before temporarily halting the flow of new records, or -1 for unlimited buffering
bufferSize=100

maxWriteSize=100

tableWriteWait=1000

timestamp=UTC

bigQueryPartitionDecorator=false
Some of the values are left blank for learning purposes. Set the following values for the keys in the bigquery-sink-connector.properties file:
KeyValueconnector.classcom.wepay.kafka.connect.bigquery.BigQuerySinkConnectortopicsclassified-ad-visitsproject_YOUR_PROJECTID (pandaq-xxxxxx)datasetsuser_actionsdefaultDatasetuser_actionskeyfile_YOUR_HOMEDIRECTORY/gcp-pandaq-admin.json
To run the cluster with the configurations that you applied, open a new terminal window and navigate to _YOUR_HOME_DIRECTORY_/pandaq_integration/configuration. Run the following command in the directory:
../kafka_2.13-3.1.0/bin/connect-standalone.sh connect.properties bigquery-sink-connector.properties
You should get the following output:
...output omitted...
(com.wepay.kafka.connect.bigquery.config.BigQuerySinkTaskConfig:376)
...output omitted...
[2022-04-05 13:28:45,798] INFO [bigquery-sink-connector|task-0] [Consumer clientId=connector-consumer-bigquery-sink-connector-0, groupId=connect-bigquery-sink-connector] (Re-)joining group (org.apache.kafka.clients.consumer.internals.ConsumerCoordinator:535)
[2022-04-05 13:28:45,802] INFO [bigquery-sink-connector|task-0] [Consumer clientId=connector-consumer-bigquery-sink-connector-0, groupId=connect-bigquery-sink-connector] Successfully joined group with generation Generation{generationId=41, memberId='connector-consumer-bigquery-sink-connector-0-d5aad48e-e809-4c6d-a048-f726348f902b', protocol='range'} (org.apache.kafka.clients.consumer.internals.ConsumerCoordinator:595)
[2022-04-05 13:28:45,805] INFO [bigquery-sink-connector|task-0] [Consumer clientId=connector-consumer-bigquery-sink-connector-0, groupId=connect-bigquery-sink-connector] Finished assignment for group at generation 41: {connector-consumer-bigquery-sink-connector-0-d5aad48e-e809-4c6d-a048-f726348f902b=Assignment(partitions=[classified-ad-visits-0])} (org.apache.kafka.clients.consumer.internals.ConsumerCoordinator:652)
[2022-04-05 13:28:45,825] INFO [bigquery-sink-connector|task-0] [Consumer clientId=connector-consumer-bigquery-sink-connector-0, groupId=connect-bigquery-sink-connector] Successfully synced group in generation Generation{generationId=41, memberId='connector-consumer-bigquery-sink-connector-0-d5aad48e-e809-4c6d-a048-f726348f902b', protocol='range'} (org.apache.kafka.clients.consumer.internals.ConsumerCoordinator:761)
[2022-04-05 13:28:45,826] INFO [bigquery-sink-connector|task-0] [Consumer clientId=connector-consumer-bigquery-sink-connector-0, groupId=connect-bigquery-sink-connector] Notifying assignor about the new Assignment(partitions=[classified-ad-visits-0]) (org.apache.kafka.clients.consumer.internals.ConsumerCoordinator:279)
[2022-04-05 13:28:45,828] INFO [bigquery-sink-connector|task-0] [Consumer clientId=connector-consumer-bigquery-sink-connector-0, groupId=connect-bigquery-sink-connector] Adding newly assigned partitions: classified-ad-visits-0 (org.apache.kafka.clients.consumer.internals.ConsumerCoordinator:291)
[2022-04-05 13:28:45,836] INFO [bigquery-sink-connector|task-0] [Consumer clientId=connector-consumer-bigquery-sink-connector-0, groupId=connect-bigquery-sink-connector] Found no committed offset for partition classified-ad-visits-0 (org.apache.kafka.clients.consumer.internals.ConsumerCoordinator:1388)
[2022-04-05 13:28:45,854] INFO [bigquery-sink-connector|task-0] [Consumer clientId=connector-consumer-bigquery-sink-connector-0, groupId=connect-bigquery-sink-connector] Resetting offset for partition classified-ad-visits-0 to position FetchPosition{offset=0, offsetEpoch=Optional.empty, currentLeader=LeaderAndEpoch{leader=Optional[localhost:9092 (id: 0 rack: null)], epoch=absent}}. (org.apache.kafka.clients.consumer.internals.SubscriptionState:398)You have the Redpanda cluster with a topic called classified-ad-visits and you’ve configured your BigQuery project with the classified-ad-visits table in the user_actions data set.
Download the JSON file with sample data to simulate users’ classified ad actions. Navigate to this link and click Download. Name the file classified-ad-visits-data.json.
The downloaded file content should look like the following:
...output omitted...
{"userId": 6130, "classifiedId": 6626, "visitCount": 7273, "lastVisitDate": "2019-12-05T16:13:36"}
{"userId": 6065, "classifiedId": 2128, "visitCount": 8234, "lastVisitDate": "2020-11-10T03:35:26"}
{"userId": 79, "classifiedId": 4056, "visitCount": 7608, "lastVisitDate": "2018-06-01T05:17:58"}
{"userId": 6877, "classifiedId": 2271, "visitCount": 4092, "lastVisitDate": "2019-03-19T14:07:30"}
{"userId": 8044, "classifiedId": 1645, "visitCount": 4327, "lastVisitDate": "2020-06-30T23:36:12"}
{"userId": 3940, "classifiedId": 3672, "visitCount": 8028, "lastVisitDate": "2020-07-01T15:32:58"}
{"userId": 3992, "classifiedId": 9256, "visitCount": 1809, "lastVisitDate": "2020-06-24T15:13:39"}
{"userId": 8711, "classifiedId": 2786, "visitCount": 2869, "lastVisitDate": "2018-01-30T23:00:40"}
{"userId": 8624, "classifiedId": 3630, "visitCount": 582, "lastVisitDate": "2019-04-11T17:35:45"}
{"userId": 8751, "classifiedId": 5249, "visitCount": 1269, "lastVisitDate": "2018-06-08T22:01:28"}
{"userId": 5475, "classifiedId": 5617, "visitCount": 1484, "lastVisitDate": "2018-04-26T20:07:13"}
{"userId": 9284, "classifiedId": 6192, "visitCount": 8694, "lastVisitDate": "2018-03-11T22:58:11"}
{"userId": 1717, "classifiedId": 8168, "visitCount": 1209, "lastVisitDate": "2019-09-04T08:36:27"}
{"userId": 4112, "classifiedId": 2190, "visitCount": 3708, "lastVisitDate": "2018-06-25T04:44:22"}
{"userId": 4904, "classifiedId": 7738, "visitCount": 6757, "lastVisitDate": "2018-04-19T01:47:39"}
...output omitted...
Move the file to _YOUR_HOME_DIRECTORY_/pandaq_integration and run the following command to produce the messages to Redpanda using the rpk CLI, which you run inside the Redpanda container:
docker exec -it redpanda-1 /bin/sh -c \
'rpk topic produce classified-ad-visits < /tmp/pandaq_integration/classified-ad-visits-data.json'
The following output indicates that you successfully sent 20000 records to Redpanda in a few seconds:
...output omitted...
Produced to partition 0 at offset 19992 with timestamp 1649194465989.
Produced to partition 0 at offset 19993 with timestamp 1649194465989.
Produced to partition 0 at offset 19994 with timestamp 1649194465989.
Produced to partition 0 at offset 19995 with timestamp 1649194465989.
Produced to partition 0 at offset 19996 with timestamp 1649194465989.
Produced to partition 0 at offset 19997 with timestamp 1649194465989.
Produced to partition 0 at offset 19998 with timestamp 1649194465989.
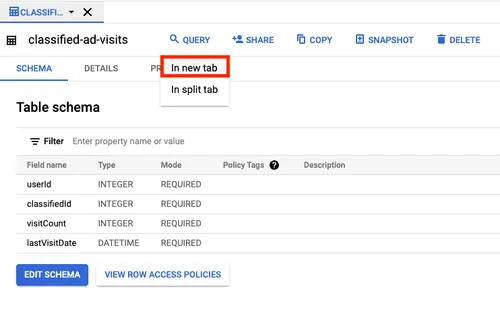
Produced to partition 0 at offset 19999 with timestamp 1649194465989.The same number of records must be sent to BigQuery. To verify this, navigate back to your BigQuery project in your browser and click the table classified-ad-visits on the Explorer section. Click Query > In new tab to open a tab where you can run queries against your table.
Run the following query to verify the record count in your BigQuery table. Replace _YOUR_PROJECT_ID_ with your pandaq project ID that looks like pandaq-xxxxxx:
SELECT count(*) FROM `_YOUR_PROJECT_ID_.user_actions.classified-ad-visits`
On the opened Query results section, you should see the result as 20000.
In order to find the user ID that the organizer requires from you, use the following table and write the SQL command.
Table FieldValueVisit Count> 5000Last Visit Date> Jan 1, 2020Classified Ad IDMax.
The SQL command is as follows:
select max(classifiedId)
  from `_YOUR_PROJECT_ID_.user_actions.classified-ad-visits`
where visitCount > 5000
  and lastVisitDate > cast('2020-01-01 00:00:00' as datetime)
This should return 10000 as the maximum of the classified IDs later than the relevant date. With this information, you can find the user who visited the classified ad with ID 10000 more than 5000 times, after the date Jan 1, 2020.
Run the following query in the same query window to find the user ID:
select userId
  from `_YOUR_PROJECT_ID_.user_actions.classified-ad-visits`
where visitCount > 5000
  and lastVisitDate > cast('2020-01-01 00:00:00' as datetime)
  and classifiedId = 10000
On the Query results section you can see the user ID as 9328. If you’ve found the same user ID, congratulations! You’ve completed the demo scenario successfully.
You’ve learned how to use Kafka Connect to read messages from Redpanda and send them into BigQuery, then to run SQL queries on BigQuery to analyze your data.
If you integrate Redpanda and BigQuery through Kafka Connect, you can stream large amounts of data, write them in a table in real time, and keep your data ready to be analyzed for any number of use cases.
You can find the resources for this tutorial in this GitHub repository. You can also check out Redpanda’s source-available code in this repo, or join the Redpanda Community on Slack to ask questions about running this demo.
Subscribe to our VIP (very important panda) mailing list to pounce on the latest blogs, surprise announcements, and community events!
Opt out anytime.