Full CDC semantics land in the Iceberg output for Redpanda Connect
Your lakehouse mirrors the database, instantly.
Get up and running with a real-time word count application by integrating Apache Flink® with Redpanda.


In this article series, you’ll be learning how to integrate Redpanda with a variety of data-processing tools. This post will focus on integrating Redpanda with Apache FlinkⓇ, an open source framework for processing large amounts of data.
After introducing you to some of Flink’s basic features, you’ll walk through a step-by-step tutorial that will teach you how to get Redpanda and Flink up and running, how to store data in Redpanda and process it in Flink, and how to send the processed results back to Redpanda. You’ll be writing a basic word count application to run as a stream-processing job in Flink.
Let’s face it — word count is the “Hello world!” of big data. While word count seems like a simple exercise, it helps to teach you the basics of reading data from a source, processing it, and producing a specific output. Using real data, you will likely need more complex processing routines, but the basic principles of word count (read, process, output) stay the same. Once you've got the basics down, it will be easier to implement a more complex processing loop.
While there are a variety of popular data processing tools on the market, some of the key features that set Flink apart include the following:
Most of the data you send to Flink will be a data stream of some kind. Unbounded streams are data streams that have a start but no end. These streams are continually processed and shouldn't end. A good example of an unboaded stream would be reading messages from Twitter, which is achieved using Flink's DataStream API. You can also change the execution mode of the DataStream API to handle bounded streams. By default, the behavior of the DataStream API is to execute a job in "Streaming Mode". You can, however, change the execution mode to "Batch Mode" and the API will process the stream in a more traditional manner. You should only use "Batch Mode" for bounded streams that have a known fixed input and that do not need to run continuously.
Many companies around the world that deal with big data streams, like Netflix and Airbnb, use Flink to process those streams. Organizations also use Flink for fraud detection or network monitoring—use cases that usually involve big data streams.
To get started with the tutorial, you’ll first install Redpanda and Flink directly on your own machine. You’ll be using Docker and Docker Compose to install all the different components.
Docker should work well in both Linux and Mac environments. There are also other tools available on Mac, like Docker Desktop, that can help you get set up quickly.
Please consult the installation documentation for Docker should you get stuck along the way.
Additionally, of the code used to run this demo can be found in this GitHub repo.
Here, you will be combining several containers in a single docker-compose.yml file. This has the added benefit of making sure the different containers are operating on the same Docker network bridge and can reach each other’s published ports.
Create a directory where you will store your docker-compose.yml file:
$ mkdir redpanda_flink

$ cd redpanda_flink
Your docker-compose.yml file should look like this:
version: "3"

services:
  redpanda-1:
    hostname: redpanda-1
    command:
    - redpanda
    - start
    - --smp
    - '1'
    - --reserve-memory
    - 0M
    - --overprovisioned
    - --node-id
    - '0'
    - --kafka-addr
    - PLAINTEXT://redpanda-1:29092,OUTSIDE://redpanda-1:9092
    - --advertise-kafka-addr
    - PLAINTEXT://redpanda-1:29092,OUTSIDE://redpanda-1:9092
    image: docker.vectorized.io/vectorized/redpanda:latest
    container_name: redpanda-1
    ports:
    - "9092:9092"
    - "9644:9644"

  jobmanager:
    hostname: flink-jobmanager
    image: flink:latest
    ports:
      - "8081:8081"
    command: jobmanager
    environment:
      - |
        FLINK_PROPERTIES=
        jobmanager.rpc.address: jobmanager

  taskmanager:
    hostname: flink-taskmanager
    image: flink:latest
    depends_on:
      - jobmanager
    command: taskmanager
    scale: 1
    environment:
      - |
        FLINK_PROPERTIES=
        jobmanager.rpc.address: jobmanager
        taskmanager.numberOfTaskSlots: 2
Something to take note of in the docker-compose.yml file is that you are advertising your kafka-addr setting as redpanda-1:9092. This makes use of a feature in Docker that binds the hostname of a container to internal DNS entries so that different containers can access ports on other containers using the appropriate hostname, which Docker resolves to the correct IP address.
You can start all the containers mentioned in your docker-compose.yml file by running the following command:$ docker-compose up
Now let’s run a few checks in another terminal window to make sure everything is running as it should. Use this command to check your Redpanda cluster’s status:$ docker exec -it redpanda-1 rpk cluster info
You should get a message similar to this:
BROKERS
=======
ID    HOST        PORT
0*    redpanda-1  29092
If you get a message like this, your Redpanda cluster is listening and good to go!
To test whether your Flink containers are up and running, you can navigate to http://localhost:8081 using your browser, where you will be greeted by Flink’s Overview Dashboard:

Now that you have both Redpanda and Flink up and running, you can continue your quest to get the two to communicate.
For the purpose of this tutorial, you’ll use a very simple example. Create a topic in your Redpanda container that Flink will consume from. In this example, you’ll create a words topic that will record random words that you type in:$ docker exec -it redpanda-1 rpk topic create words
The output will look like this:
TOPIC  STATUS
words  OK
You can use the topic describe command to get more information about your newly created topic:$ docker exec -it redpanda-1 rpk topic describe words
This will provide a detailed description of the topic:
SUMMARY
=======
NAME        words
PARTITIONS  1
REPLICAS    1

CONFIGS
=======
KEY                     VALUE                          SOURCE
cleanup.policy          delete                         DYNAMIC_TOPIC_CONFIG
compression.type        producer                       DEFAULT_CONFIG
message.timestamp.type  CreateTime                     DEFAULT_CONFIG
partition_count         1                              DYNAMIC_TOPIC_CONFIG
redpanda.datapolicy     function_name:  script_name:   DEFAULT_CONFIG
redpanda.remote.read    false                          DEFAULT_CONFIG
redpanda.remote.write   false                          DEFAULT_CONFIG
replication_factor      1                              DYNAMIC_TOPIC_CONFIG
retention.bytes         -1                             DEFAULT_CONFIG
retention.ms            604800000                      DEFAULT_CONFIG
segment.bytes           1073741824                     DEFAULT_CONFIG
Next, it’s time to enter some mock data. You can do this directly via rpk, the Redpanda command-line interface, which can be run from inside the Docker container. Use the topic produce command to input information directly to your topic:$ docker exec -it redpanda-1 rpk topic produce words
This puts rpk into produce mode, and you can simply enter the words you need.
Press Enter after every line to save the record and press Ctrl+D when you’re finished recording entries. Below are the entries that I used, though you are free to use your own if you’d like.
here we go again, I feel the chemicals kicking in
what about us? what about all the broken happy ever afters?
they don't really care about us
take a sad song and make it better
it's the end of the world as we know it, and I feel fine
Again, you can exit produce mode when you’re finished by pressing Ctrl+D.
Note that when you press Enter after every line, you will be greeted by a message similar to this:Produced to partition 0 at offset 0 with timestamp 1650703779684.
This simply serves to tell you that Redpanda has successfully written the record for consumption later.
You can review the entries you’ve written to Redpanda by using the topic consume command:$ docker exec -it redpanda-1 rpk topic consume words
Your output might look different than mine, depending on whether you entered the same words:
{
  "topic": "words",
  "value": "here we go again, I feel the chemicals kicking in",
  "timestamp": 1650798799655,
  "partition": 0,
  "offset": 0
}
{
  "topic": "words",
  "value": "what about us? what about all the broken happy ever afters?",
  "timestamp": 1650798837373,
  "partition": 0,
  "offset": 1
}
{
  "topic": "words",
  "value": "they don't really care about us",
  "timestamp": 1650798850829,
  "partition": 0,
  "offset": 2
}
{
  "topic": "words",
  "value": "take a sad song and make it better",
  "timestamp": 1650798861138,
  "partition": 0,
  "offset": 3
}
{
  "topic": "words",
  "value": "it's the end of the world as we know it, and I feel fine",
  "timestamp": 1650798877223,
  "partition": 0,
  "offset": 4
}
All the entries you’ve recorded are available for consumption by Flink now.
While you’re here, go ahead and create a topic for Flink to send the processed results to:$ docker exec -it redpanda-1 rpk topic create words-count
The output should look like this:
TOPIC       STATUS
words-count OK
TOPIC STATUS
words-count OK
Flink jobs are Java applications that can read from a source, process the data from that source, and then output to a destination, also called a sink in Flink terminology.
You can create a boilerplate Java application using Maven, which will set up most of the Java project for you.
Run the following Maven command to set up your Java project:
$ mvn archetype:generate                               \
      -DarchetypeGroupId=org.apache.flink              \
      -DarchetypeArtifactId=flink-quickstart-java      \
      -DarchetypeVersion=1.14.4
The archetypeVersion variable should match the version of Flink that you’re running.
Next, you will be prompted for a few Java-specific variables, such as package name. You can follow this example:
Define value for property 'groupId': com.my.examples.redpandaFlink
Define value for property 'artifactId': WordCount
Define value for property 'version' 1.0-SNAPSHOT: :
Define value for property 'package' com.my.examples.redpandaFlink: :
Confirm properties configuration:
groupId: com.my.examples.redpandaFlink
artifactId: WordCount
version: 1.0-SNAPSHOT
package: com.my.examples.redpandaFlink
 Y: : Y
Once the project has been built, you should see output similar to this:
...
[INFO] BUILD SUCCESS
[INFO] ------------------------------------------------------------------------
[INFO] Total time:  35.000 s
[INFO] Finished at: 2022-04-23T14:18:02+02:00
[INFO] ------------------------------------------------------------------------
You can choose to edit the Java project from the command line, or you can import it into your favorite Java IDE as an existing Maven project.
The finished Maven build will contain the skeleton code for both a StreamingJob and a BatchJob. You will modify the StreamingJob class to demonstrate a long-running job in Flink.
First, though, you need to import the Apache KafkaⓇ connector module into your project. Do so by adding the following to pom.xml in the root of your project directory:
<dependency>
  <groupId>org.apache.flink</groupId>
  <artifactId>flink-connector-kafka_2.12</artifactId>
  <version>${flink.version}</version>
</dependency>
Remember that Redpanda is a drop-in replacement for Kafka, so from Flink’s perspective, you’re connecting to a Kafka data source.
Next, you can modify the StreamingJob.java file located in the src/main/java/com/my/examples/redpandaFlink directory of your project.
The code below was modified from a Redpanda example found here.
Modify the class as follows:
package com.my.examples.redpandaFlink;

import org.apache.flink.api.common.functions.FlatMapFunction;
import org.apache.flink.streaming.api.datastream.DataStream;
import org.apache.flink.api.java.tuple.Tuple2;
import org.apache.flink.util.Collector;
import org.apache.flink.connector.kafka.source.KafkaSource;
import org.apache.flink.connector.kafka.source.enumerator.initializer.OffsetsInitializer;
import org.apache.flink.connector.kafka.sink.KafkaSink;
import org.apache.flink.connector.kafka.sink.KafkaRecordSerializationSchema;
import org.apache.flink.api.common.serialization.SimpleStringSchema;
import org.apache.flink.streaming.api.environment.StreamExecutionEnvironment;
import org.apache.flink.api.common.eventtime.WatermarkStrategy;

// this code was mostly cobbled together from an original demo found at:
// https://github.com/redpanda-data/flink-kafka-examples/blob/main/src/main/java/io/redpanda/examples/WordCount.java

public class StreamingJob {
    final static String inputTopic = "words";
    final static String outputTopic = "words-count";
    final static String jobTitle = "WordCount";

    public static void main(String[] args) throws Exception {
        // Redpanda is listening on localhost. Remember to use the container name for the address
        final String bootstrapServers = args.length > 0 ? args[0] : "redpanda-1:9092";

        // set up the streaming execution environment
        final StreamExecutionEnvironment env = StreamExecutionEnvironment.getExecutionEnvironment();

        KafkaSource<String> source = KafkaSource.<String>builder()
                .setBootstrapServers(bootstrapServers)
                .setTopics(inputTopic)
                .setStartingOffsets(OffsetsInitializer.earliest())
                .setValueOnlyDeserializer(new SimpleStringSchema())
                .build();

        KafkaRecordSerializationSchema<String> serializer = KafkaRecordSerializationSchema.builder()
                .setValueSerializationSchema(new SimpleStringSchema())
                .setTopic(outputTopic)
                .build();

        KafkaSink<String> sink = KafkaSink.<String>builder()
                .setBootstrapServers(bootstrapServers)
                .setRecordSerializer(serializer)
                .build();

        DataStream<String> text = env.fromSource(source, WatermarkStrategy.noWatermarks(), "Redpanda Source");

        // Split up the lines in pairs (2-tuples) containing: (word,1)
        DataStream<String> counts = text.flatMap(new Tokenizer())
        // Group by the tuple field "0" and sum up tuple field "1"
        .keyBy(value -> value.f0)
        .sum(1)
        .flatMap(new Reducer());

        // Add the sinkTo so results
        // are written to the outputTopic
        counts.sinkTo(sink);

        // Execute program
        env.execute(jobTitle);
    }

    /**
     * Implements the string tokenizer that splits sentences into words as a user-defined
     * FlatMapFunction. The function takes a line (String) and splits it into multiple pairs in the
     * form of "(word,1)" ({@code Tuple2<String, Integer>}).
     */
    public static final class Tokenizer
            implements FlatMapFunction<String, Tuple2<String, Integer>> {

        @Override
        public void flatMap(String value, Collector<Tuple2<String, Integer>> out) {
            // Normalize and split the line
            String[] tokens = value.toLowerCase().split("\\W+");

            // Emit the pairs
            for (String token : tokens) {
                if (token.length() > 0) {
                    out.collect(new Tuple2<>(token, 1));
                }
            }
        }
    }

    // Implements a simple reducer using FlatMap to
    // reduce the Tuple2 into a single string for
    // writing to kafka topics
    public static final class Reducer
            implements FlatMapFunction<Tuple2<String, Integer>, String> {

        @Override
        public void flatMap(Tuple2<String, Integer> value, Collector<String> out) {
            // Convert the pairs to a string
            // for easy writing to Kafka Topic
            String count = value.f0 + " " + value.f1;
            out.collect(count);
        }
    }
}
Once you’ve saved the project, you can use Maven to build a JAR file for Flink to use. In the root of your Java project directory (where pom.xml is located), run the following command:mvn clean package
This will create the JAR file in the target directory of your project. Now you can run this JAR file on Flink. Navigate to the Overview Dashboard (http://localhost:8081) and select Submit New Job on the left-hand menu:

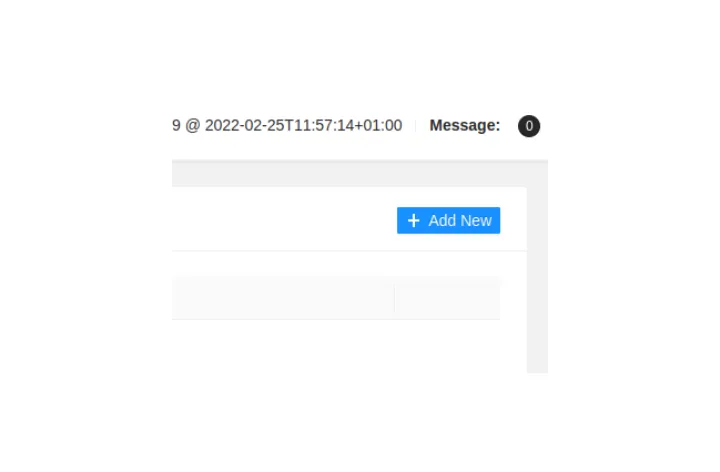
Select Add New close to the top right-hand corner:
Navigate to the target directory where your JAR file was created, and select it for uploading to Flink:

Once uploaded, the JAR file will be listed in “Uploaded Jars.” Click on the entry to expand it for more options:

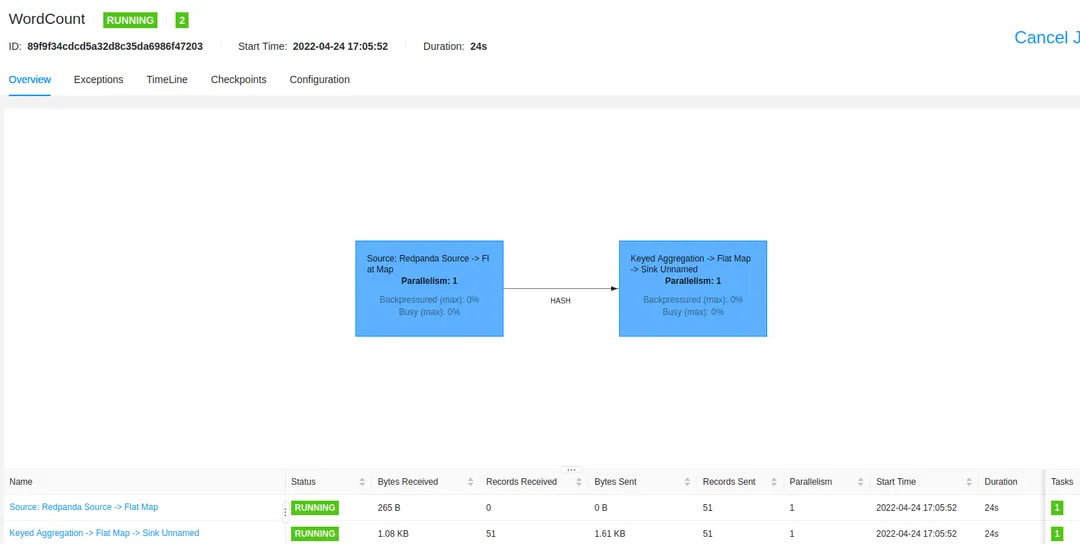
That's it! Once you click Submit, the job will start running in Flink. Currently, the job will read everything that was available in the words topic, process it, and output the results to the words-count topic. Click Submit to see the job being loaded and running:
Already, you can see the results of the processed events by using rpk to consume the words-count topic:$ docker exec -it redpanda-1 rpk topic consume words-count
The output will contain the results from the processed stream:
...
{
  "topic": "words-count",
  "value": "it 3",
  "timestamp": 1650810513443,
  "partition": 0,
  "offset": 46
}
{
  "topic": "words-count",
  "value": "and 2",
  "timestamp": 1650810513443,
  "partition": 0,
  "offset": 47
}
{
  "topic": "words-count",
  "value": "i 2",
  "timestamp": 1650810513443,
  "partition": 0,
  "offset": 48
}
{
  "topic": "words-count",
  "value": "feel 2",
  "timestamp": 1650810513443,
  "partition": 0,
  "offset": 49
}
{
  "topic": "words-count",
  "value": "fine 1",
  "timestamp": 1650810513443,
  "partition": 0,
  "offset": 50
}
You can test that the streaming job is accepting streaming results by producing more words in another terminal window while still watching the rpk topic consume words-count window:$ docker exec -it redpanda-1 rpk topic produce words
You will be in produce mode again:
my time has come
Produced to partition 0 at offset 5 with timestamp 1650813079649.
The processed results are as follows:
{
  "topic": "words-count",
  "value": "my 1",
  "timestamp": 1650813079649,
  "partition": 0,
  "offset": 51
}
{
  "topic": "words-count",
  "value": "time 1",
  "timestamp": 1650813079649,
  "partition": 0,
  "offset": 52
}
{
  "topic": "words-count",
  "value": "has 1",
  "timestamp": 1650813079649,
  "partition": 0,
  "offset": 53
}
{
  "topic": "words-count",
  "value": "come 1",
  "timestamp": 1650813079649,
  "partition": 0,
  "offset": 54
}In this tutorial, you have successfully learned to set up Redpanda and Flink, create a stream processing application in Java, and deploy said application to Flink. You can now apply this knowledge to any real-world scenario in which you want to process the streaming data that an organization, application, or website produces.
If you want to get the project up and running on your side, clone the Github repository here. The repository contains all the code of the Maven skeleton project, including all the changes you need to make to get a working Flink job.This will get you up and running to do even more complex stream processing, especially when you take into account the powerful features of Flink. And, with Redpanda as your data-streaming platform, you’re automatically API-compatible with Kafka and any of your pre-existing Kafka projects.
Learn more about using Redpanda in the documentation here, or download the binary from GitHub. You can also join Redpanda’s Slack Community to see what other people are building.
Subscribe to our VIP (very important panda) mailing list to pounce on the latest blogs, surprise announcements, and community events!
Opt out anytime.