Full CDC semantics land in the Iceberg output for Redpanda Connect
Your lakehouse mirrors the database, instantly.

Run a ready-made chat app with built-in sentiment analysis and even a profanity filter


Ever wondered how to integrate sentiment analysis or another type of text analysis into a chat application? In this tutorial, I’ll show you how to do just that. By the end, you’ll have a solution that you can run in production. To build, deploy, and run the application, you’ll use Quix, a tool to develop and run event streaming applications, and Redpanda Cloud as a message broker.
Deploying an application with multiple backend services might sound daunting, but this tutorial shouldn’t take you more than 30 minutes. There’s no server setup, database configurations, or even container orchestration. With Quix, you get to bypass all that hassle. It’s like having your own GitHub Codespace, but with a build, deployment, and runtime environment too.
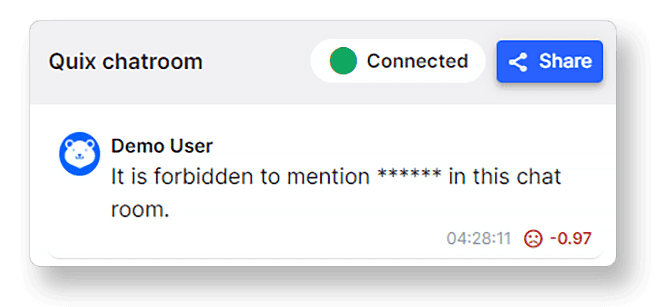
Before we get into the tech, here’s how the final result will look:
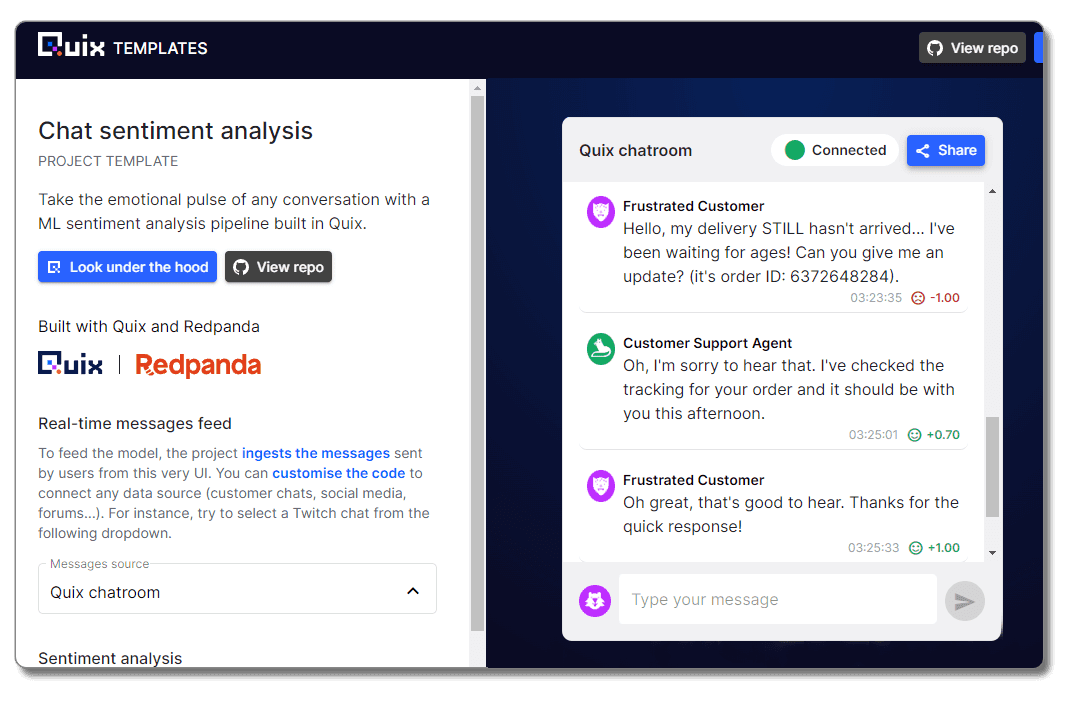
You can try the demo right now.
If you’ve ever built any kind of messaging app, you know there are a bunch of moving parts — data ingestion, text analysis, database storage, chat moderation, UI updates, you name it. What makes this demo app so convenient is that it’s all neatly organized into separate services that interact through topics in Redpanda.
In fact, you can see this for yourself—just look under the hood. There, you’ll see a read-only version of the deployment environment where you can inspect the code for each service.
What’s more, this whole demo is based on one of several project templates that anyone can fork and reuse. So you can fork and deploy the whole project to a free Quix trial account should you want to tinker with it and customize it.
There are two major steps to getting a copy of the project (and any of our demo applications):
For the second part, you’ll need a Quix account. If you haven’t created one yet, you can sign up (even with an existing Google, GitHub, or Microsoft account).
After you have the basics set up, we’ll dive into the code and look at how you can change it.
To get a handle on the code, let’s first fork the Chat sentiment analysis app repository. Why fork rather than clone? Because, later you’ll be bringing that code into your own Quix environment, and using a fork is the easiest way to keep your environment synchronized. You’ll also be able to get any upstream changes we make to the project template.
For the sake of simplicity, I’m assuming you already have a GitHub account. However, you might want to create a specific git user for this project. Later you’ll be giving Quix SSH access to the repository and having a separate user is a good way to ensure that Quix does not have more access than it should.
Assuming you have a test GitHub account (or an account with no access to mission-critical repos), follow these steps:

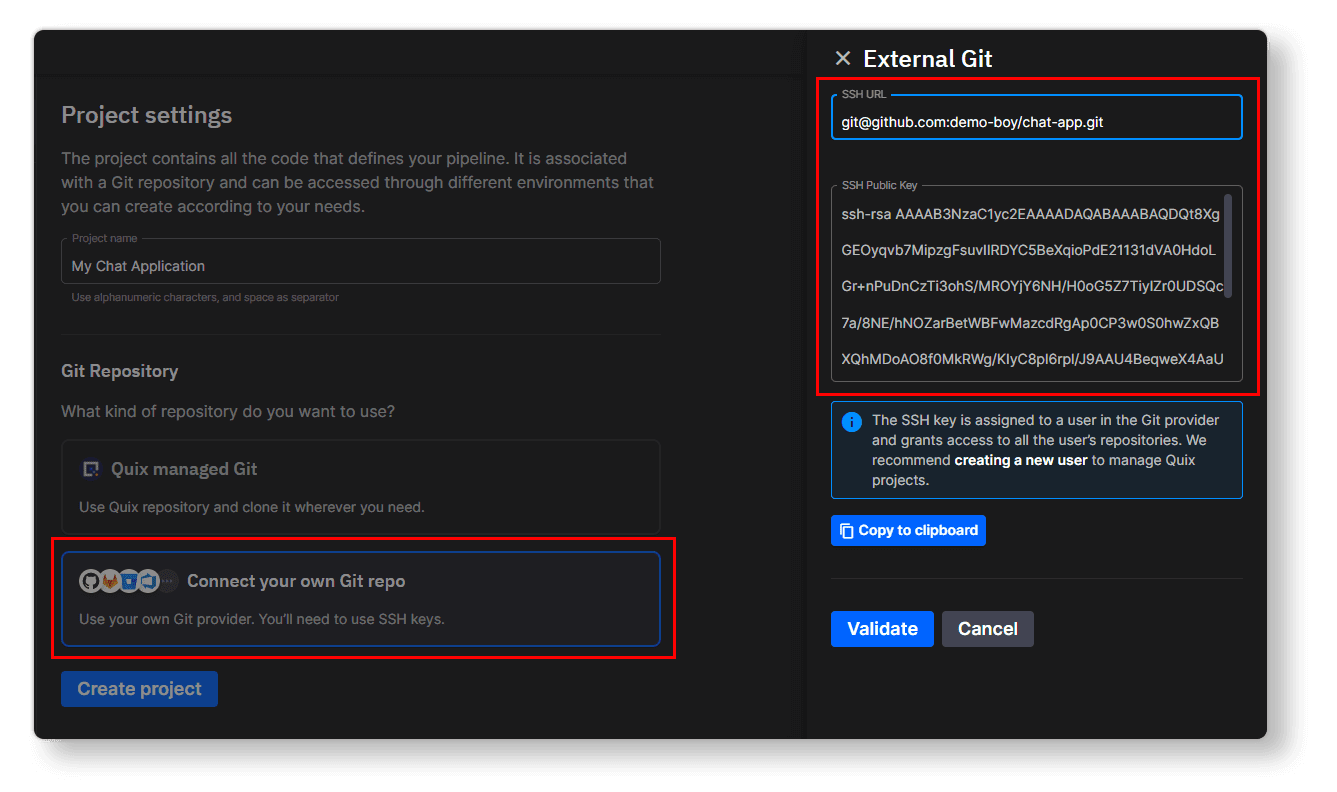
Before you can create an environment in Quix, you first need to create a project. With the git integration, a project corresponds to a repository and an environment corresponds to a branch. That’s why, during the project creation wizard, you’ll then be asked to add an initial environment. You can add more environments later once you get the hang of things.
To create a project and connect an environment to your forked repo, follow these steps:
Tutorial for the environment name and select the tutorial branch from your forked repo.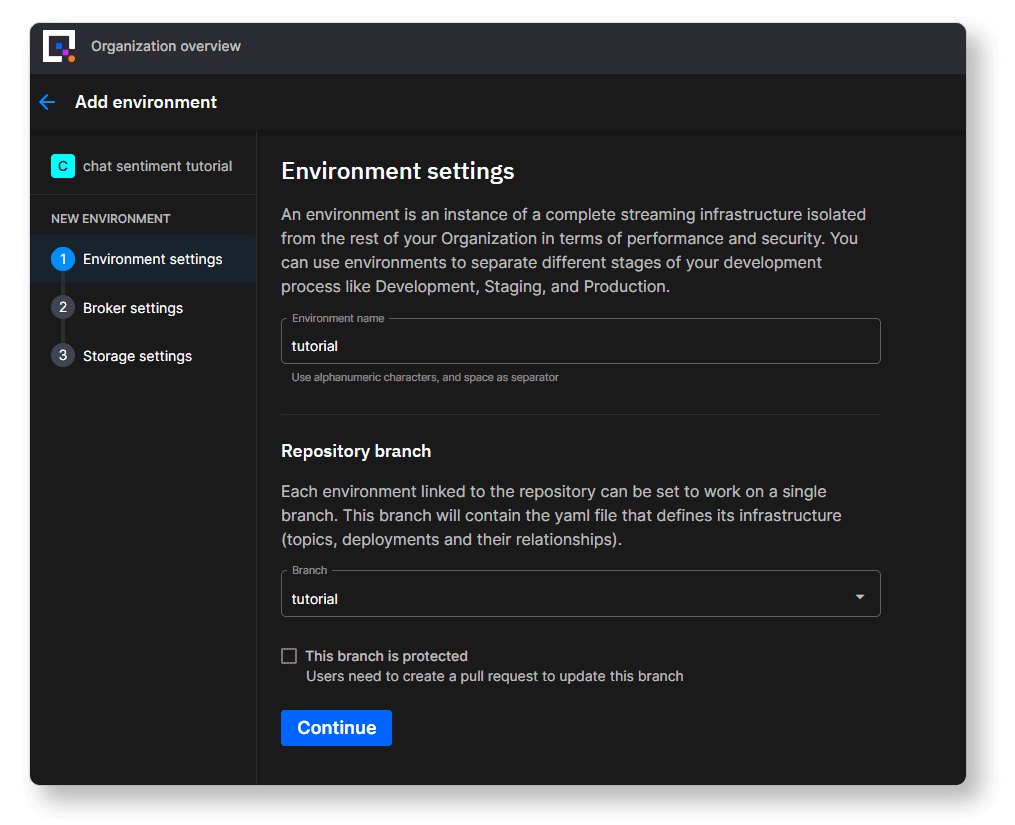


Did everything go according to plan? I hope so. The idea with project templates is that everything just runs “out of the box.” Getting a demo application with that many services up and running so quickly is no mean feat. In other cloud environments, there’s usually a lot more configuration you’ll need to do before you can get anything to build or run.
Now let’s go over how the app works and make some changes.
Before you start changing the code, it helps to understand a little bit about the application’s architecture. The key components of the application can be simplified down to this abstraction with two key components: sentiment demo UI and sentiment analysis services.
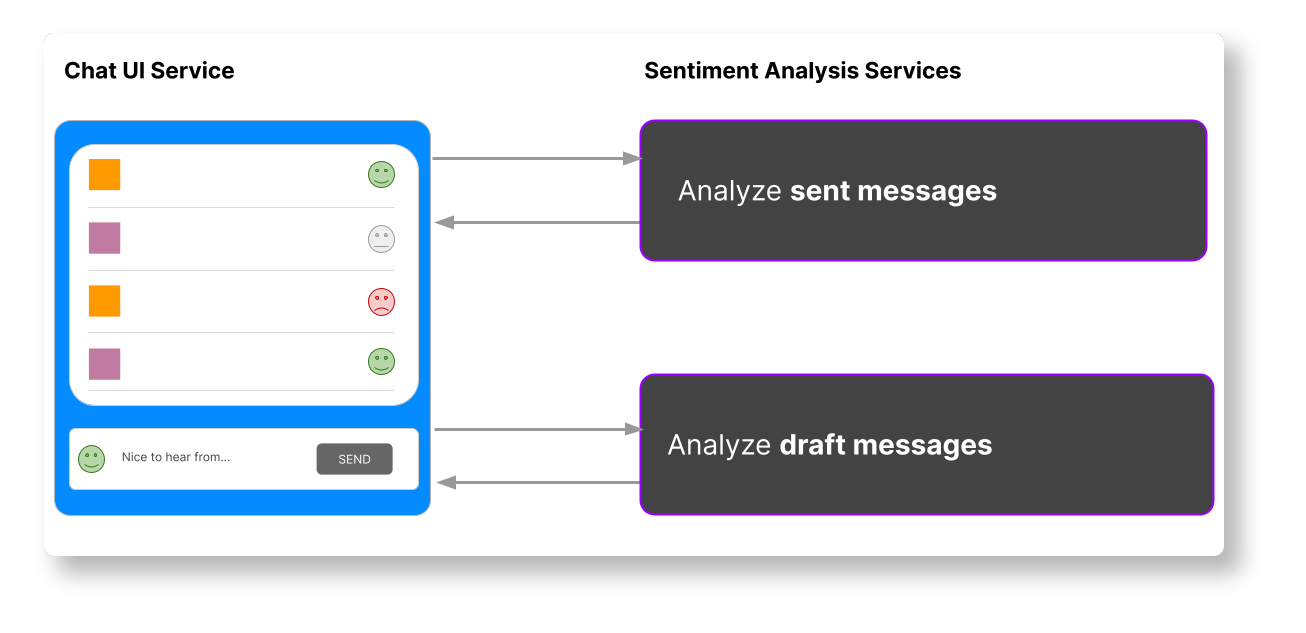
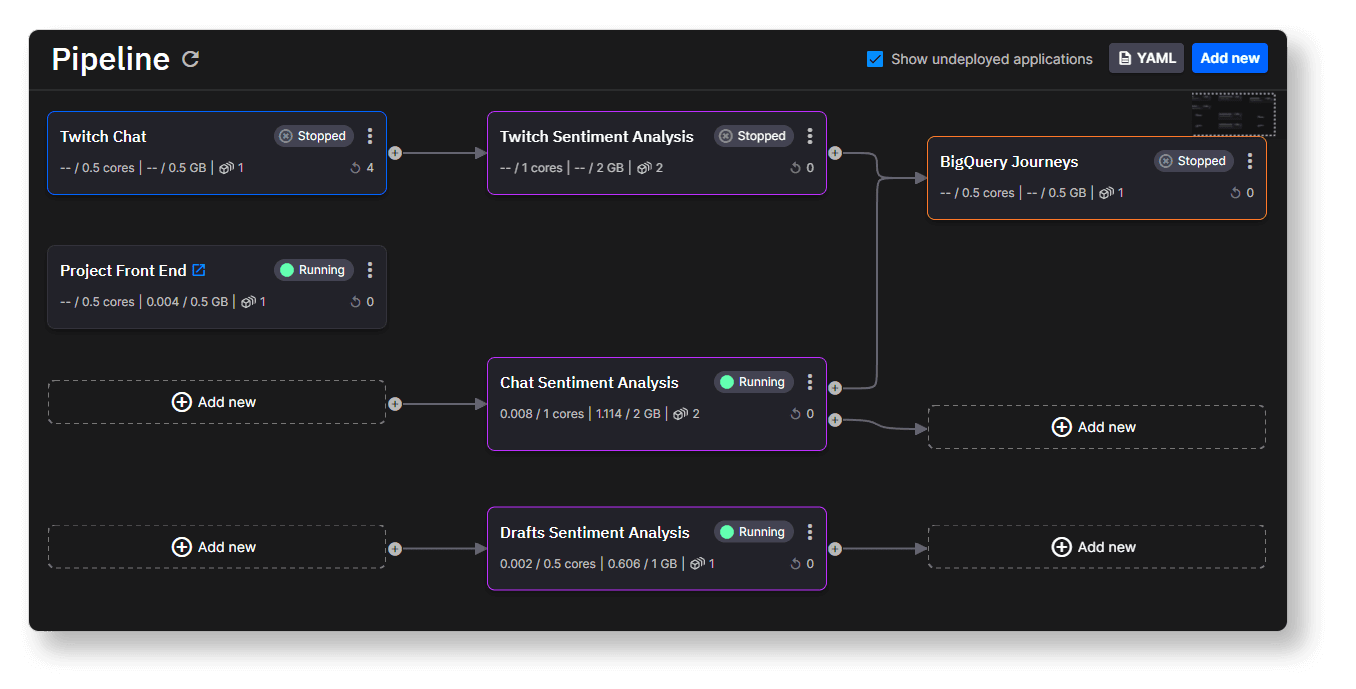
Of course, what you’ll see on the Pipeline page in Quix is a little more complex. It gives you an overview of the app’s architecture, but there are a few hidden details. I’ve annotated the following screenshot with this extra information:

I won’t go into too much detail about the specifics of the individual services because the documentation does a good job of that already. But if you want to know more about how they work, here is some reference information with links to the documentation.
If you click the service name you can see the actual service running in a Quix read-only environment including the runtime logs and data lineage.
Service name
Description
Optional service that allows you to pull in live chat messages from Twitch channels and see sentiment analysis performed on those messages. [Documentation] [Source code]
Chat sentiment analysis service
Uses the default Hugging Face Transformers model for sentiment analysis to calculate sentiment scores for each chat message. [Documentation] [Source code]
A chat room user interface to demonstrate how you can connect a frontend to a backend running in Quix. [Documentation] [Source code]
Optional service that provides an example of how you can stream the chat history into a BigQuery database for offline analysis. [Source code]
In this tutorial, I want to focus on showing you how to customize the project for your own requirements.
A demo is all fine and good, but it’s more useful if you can customize it for your own use case. From here on, I’ll assume you’ve got a bit of development experience under your belt since you’ll be making changes to the code. Non-developers are welcome to tackle this challenge too, but just bear in mind that the content is aimed at people with coding experience. Anyway, let’s get started.
I’ll show you how to do the following update to the backend to check chat messages for banned words and replace those words with asterisks.
To prepare for these steps, first clone our tutorial code repository:
git clone https://github.com/quixio/tutorial-code.git
In the repository, navigate to the “chat-with-sentiment-exercise” folder. There, you’ll find two subfolders.
Since this is a two-part tutorial, you’ll only need the files from the “Sentiment analysis folder” for now. In part two, you’ll learn how to update the frontend with replacement files from the “Sentiment Demo UI” tutorial folder.
We’ll implement the censorship in the backend so you can keep the history of the original chat messages as well as the censored versions (which is useful for debugging and analysis). To keep things simple, you’ll embed the censorship logic into the sentiment analysis service. In production, the censorship mechanism should probably run in its own service, but since the sentiment service is already processing messages anyway, it’s an easy shortcut.
The first thing you need is a new topic to place the sanitized chat messages. Not sure what a topic is? The Redpanda documentation is a good starting point, but in essence, topics are described as similar to a folder in a filesystem, and the events, in the form of messages, are the files in that folder. You’ll learn how to create one in the Quix UI, which is a very simple process.
The basic idea of this exercise is to have the sentiment analysis service send its output to two topics.
To create a topic in the Quix Portal, follow these steps:
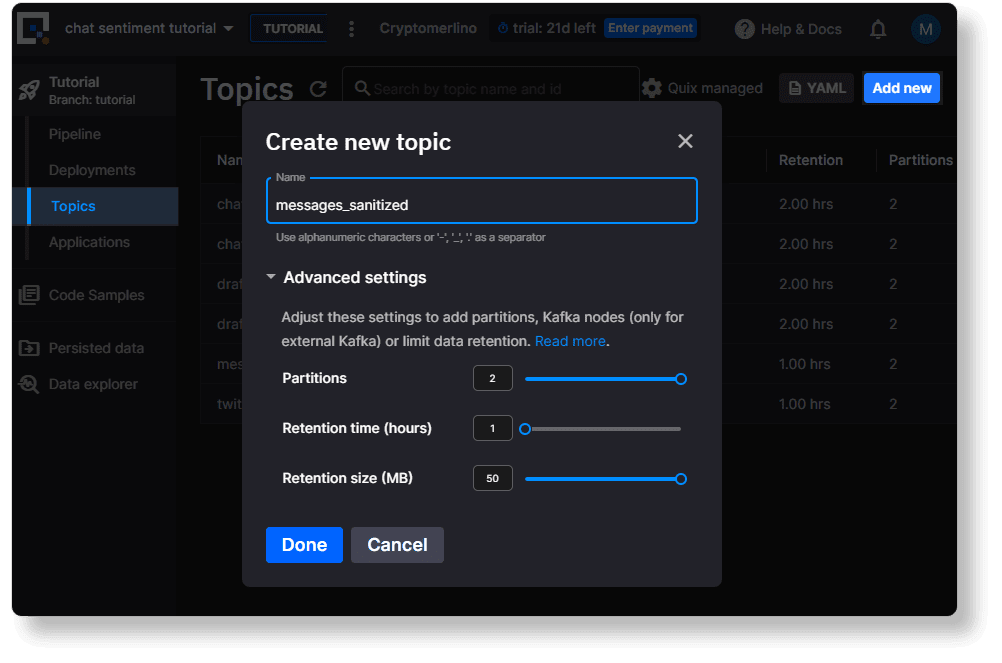
Now that you have somewhere to put your censored messages, let’s update the sentiment analysis service to censor inappropriate language and send the messages to “messages_sanitized”.
First, open the source code for this service in the Quix IDE.
We’re going to update main.py and quix_function.py, but first we need to add the banned words list.
Next, set a new environment variable that stores the name of the new “messages_sanitized” topic. (This makes it easier to switch topics later).
Now, in the Quix IDE, replace the code main.py and quix_function.py with the updated versions from the tutorial-code repository (click “Commit” to save each file).
Updated versions:
Once you’ve committed the changes, it’s a good idea to tag your most recent revision so it’s easier to tell which version of the code you want a deployment to use.
Now redeploy the service (or click Run if you want to test it first).
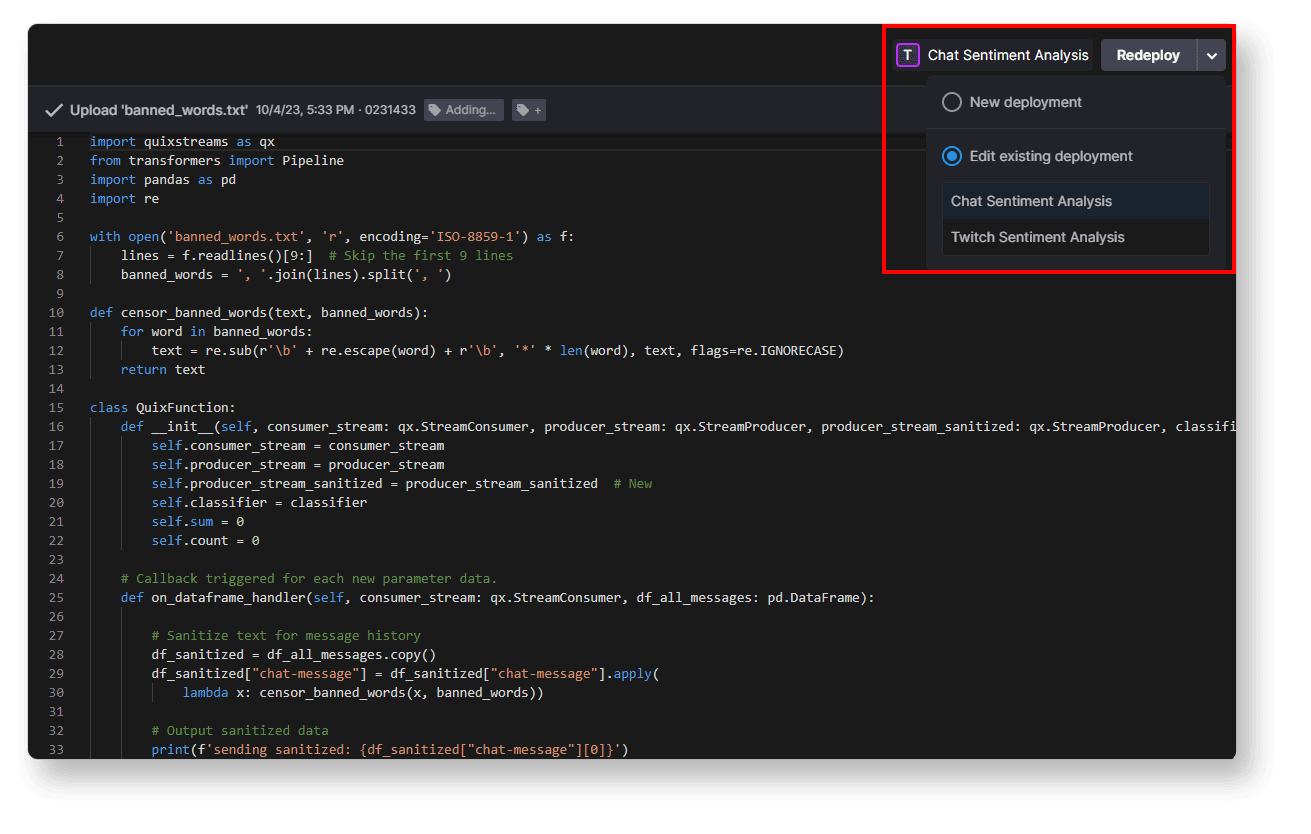
In the deployment settings dialog, select the tag that you just created so it’s clearer what change the deployment is using.
Navigate back to the Pipeline page where you should see a loading indicator on the “Sentiment analysis” deployment.
Now you can already test this update in a limited sense. The banned words won’t be censored in the frontend yet, but you can check to make sure the censored versions of the messages are being written to the “messages_sanitized” topic.
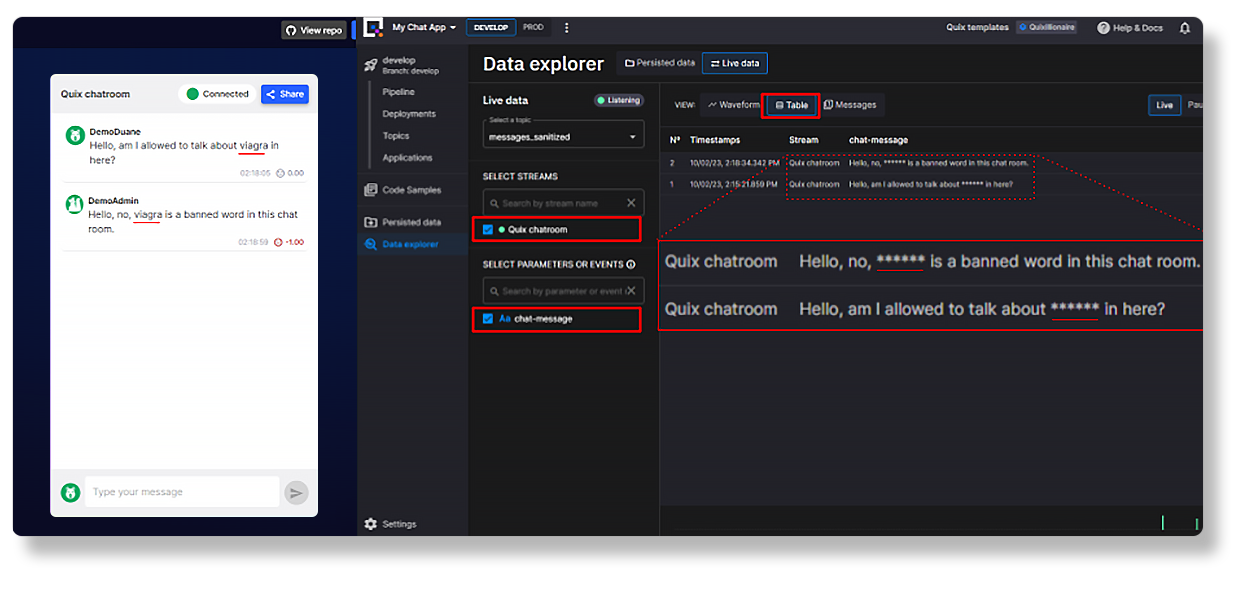
Hopefully, you should start to see chat messages coming through your new topic. If you got this far, congratulations! But the journey doesn’t have to be over yet.
To learn how to update the frontend so that the censored messages are actually displayed in the chat history, keep an eye out for part two of this tutorial!
If you have any issues, be sure to join the Quix Community on Slack and post your questions. You can also find us in the Redpanda Community on Slack and chat with their engineers about Redpanda Cloud.
Originally posted in The New Stack.
Subscribe to our VIP (very important panda) mailing list to pounce on the latest blogs, surprise announcements, and community events!
Opt out anytime.