Full CDC semantics land in the Iceberg output for Redpanda Connect
Your lakehouse mirrors the database, instantly.

A step-by-step tutorial to capture changed data for high-throughput, low-latency applications


You can build a real-time CDC pipeline between ScyllaDB and Redpanda by setting up ScyllaDB and Redpanda, creating a standalone Kafka Connect cluster, and incorporating the ScyllaDB CDC Connector JAR files as plugins. This allows you to establish a connection between ScyllaDB and Kafka Connect. The tutorial uses ScyllaDB's CDC quickstart guide, which streams data from an arbitrary orders table for an e-commerce business to a sink using the Kafka Connect-compatible Debezium connector.
To set up Redpanda, use the docker-compose.yaml file in the Redpanda Docker quickstart tutorial to run the necessary command. A Redpanda cluster and a Redpanda console will be up and running after a brief wait. You can check the status of the Redpanda cluster using the rpk CLI tool.
To set up a CDC pipeline between ScyllaDB and Redpanda, you'll need Docker Engine and Docker Compose, a Redpanda instance on Docker, a ScyllaDB instance running on Docker, ScyllaDB Kafka Connect drivers, the jq CLI tool, and the rpk CLI tool.
Change Data Capture (CDC) is a methodology for capturing change events from a source database. Once captured, these change events can be used for many downstream use cases, such as triggering events based on specific conditions, auditing, and analytics.
ScyllaDB is a distributed, wide-column NoSQL database known for its ultra-fast performance. It's written in C++ to make the best use of the low-level Linux primitives, which helps attain much better I/O. ScyllaDB’s modern approach to NoSQL and its architecture supporting data-intensive and low-latency applications make it an excellent choice for applications like fast-moving IoT, time series, and e-commerce data.
Data-intensive applications involve fast changes to data, especially those that deal with e-commerce or financial trading. You can create workflows based on changing data decoupled from the main application. This is where change data capture (CDC) comes in.
CDC is a methodology for capturing change events from a source database. Once captured, the change events can be used for many downstream use cases, such as triggering events based on specific conditions, auditing, and analytics.
ScyllaDB is a distributed, wide-column NoSQL database known for its ultra-fast performance as it's written in C++ to make the best use of the low-level Linux primitives, which helps attain much better I/O. It's also an excellent alternative to DynamoDB and a drop-in replacement for Apache Cassandra.
ScyllaDB’s modern approach to NoSQL and its architecture supporting data-intensive and low-latency applications make it an excellent choice for many applications. ScyllaDB shines when you need it to respond and scale super fast. ScyllaDB can be the primary database in many use cases, but it's best suited for fast-moving IoT, time series, and e-commerce data.
Since both ScyllaDB and Redpanda are purpose-built for data-intensive applications, it makes perfect sense to connect the two. This post will take you through setting up a CDC integration between ScyllaDB and Redpanda, using a Debezium CDC connector that's compatible with Kafka Connect. Let's dig in.
This tutorial will first guide you through the process of setting up ScyllaDB and Redpanda. You'll create a standalone Kafka Connect cluster and incorporate the ScyllaDB CDC Connector JAR files as plugins. This will allow you to establish a connection between ScyllaDB and Kafka Connect.
This tutorial uses ScyllaDB's CDC quickstart guide, which takes an arbitrary orders table for an e-commerce business and streams data from that to a sink using the Kafka Connect-compatible Debezium connector. The following image depicts the simplified architecture of the setup:
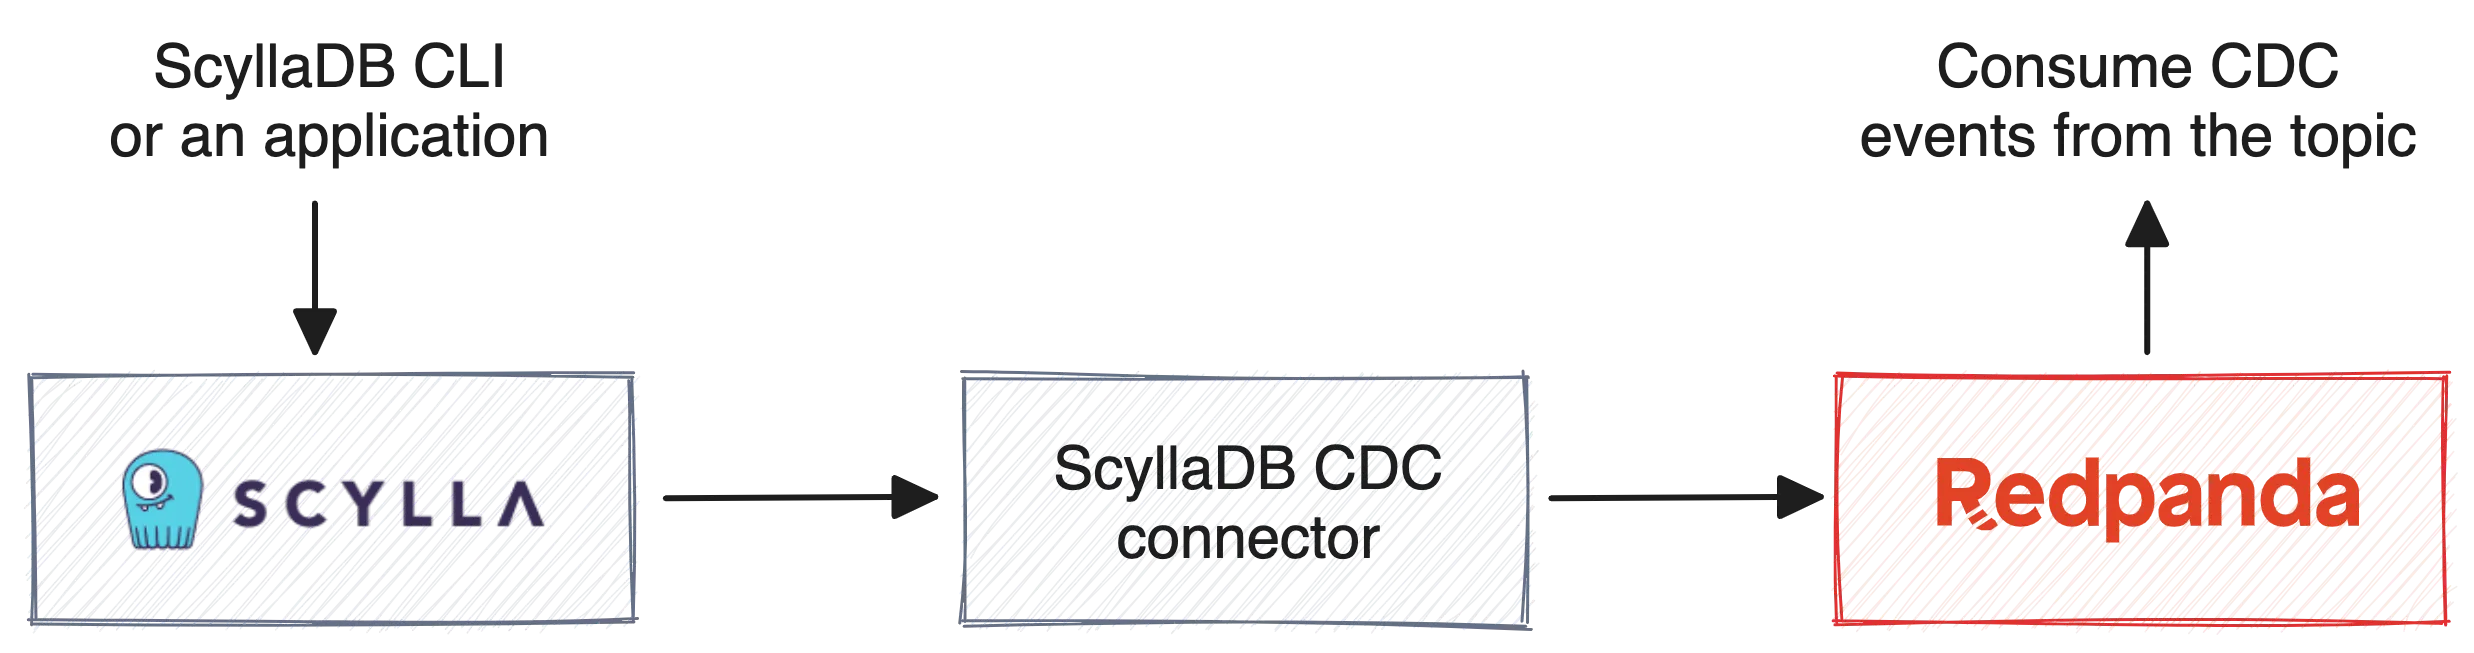
Connecting ScyllaDB and Redpanda using Kafka Connect
The orders table receives new orders and updates on previous orders. In this example, you'll insert a few simple orders with an order_id, a customer_id, and a product. You'll first insert a few records in the orders table and then perform a change on one of the records. All the data, including new records, changes, and deletes, will be available as change events on the Redpanda topic you've tied to the ScyllaDB orders table.
To complete this tutorial, you'll need the following:
jq CLI toolrpk CLI toolNote: The operating system used in this tutorial is macOS.
After installing and starting Docker Engine on your machine, execute the following Docker command to get ScyllaDB up and running:
docker run --rm -ti \
  -p 127.0.0.1:9042:9042 scylladb/scylla \
  --smp 1 --listen-address 0.0.0.0 \
  --broadcast-rpc-address 127.0.0.1
This command will spin up a container with ScyllaDB, accessible on 127.0.0.1 on port 9042. To check ScyllaDB's status, run the following command that uses the ScyllaDB nodetool utility:
docker exec -it 225a2369a71f nodetool status This command should give you an output that looks something like the following:
Datacenter: datacenter1
=======================
Status=Up/Down
|/ State=Normal/Leaving/Joining/Moving
--  Address  Load       Tokens       Owns    Host ID                               Rack
UN  0.0.0.0  256 KB     256          ?       2597950d-9cc6-47eb-b3d6-a54076860321  rack1
The UN at the beginning of the table output means Up and Normal. These two represent the cluster's status and state, respectively.
To set up CDC on ScyllaDB, you first need to log in to the cluster using the cqlsh CLI. You can do that using the following command:
docker exec -it 225a2369a71f cqlshIf you're able to log in successfully, you'll see the following message:
Connected to  at 0.0.0.0:9042.
[cqlsh 5.0.1 | Cassandra 3.0.8 | CQL spec 3.3.1 | Native protocol v4]
Use HELP for help.
cqlsh>
Keyspaces are high-level containers for all the data in ScyllaDB. A keyspace in ScyllaDB is conceptually similar to a schema or database in MySQL. Use the following command to create a new keyspace called quickstart_keyspace with SimpleStrategy replication and a replication_factor of 1:
CREATE KEYSPACE quickstart_keyspace WITH REPLICATION = {'class': 'SimpleStrategy', 'replication_factor': 1};Now, use this keyspace for further CQL commands:
USE quickstart_keyspace;
Please note that the SimpleStrategy replication class is not recommended for production use. Instead, you should use the NetworkTopologyStrategy replication class. You can learn more about replication methodologies from ScyllaDB University.
Use the following CQL statement to create the orders table described at the beginning of the tutorial:
CREATE TABLE orders(
   customer_id int,
   order_id int,
   product text,
   PRIMARY KEY(customer_id, order_id)) WITH cdc = {'enabled': true};
This statement creates the orders table with a composite primary key consisting of customer_id and order_id. The orders table will be CDC-enabled.
ScyllaDB stores table data in a base table, but when you enable CDC on that table, an additional table that captures all the changed data is created as well. That table is called a log table.
Populate a few records for testing purposes:
INSERT INTO quickstart_keyspace.orders(customer_id, order_id, product) VALUES (1, 1, 'pizza');
INSERT INTO quickstart_keyspace.orders(customer_id, order_id, product) VALUES (1, 2, 'cookies');
INSERT INTO quickstart_keyspace.orders(customer_id, order_id, product) VALUES (1, 3, 'tea');
During the course of the tutorial, you'll insert three more records and perform an update on one record, totaling seven events in total, four of which are change events after the initial setup.
Use the docker-compose.yaml file in the Redpanda Docker quickstart tutorial to run the following command:
docker compose up -dA Redpanda cluster and a Redpanda console will be up and running after a brief wait. You can check the status of the Redpanda cluster using the following command:
docker exec -it redpanda-0 rpk cluster info
The output of the command should look something like the following:
CLUSTER
=======
redpanda.3fdc3646-9c9d-4eff-b5d6-854093a25b67

BROKERS
=======
ID    HOST        PORT
0*    redpanda-0  9092
Before setting up an integration between ScyllaDB and Redpanda, check if all the Docker containers you have spawned are running by using the following command:
docker exec -it redpanda-0 rpk cluster infodocker ps --format "table {{.Image}}\t{{.Names}}\t{{.Status}}\t{{.Ports}}"
Look for the STATUS column in the table output:
IMAGE                                               NAMES              STATUS       PORTS
scylladb/scylla                                     gifted_hertz       Up 8 hours   22/tcp, 7000-7001/tcp, 9160/tcp, 9180/tcp, 10000/tcp, 127.0.0.1:9042->9042/tcp
docker.redpanda.com/vectorized/console:v2.2.4       redpanda-console   Up 9 hours   0.0.0.0:8080->8080/tcp
docker.redpanda.com/redpandadata/redpanda:v23.1.8   redpanda-0         Up 9 hours   8081-8082/tcp, 0.0.0.0:18081-18082->18081-18082/tcp, 9092/tcp, 0.0.0.0:19092->19092/tcp, 0.0.0.0:19644->9644/tcp
If these containers are up and running, you can start setting up the integration.
Download and install Kafka using the following sequence of commands:
# Extract the binaries
wget https://downloads.apache.org/kafka/3.4.0/kafka_2.13-3.4.0.tgz && tar -xzf kafka_2.13-3.4.0.tgz && cd kafka_2.13-3.4.0

#start Kafka connect in standalone mode
bin/connect-standalone.sh config/connect-standalone.properties
The .properties files will be kept in the kafka_2.13-3.4.0/config folder in your download location.
To use Kafka Connect, you must configure and validate two .properties files. You can name these files anything. In this tutorial, the two files are called connect-standalone.properties and connector.properties. The first file contains the properties for the standalone Kafka Connect instance. For this file, you will only change the default values of two variables:
bootstrap.servers variable is localhost:9092. As you're using Redpanda and its broker is running on port 19092, you'll replace the default value with localhost:19092.plugin.path variable to that path. In this case, it's /usr/local/share/kafka/plugins. This is where your ScyllaDB CDC Connector JAR file will be copied.The comment-stripped version of the connect-standalone.properties file should look like the following:
bootstrap.servers=localhost:19092
key.converter.schemas.enable=true
value.converter.schemas.enable=true
offset.storage.file.filename=/tmp/connect.offsets
offset.flush.interval.ms=10000
plugin.path=/usr/local/share/kafka/plugins
The second .properties file will contain settings specific to the ScyllaDB connector. You need to change the scylla.cluster.ip.addresses variable to 127.0.0.1:9042. The connector.properties file should then look like the following:
name = QuickstartConnector
connector.class = com.scylladb.cdc.debezium.connector.ScyllaConnector
key.converter = org.apache.kafka.connect.json.JsonConverter
value.converter = org.apache.kafka.connect.json.JsonConverter
scylla.cluster.ip.addresses = 127.0.0.1:9042
scylla.name = QuickstartConnectorNamespace
scylla.table.names = quickstart_keyspace.orders
Using both the .properties files, go to the Kafka installation directory and run the connect-standalone.sh script with the following command:
bin/connect-standalone.sh config/connect-standalone.properties config/connector.properties
When you created the orders table, you enabled CDC, which means that there's a log table with all the records and changes. If the Kafka Connect setup is successful, you should now be able to consume these events using the rpk CLI tool. To do so, use the following command:
rpk topic consume --brokers 'localhost:19092' QuickstartConnectorNamespace.quickstart_keyspace.orders | jq .
The output should result in the following three records, as shown below:
{
"topic": "QuickstartConnectorNamespace.quickstart_keyspace.orders",
"key": "{\"schema\":{\"type\":\"struct\",\"fields\":[{\"type\":\"int32\",\"optional\":true,\"field\":\"customer_id\"},{\"type\":\"int32\",\"optional\":true,\"field\":\"order_id\"}],\"optional\":false,\"name\":\"QuickstartConnectorNamespace.quickstart_keyspace.orders.Key\"},\"payload\":{\"customer_id\":1,\"order_id\":1}}",
"value":
…output omitted…
"timestamp": 1683357426891,
"partition": 0,
"offset": 0
}
{
"topic": "QuickstartConnectorNamespace.quickstart_keyspace.orders",
"key": "{\"schema\":{\"type\":\"struct\",\"fields\":[{\"type\":\"int32\",\"optional\":true,\"field\":\"customer_id\"},{\"type\":\"int32\",\"optional\":true,\"field\":\"order_id\"}],\"optional\":false,\"name\":\"QuickstartConnectorNamespace.quickstart_keyspace.orders.Key\"},\"payload\":{\"customer_id\":1,\"order_id\":2}}",
"value":
…output omitted…
"timestamp": 1683357426898,
"partition": 0,
"offset": 1
}
{
"topic": "QuickstartConnectorNamespace.quickstart_keyspace.orders",
"key": "{\"schema\":{\"type\":\"struct\",\"fields\":[{\"type\":\"int32\",\"optional\":true,\"field\":\"customer_id\"},{\"type\":\"int32\",\"optional\":true,\"field\":\"order_id\"}],\"optional\":false,\"name\":\"QuickstartConnectorNamespace.quickstart_keyspace.orders.Key\"},\"payload\":{\"customer_id\":1,\"order_id\":3}}",
"value":
…output omitted…
"timestamp": 1683357426898,
"partition": 0,
"offset": 2
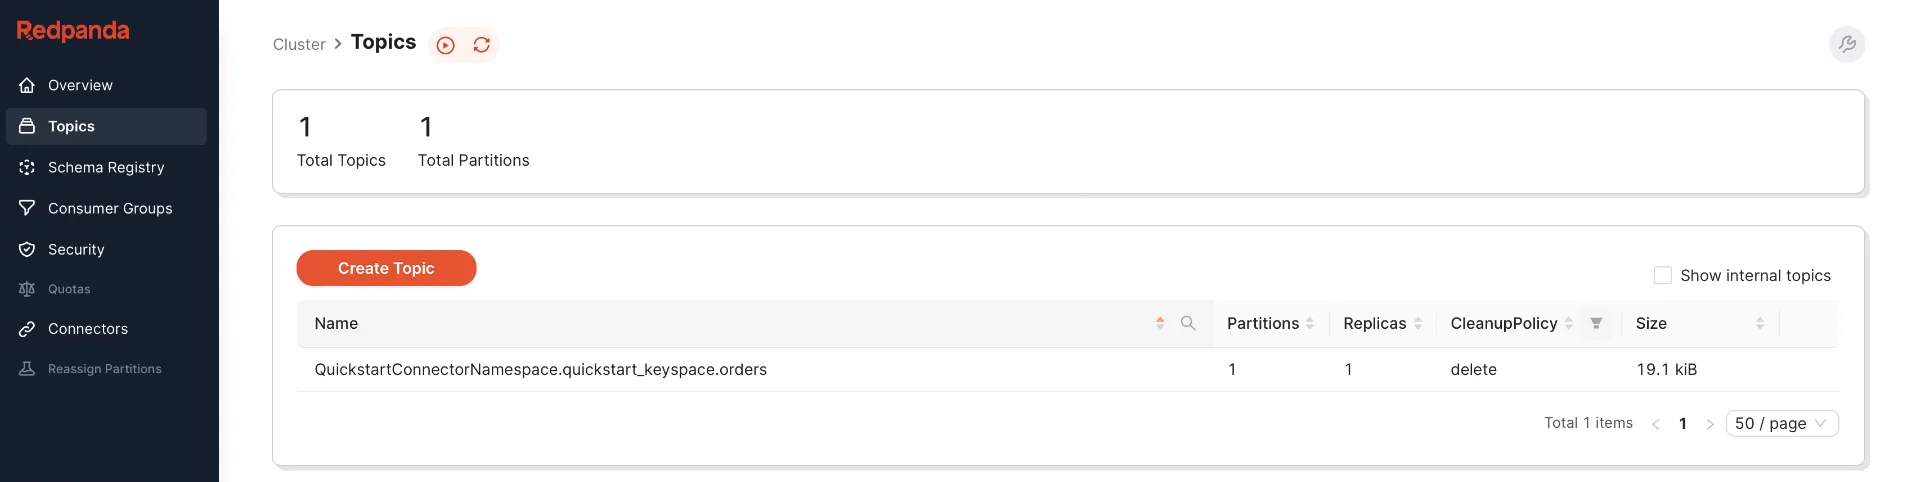
}If you get a similar output, you've successfully integrated ScyllaDB with Redpanda using Kafka Connect. Alternatively, you can go to the Redpanda console hosted on localhost:8080 and see if the topic corresponding to the ScyllaDB orders table is available:
You can now test whether data changes to the orders table can trigger CDC.
To test CDC for new records, insert the following two records in the orders table using the cqlsh CLI:
INSERT INTO quickstart_keyspace.orders(customer_id, order_id, product) VALUES (1, 4, 'chips');
INSERT INTO quickstart_keyspace.orders(customer_id, order_id, product) VALUES (1, 5, 'lollies');
If the insert is successful, the rpk topic consume command will give you the following additional records:
{
  "topic": "QuickstartConnectorNamespace.quickstart_keyspace.orders",
  "key": "{\"schema\":{\"type\":\"struct\",\"fields\":[{\"type\":\"int32\",\"optional\":true,\"field\":\"customer_id\"},{\"type\":\"int32\",\"optional\":true,\"field\":\"order_id\"}],\"optional\":false,\"name\":\"QuickstartConnectorNamespace.quickstart_keyspace.orders.Key\"},\"payload\":{\"customer_id\":1,\"order_id\":4}}",
  "value":
…output omitted…
  "timestamp": 1683357768358,
  "partition": 0,
  "offset": 3
}
{
  "topic": "QuickstartConnectorNamespace.quickstart_keyspace.orders",
  "key": "{\"schema\":{\"type\":\"struct\",\"fields\":[{\"type\":\"int32\",\"optional\":true,\"field\":\"customer_id\"},{\"type\":\"int32\",\"optional\":true,\"field\":\"order_id\"}],\"optional\":false,\"name\":\"QuickstartConnectorNamespace.quickstart_keyspace.orders.Key\"},\"payload\":{\"customer_id\":1,\"order_id\":5}}",
  "value":
…output omitted…
  "timestamp": 1683358068355,
  "partition": 0,
  "offset": 4
}
You'll now insert one more record with the product value of pasta:
INSERT INTO quickstart_keyspace.orders(customer_id, order_id, product) VALUES (1, 5, 'pasta');
Later on, you'll change this value with an UPDATE statement to spaghetti and trigger a CDC update event.
The newly inserted record should be visible with your rpk topic consume command:
{
  "topic": "QuickstartConnectorNamespace.quickstart_keyspace.orders",
  "key": "{\"schema\":{\"type\":\"struct\",\"fields\":[{\"type\":\"int32\",\"optional\":true,\"field\":\"customer_id\"},{\"type\":\"int32\",\"optional\":true,\"field\":\"order_id\"}],\"optional\":false,\"name\":\"QuickstartConnectorNamespace.quickstart_keyspace.orders.Key\"},\"payload\":{\"customer_id\":1,\"order_id\":6}}",
  "value":
…output omitted…
  "timestamp": 1683361158363,
  "partition": 0,
  "offset": 5
}
Now, execute the following UPDATE statement and see if a CDC update event is triggered:
UPDATE quickstart_keyspace.orders SET product = 'spaghetti' WHERE order_id = 6 and customer_id = 1;
After running this command, you'll need to run the rpk topic consume command to verify the latest addition to the QuickstartConnectorNamespace.quickstart_keyspace.orders topic. The change event record should look like the following:
{
  "topic": "QuickstartConnectorNamespace.quickstart_keyspace.orders",
  "key": "{\"schema\":{\"type\":\"struct\",\"fields\":[{\"type\":\"int32\",\"optional\":true,\"field\":\"customer_id\"},{\"type\":\"int32\",\"optional\":true,\"field\":\"order_id\"}],\"optional\":false,\"name\":\"QuickstartConnectorNamespace.quickstart_keyspace.orders.Key\"},\"payload\":{\"customer_id\":1,\"order_id\":6}}",
  "value":
…output omitted…
  "timestamp": 1683362868372,
  "partition": 0,
  "offset": 6
}When you spin up Redpanda using Docker Compose, it creates a Redpanda cluster and a Redpanda Console. Using the console, you can visually inspect topics and messages. After all the change events on the orders table are captured, you can go to the Redpanda Console and select the QuickstartConnectorNamespace.quickstart_keyspace.orders topic to see the messages, as shown below:
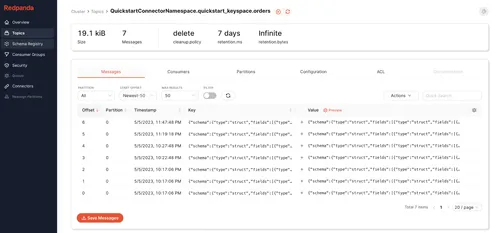
Redpanda console showing all events in the topic
You can also see the schema details, the payload, and other event metadata in the event message, as shown below:
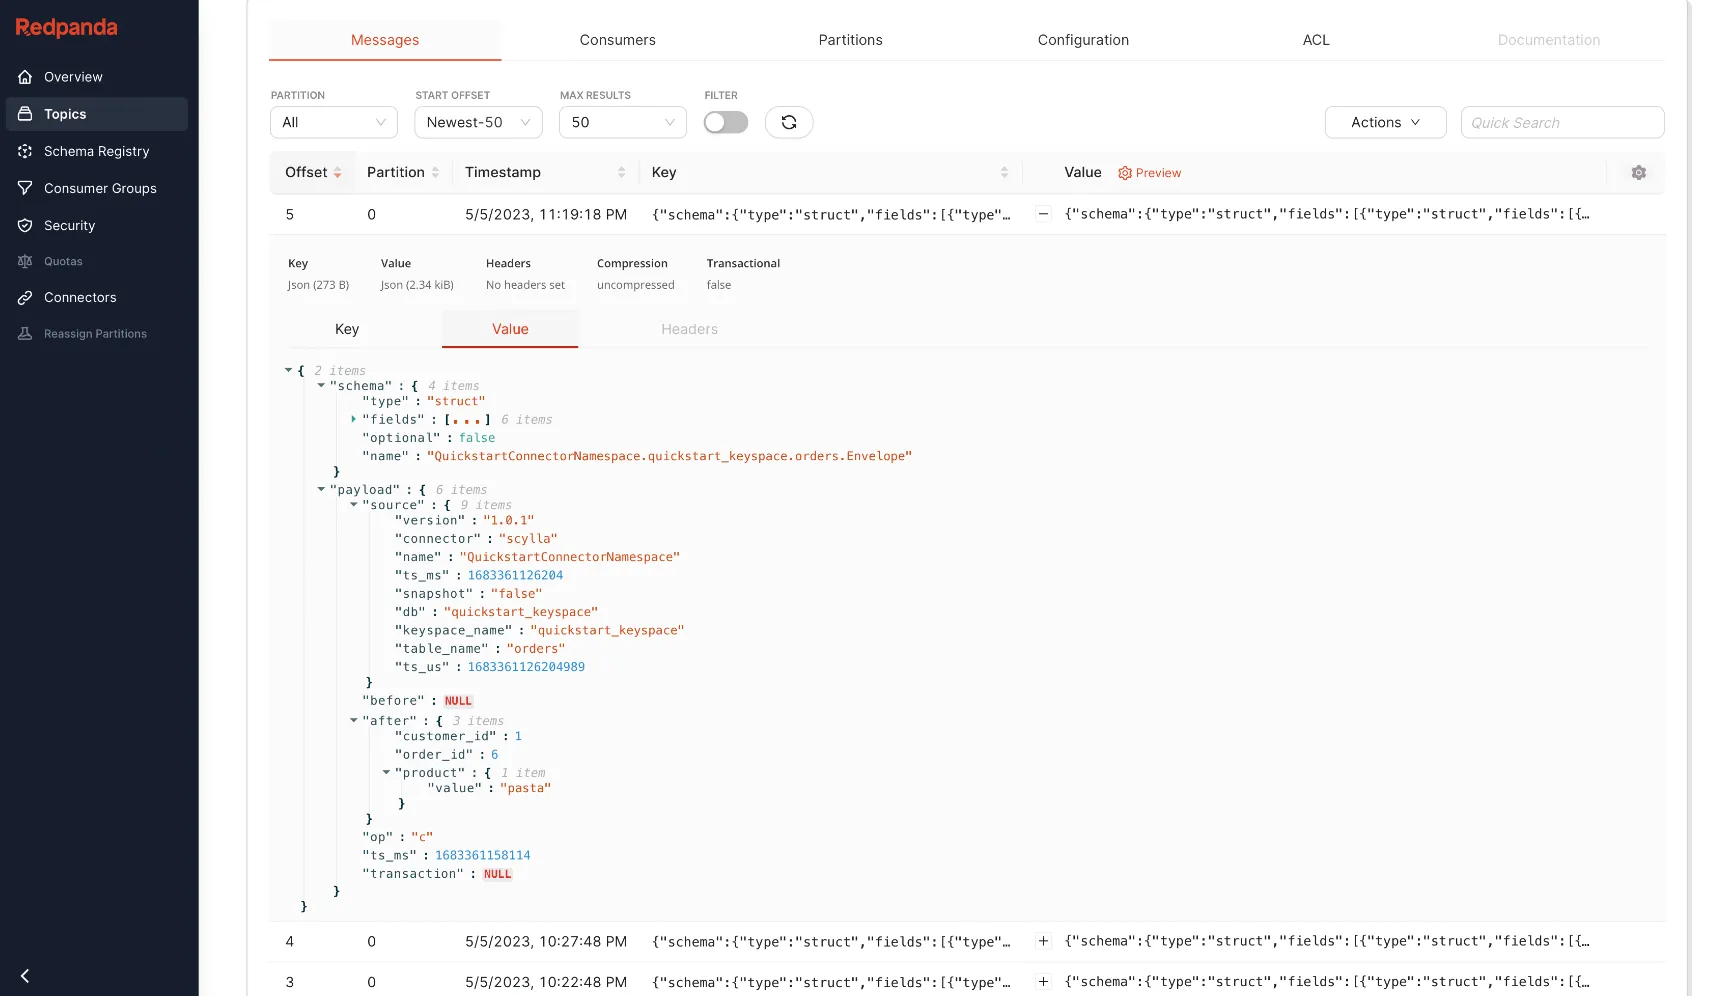
Redpanda Console showing details of one of the events
You've now successfully set up CDC between ScyllaDB and Redpanda, consumed change events from the CLI, and accessed the same messages using the Redpanda Console!
This tutorial introduced you to ScyllaDB and provided step-by-step instructions to set up a connection between ScyllaDB and Redpanda for capturing changed data. Messaging between systems is one of the most prominent ways to create asynchronous, decoupled applications. Bringing CDC events to Redpanda allows you to integrate various systems.
Using this CDC connection, you can consume data from Redpanda for various purposes, such as triggering workflows based on change events, integrating with other data sources, and creating a data lake. By following the tutorial and using the supporting GitHub repository, you can easily get started with CDC.
To explore Redpanda, check the documentation and browse the Redpanda blog for more tutorials. If have any questions or want to chat with the team, join the Redpanda Community on Slack.
Subscribe to our VIP (very important panda) mailing list to pounce on the latest blogs, surprise announcements, and community events!
Opt out anytime.