Full CDC semantics land in the Iceberg output for Redpanda Connect
Your lakehouse mirrors the database, instantly.

Learn how to use TriggerMesh to stream data from a Redpanda topic into an Amazon S3 bucket—the Kubernetes-native way.


It's simple to run Redpanda on Kubernetes thanks to the availability of Helm charts. But what about a K8s-native way to connect data sources and sinks to Redpanda? Kafka Connect predates containerization technology and is not very idiomatic to Kubernetes. There is some interesting reading available on the ideation for Kubernetes-native Kafka Connect and the pros and cons of Kafka on Kubernetes for data streaming that discuss some of the challenges of running Kafka Connect on K8s.
An alternative to Kafka Connect in this scenario is TriggerMesh, which was built to run natively on Kubernetes. It does this by providing Kubernetes controllers and Custom Resource Definitions which can be used to describe and deploy sources and sinks for Redpanda just like you would any other native Kubernetes object. TriggerMesh's Kafka connectors are among its most popular and well suited to act as a Kafka consumer or producer with Redpanda’s Kafka API. And TriggerMesh can connect to many other systems that you might want to use as sources or sinks for Redpanda, such as Google Cloud Storage, Azure Storage, Amazon Simple Queue Service, HTTP APIs, MongoDB, and much more.
In this post, we’ll walk through a specific example of using TriggerMesh to stream data from a Redpanda topic into an Amazon S3 bucket—with everything running the Kubernetes-native way.
To give you a better idea of what we'll be building in this example, here's a diagram of how it all connects.

Diagram of how TriggerMesh and Redpanda work with Kubernetes
Now let's get into the code. It's just seven steps, and you can find all the source code in this Redpanda GitHub repo.
You can use any K8s distribution, but in this example we'll run kind locally.
Define the kind-config.yaml file as follows:
apiVersion: kind.x-k8s.io/v1alpha4
kind: Cluster
nodes:
  - role: control-plane
  - role: worker
  - role: worker
  - role: worker
Then create a multi-node Kubernetes kind cluster:
kind create cluster --config kind-config.yaml
kubectl get nodes
#output
NAME                 STATUS   ROLES           AGE   VERSION
kind-control-plane   Ready    control-plane   36s   v1.25.3
kind-worker          Ready    <none>          16s   v1.25.3
kind-worker2         Ready    <none>          16s   v1.25.3
kind-worker3 Ready <none> 16s v1.25.3It’s easy to spin up a multi-node Redpanda cluster by using the provided Helm charts:
helm repo add redpanda https://charts.redpanda.com/
helm repo update
helm install redpanda redpanda/redpanda \
    --namespace redpanda \
    --create-namespace
It will take a few seconds for the cluster to be created. you can use the following command to track the progress:
kubectl -n redpanda rollout status statefulset redpanda --watch

#output
Waiting for 3 pods to be ready...
Waiting for 2 pods to be ready...
Waiting for 1 pods to be ready...
statefulset rolling update complete 3 pods at revision redpanda-76d98b7647...
You should see some sample commands in the output, such as checking the API status:
kubectl -n redpanda exec -ti redpanda-0 -c redpanda -- rpk cluster info --brokers \
redpanda-0.redpanda.redpanda.svc.cluster.local.:9093,\
redpanda-1.redpanda.redpanda.svc.cluster.local.:9093,\
redpanda-2.redpanda.redpanda.svc.cluster.local.:9093
Lets create a topic that we'll read from later on with a TriggerMesh source connector:
kubectl -n redpanda exec -ti redpanda-0 -c redpanda -- rpk topic create test-topic --brokers \
redpanda-0.redpanda.redpanda.svc.cluster.local.:9093,\
redpanda-1.redpanda.redpanda.svc.cluster.local.:9093,\
redpanda-2.redpanda.redpanda.svc.cluster.local.:9093 TriggerMesh relies on Knative Serving to run some of its components as Knative Services. In this example, that'll be the Amazon S3 target, which will scale automatically, including to 0 when not being used.
TriggerMesh will relax the dependency on Knative Serving in the near future. In the meantime, here is a quick guide for installing the Knative Serving.
Begin by installing the Knative Operator manifest:
kubectl apply -f https://github.com/knative/operator/releases/download/knative-v1.8.5/operator.yaml -n default
Check the status of the Operator by running the command:
kubectl get deployment knative-operator -n default
Now install the Knative Serving component with the Kourier Networking layer:
kubectl apply -f - <<EOF
apiVersion: v1
kind: Namespace
metadata:
  name: knative-serving
---
apiVersion: operator.knative.dev/v1beta1
kind: KnativeServing
metadata:
  name: knative-serving
  namespace: knative-serving
spec:
  ingress:
    kourier:
      enabled: true
  config:
    network:
      ingress-class: "kourier.ingress.networking.knative.dev"
EOF
Check the status of Knative Serving Custom Resource using the command (can take a minute before it displays as ready):
kubectl get KnativeServing knative-serving -n knative-serving --watch
Finally, configure Knative Serving to use the sslip.io DNS with the provided manifest:
kubectl apply -f https://github.com/knative/serving/releases/download/knative-v1.8.5/serving-default-domain.yaml
Add the TriggerMesh chart repository to Helm:
helm repo add triggermesh https://storage.googleapis.com/triggermesh-charts
To install the chart with the release name triggermesh:
helm install -n triggermesh triggermesh triggermesh/triggermesh --create-namespace
The command deploys the TriggerMesh open-source components and uses the default configuration that can be adapted depending on your needs.
First, make sure to set up an S3 bucket, which we'll use as an event target.
You can follow their official instructions to create your first S3 bucket.
You'll need the queue's ARN and AWS credentials to authenticate the TriggerMesh AWS Target. Here we're using a user access key, but you can also use an IAM role (see the Amazon S3 Target docs for details).
The manifest belows starts with a K8s secret for storing the credentials, and is followed by a CRD for the TriggerMesh Amazon S3 Target connector.
apiVersion: v1
kind: Secret
metadata:
  name: aws
type: Opaque
stringData:
  AWS_ACCESS_KEY_ID: "<AWS Access Key ID>"
  AWS_SECRET_ACCESS_KEY: "<AWS Secret Access Key>"

---

apiVersion: targets.triggermesh.io/v1alpha1
kind: AWSS3Target
metadata:
  name: aws-s3-target
spec:
  arn: <S3 bucket ARN>
  auth:
    credentials:
      accessKeyID:
        valueFromSecret:
          name: aws
          key: AWS_ACCESS_KEY_ID
      secretAccessKey:
        valueFromSecret:
          name: aws
          key: AWS_SECRET_ACCESS_KEY
You can save this to a file called awsS3target.yaml and then create these resources on your cluster:
kubectl apply -f awsS3target.yaml
Now lets create the TriggerMesh Kafka source connector that will read from Redpanda and write directly to the Amazon S3 target. What will happen under the hood is that the Kafka source will read from the Redpanda topic, convert the message to a CloudEvent, and send the CloudEvent to the S3 target over HTTP.
This simple architecture is enough for this demo, but we recommend using a TriggerMesh broker component between the Kafka source and the S3 target for more advanced use cases.
apiVersion: sources.triggermesh.io/v1alpha1
kind: KafkaSource
metadata:
  name: kafka-source
spec:
  groupID: test-consumer-group
  bootstrapServers:
    - redpanda-0.redpanda.redpanda.svc.cluster.local:9093
    - redpanda-1.redpanda.redpanda.svc.cluster.local:9093
    - redpanda-2.redpanda.redpanda.svc.cluster.local:9093
  topic: test-topic
  sink:
    ref:
      apiVersion: targets.triggermesh.io/v1alpha1
      kind: AWSS3Target
      name: aws-s3-target
Save this to a file called kakfasource.yaml and create the objects on your cluster:
kubectl apply -f kafkasource.yaml
I like to use Redpanda Console to interact with topics, send messages, manage consumer groups, and explore real-time data with time-travel debugging. To access it on K8s, we'll need to do some port forwarding.
kubectl -n redpanda port-forward svc/redpanda-console 8080:8080
You should then be able to open the Redpanda Console at http://localhost:8080/topics and send an event with a payload like {"hello":"world":}.

Screenshot of Redpanda Console showing the test topic
Head over to S3 and you should see the object there.
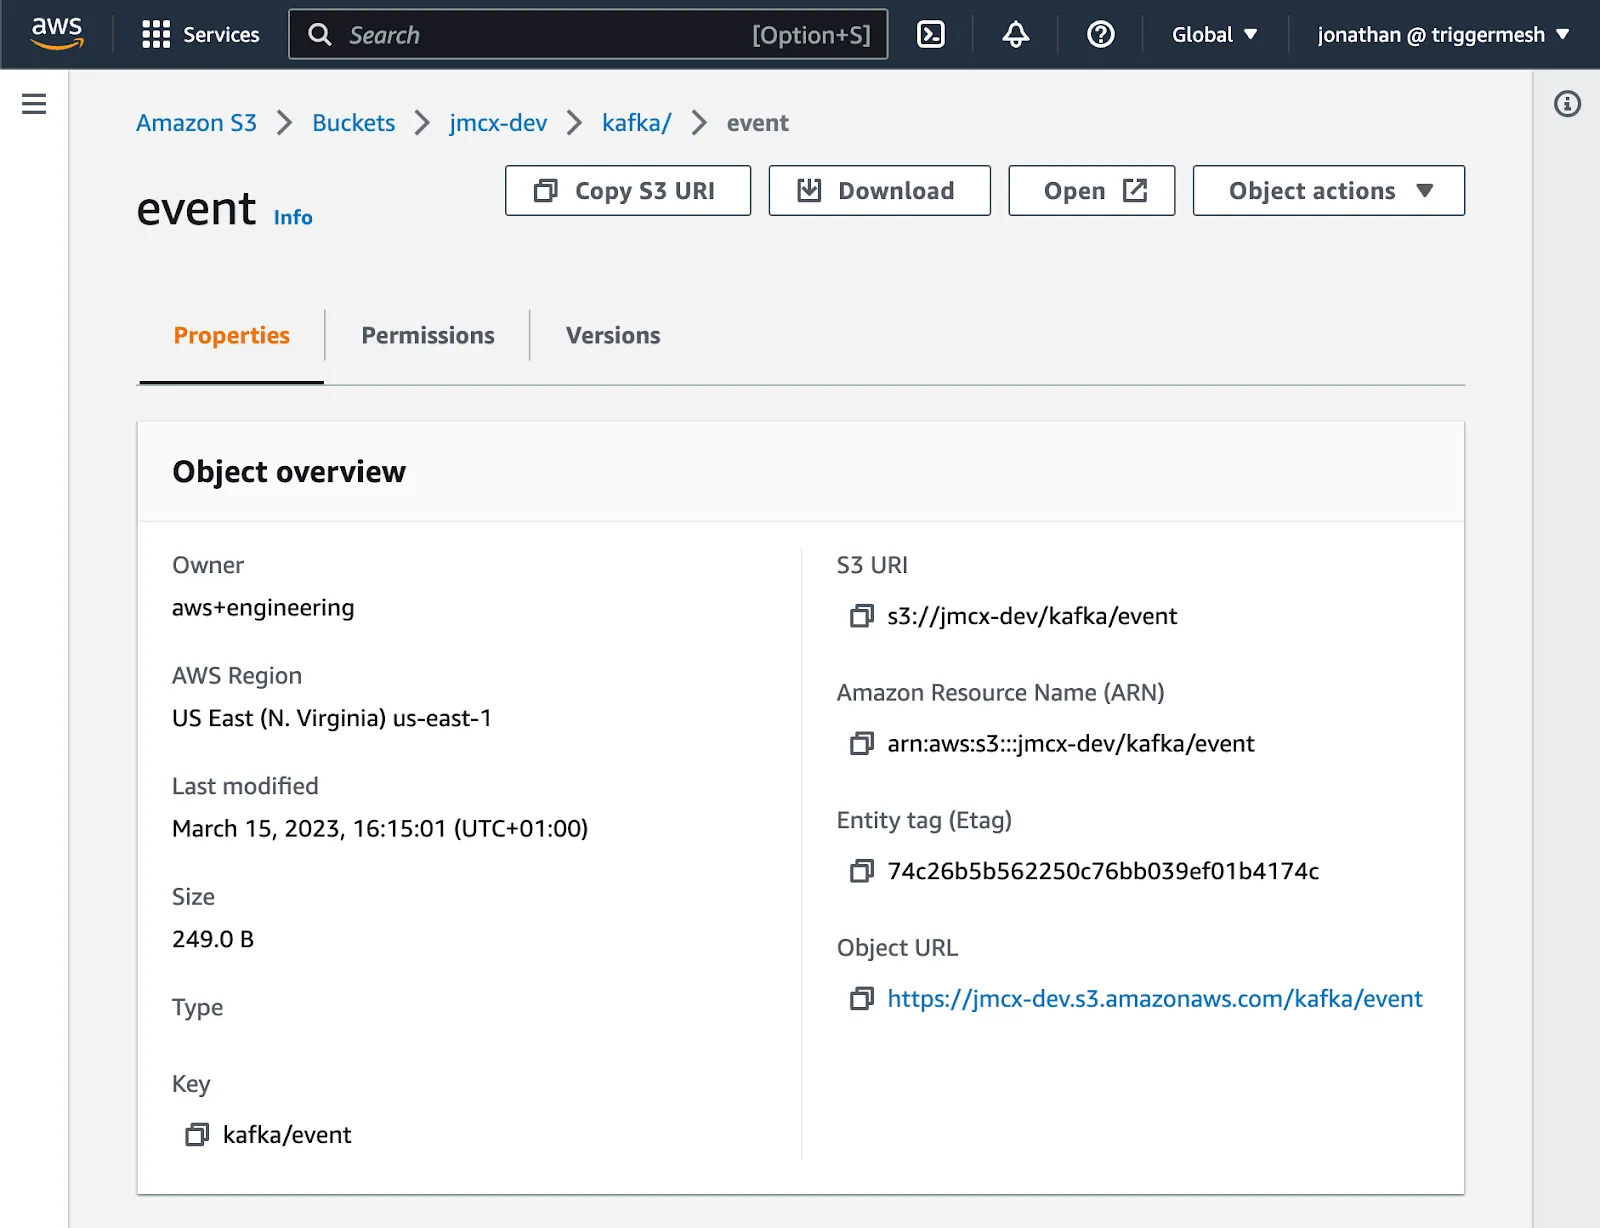
Screenshot of Amazon S3 Console showing the object sent from Redpanda Console
Well done! You are now streaming data from Redpanda to S3.
We just demonstrated how to stream data from Redpanda to Amazon S3 with TriggerMesh on Kubernetes. The same process can be used to ingest data into Redpanda, and there are many different sources and sinks to choose from.
Some of the strengths of this approach are:
If you'd like to give TriggerMesh a try, head over to the quickstart guide or join the community on Slack and ask all your questions.
To learn more about Redpanda, check out our documentation and browse the Redpanda blog for tutorials on how to easily integrate with Redpanda. For a more hands-on approach, take Redpanda for a test drive!
If you get stuck, have a question, or just want to chat with the team and fellow Redpanda users, join the Redpanda Community on Slack.
Subscribe to our VIP (very important panda) mailing list to pounce on the latest blogs, surprise announcements, and community events!
Opt out anytime.