Full CDC semantics land in the Iceberg output for Redpanda Connect
Your lakehouse mirrors the database, instantly.
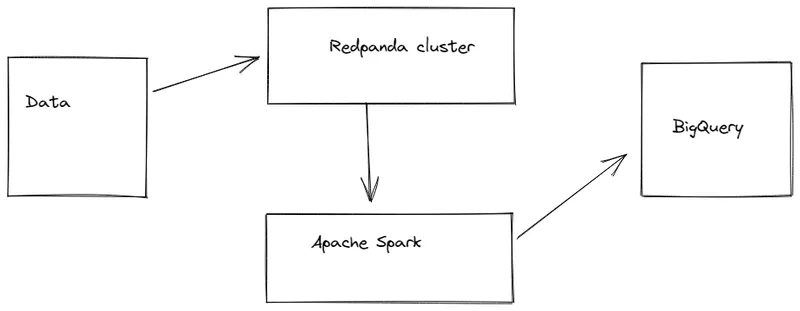
Integrate Redpanda with Apache Spark and BigQuery to build an engine of record.


To set up Redpanda, you need to create a docker-compose.yaml file in a publicly accessible server. This file will set up all the configurations required for your application and ensure your Redpanda cluster can connect with Apache Spark. After creating the docker-compose.yaml file, you can run the Redpanda container by executing the code: docker-compose up -d. This blog provides a detailed guide on how to do this.
First, produce messages to your Redpanda cluster. This tutorial streams a Kaggle data set on temperature readings for IoT devices from Kaggle to Redpanda. Then, set up BigQuery and create a project. After creating the project, create a data set and a table in BigQuery; the table will be used to receive the streamed data from the Redpanda cluster. This blog provides a detailed guide on how to do this.
Redpanda acts as a real-time streaming data software, BigQuery serves as a cloud-based, scalable, serverless data warehouse, and Apache Spark is used for processing high-volume data. In building the engine of record, BigQuery acts as a data warehouse source, while the data is streamed to BigQuery using Redpanda and Apache Spark. This blog provides a detailed tutorial on how to integrate these tools, available in this GitHub repo.
An engine of record is a limitless data store that can scale with your organization, whether you serve a few customers or millions. Adopting an engine of record means that you don't have to change your entire architecture, no matter how much your data volume grows. This is crucial for ensuring low latency, fast computation, and no loss of data.
You'll need Apache Spark in Scala to stream outputs from Redpanda to BigQuery. Docker will be used to develop, ship, and run Redpanda containers. Since you'll be using Apache Spark's Scala API, you should also have Scala installed. Finally, you'll need a BigQuery account that's not free tier. This blog provides detailed instructions on how to install and set up these tools.
An engine of record is a limitless data store, which means that it can scale with your organization, whether you serve only a few customers or millions. Adopting an engine of record means that you don’t have to change your entire architecture, no matter how much your data volume grows.
This article demonstrates how to use Redpanda with BigQuery and Apache Spark to build an engine of record. Learning how to successfully integrate these tools is important to ensure that there’s low latency, fast computation, and no loss of data.
Consider a food ordering business that starts with only a few hundred customers and can process orders every ten minutes using a batch processing architecture. Processing data in batches is only practical for businesses that don’t have to quickly process large volumes of data; significant growth would cause this kind of architecture to buckle.
In this scenario, using Redpanda as an engine of record would be suitable to stream order-request data, payment information, and logistic information in real time to a data warehouse. When any of this information is being modified, Redpanda automatically streams it to the data warehouse and the order gets prepared.
Sensor readings are another use case for an engine of record. IoT sensors read thousands or millions of streams every minute. Using Redpanda, you can utilize that streaming data and generate insights from it.
Before we jump into our tutorial on how to build an engine of record, let’s meet the tools you’ll be using to do so.
To view the full tutorial and demo code, refer to this GitHub repo.
The following three tools are the focus of this article:
In building the engine of record, BigQuery acts as a data warehouse source, while the data is streamed to BigQuery using Redpanda and Apache Spark.
The article explains how to connect Apache Spark in Scala to BigQuery and how to write the streaming code to read the files from Redpanda and write it to a table in BigQuery. You’ll also learn about using Docker to create Redpanda images and topics, display cluster information, and run the Redpanda cluster.
To follow this tutorial, you first need to set up Redpanda. This tutorial follows the recommended method of setting up Redpanda with Docker.
The architecture this tutorial will follow is shown in the diagram below.
The following prerequisites are also needed to successfully complete this tutorial:
To set up Redpanda, first create a docker-compose.yaml file in a publicly accessible server. This file will set up all the configurations required for your application. It’ll also ensure your Redpanda cluster can connect with Apache Spark:
version: '3.7'
services:
  redpanda:
    # NOTE: Please use the latest version here!
    image: docker.redpanda.com/vectorized/redpanda:v21.11.15
    container_name: redpanda-1
    command:
    - redpanda
    - start
    - --smp
    - '1'
    - --reserve-memory
    - 0M
    - --overprovisioned
    - --node-id
    - '0'
    - --kafka-addr
    - PLAINTEXT://0.0.0.0:29092,OUTSIDE://0.0.0.0:9092
    - --advertise-kafka-addr
    - PLAINTEXT://redpanda:29092,OUTSIDE://localhost:9092
    - --pandaproxy-addr
    - PLAINTEXT://0.0.0.0:28082,OUTSIDE://0.0.0.0:8082
    - --advertise-pandaproxy-addr
    - PLAINTEXT://redpanda:28082,OUTSIDE://localhost:8082
    ports:
    - 8081:8081
    - 8082:8082
    - 9092:9092
    - 28082:28082
    - 29092:29092
After creating the docker-compose.yaml file, you can run the Redpanda container by executing the following code: docker-compose up -d.
You can check the cluster information to confirm if the container was successfully created by executing the following code: docker exec -it redpanda-1 rpk cluster info.

Here, you see that your Redpanda cluster has been created with host redpanda-1 and port 29092.
Now, you want to create a Redpanda topic. You can create a topic by running the following line of code: docker exec -it redpanda-1 rpk topic create sensor_stream --brokers=localhost:9092.

Here, you created a topic named sensor_stream. Make sure the port on your virtual machine is publicly accessible.
After creating the topic, you should receive a message showing status OK, indicating your topic was created successfully.
Now, you want to produce messages to your Redpanda cluster. This tutorial streams a Kaggle data set on temperature readings for IoT devices from Kaggle to Redpanda. Go ahead and sign in to Kaggle to download the data set.
You can produce messages to the Redpanda cluster by running the following code: tail -n +1 IOT-temp.csv | docker exec -it redpanda-1 rpk topic produce sensor_stream --brokers=localhost:9092.
Here, you’re producing messages to the Redpanda topic sensor_stream on port 9092. When you produce messages, the console opens for you to stream messages.
For this tutorial, you can keep it simple and stream all the data in the CSV file in the data set to your Redpanda cluster. Essentially, you just copy all the records in the CSV file and paste them into your Redpanda cluster.
Go to the Google Cloud Platform home page and navigate to your console. Then, select BigQuery on the navigation pane.
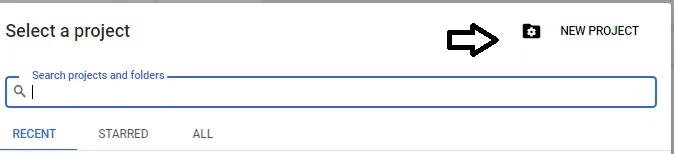
Next, create a BigQuery project. To do this, you go to the BigQuery dashboard and click New Project.
You then create a project as shown in the image below.
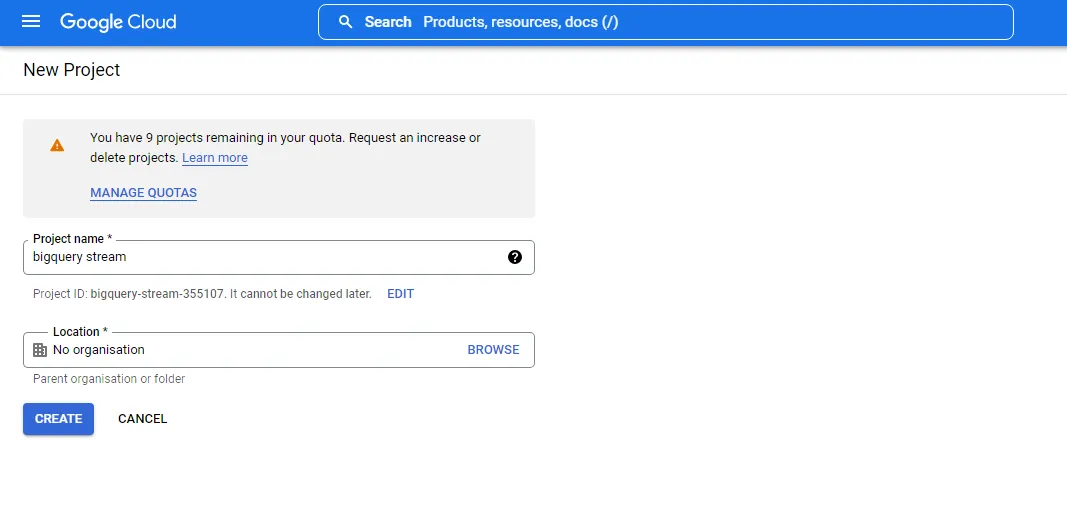
For this tutorial, you can name the project bigquery stream.
After creating the project, go to the BigQuery dashboard, and on the Explore section of the page you’ll see your project ID. Click on the three dots near it. The three dots are shown in the rectangle contained in the image below. When you click on the three dots, you’ll be able to select Create dataset.

In this case, name your data set sensor_data.
After creating the data set, you next have to create a table in BigQuery; the table will be used to receive the streamed data from the Redpanda cluster.
To create a table, you’ll go to your data set and click on the three dots. You’ll then see a pop-up window and click Create table. This is shown in the image below.

Create a table and name the table sensor_table.
To connect your BigQuery to Apache Spark, you first have to download the Google BigQuery connector.
You have to download the connector that corresponds to the version of Scala you’re using. The connector is a JAR file that you can link to your Apache Spark application.
The connector can also be downloaded using the Maven repository depending on the version of Scala you’re using.

The image above shows the connector URL from the Maven repository. You can directly attach this URL to your Scala SBT file.
To connect your BigQuery to Apache Spark, you need to create a scala file that uses the spark library and set some configurations:
spark.conf.set("viewsEnabled","true")
spark.conf.set("materializationDataset","<dataset>")
Here, materializationDataset must be set to the data set where the user has permissions in Google Cloud Platform (GCP). So this can be a data set that you created or an existing one in your GCP account. For more information on creating a data set for BigQuery on GCP, you can refer this page.
As an additional configuration, viewsEnabled must be set to true.
To authenticate your BigQuery with Apache Spark, you need to go to the service account console.
When you go to the console, you’ll see a page like the one shown below.

You then select the project bigquery stream.
After clicking the project, you’ll see a page like the one shown below.

You’ll then specify the service account name and account description. After specifying the service account details, specify the roles. For simplicity’s sake, you can specify the role as owner. This role will have administrative privileges.
Click the email address of the service account you activated and go to Keys on the navigation bar.

After this, you click on Add Key. Create a new key of type JSON.

After this step, a JSON key file will be downloaded on your computer. This file is very important because it’ll be used when authenticating your BigQuery application with Apache Spark.
To configure the JSON key file with Apache Spark, the following code is used:
spark.conf.set("credentialsFile","<path-to-json-key-file>")
Here, you specify the path to your JSON key file.
Sbt is an open source build tool mainly used in Scala and Java projects. Sbt contains all the dependencies you need to successfully execute Scala code. For this project, you will create an sbt file using the following code:
name := "Redpanda"
version := "0.1.0-SNAPSHOT"
scalaVersion := "2.13.8"

libraryDependencies++=Seq("org.apache.spark" %% "spark-sql" % "3.2.1",
  "org.apache.spark" %% "spark-streaming" % "3.2.1",
  "org.apache.kafka"%"kafka-clients"%"3.1.0",
  "org.apache.spark" %% "spark-core" % "3.2.1",
  "org.apache.spark"%"spark-sql-kafka-0-10_2.13"%"3.2.1",
  "com.google.cloud.spark" %% "spark-bigquery-with-dependencies" % "0.26.0"

)
Here, you are installing all the necessary dependencies, including Spark Core, Spark Streaming, Spark BigQuery Connector, and Spark SQL amongst others.
Note that the necessary dependencies should be installed based on the version of Scala you use.
The Scala object will contain all the code for this project. You create a Scala object named RedpandaSpark.scala, which will be in the directory src/main/Scala.
You can use the interpreter to run the code for the Scala object.
Now, you will stream the data from Apache Spark to BigQuery. For this, you’ll use Redpanda to route the events to Apache Spark and then write the outputs to BigQuery:
import org.apache.spark.sql.SparkSession
import com.google.cloud.spark.bigquery._
spark.conf.set("viewsEnabled","true")
spark.conf.set("credentialsFile","<path-to-json-key-file>")
spark.conf.set("materializationDataset","sensor_data")

   val spark = SparkSession
     .builder
     .appName("Redpanda Stream")
     .config("spark.master", "local")
      .config("spark.jars.packages", "com.google.cloud.spark:spark-bigquery-with-dependencies_2.11:0.26.0")
     .getOrCreate()
val bucket = "[bucket]"
spark.conf.set("temporaryGcsBucket", bucket)

   val redpanda_read = spark.readStream
     .format("kafka")
     .option("kafka.bootstrap.servers", "localhost:9092")
     .option("subscribe", "sensor_stream")
     .option("startingOffsets", "earliest") // From Beginning
     .load()
val sensor_data=redpanda.read.selectExpr(“CAST(value AS STRING)”,”CAST(key AS STRING)”)
val stream_1=sensor_data.withColumn(“value”,split(col(“value”),”,”)).select(col(“value”)(0).as(“id”),col(“value”)(3).as(“temperature”))
val stream_2=sensor_data.withColumn(“value”,split(col(“value”),”,”)).select(col(“value”)(0).as(“id”),col(“value”)(3).as(“temperature”))
val joined_stream=stream_1.union(stream_2))

val redpanda_write=joined_stream.write.format("bigquery")
     .option("table", "sensor_data.sensor_table").save()
This block of code reads the stream from Redpanda. The line of code .option(“subscribe”,”sensor_stream”) means you’re subscribing to the sensor_stream topic.
Remember, previously, you created a topic called sensor_stream. Here, you want to consume the messages from this topic.
The line of code .option(“startingOffsets”,”earliest”) specifies that you want to stream all the data from the beginning.
From the Kafka stream, two variables were created: stream_1 and stream_2. These two variables are streams of ID and temperature. The two variables were then joined on the joined_stream variable. The output of the combined stream was then consolidated to BigQuery.
Finally, write the results of your stream to the table you created in BigQuery. To do this, you have to reference the table through its data set. You use the format dataset_name.table_name.
After populating the table with data, you want to save the results in the BigQuery table. You do this by using the following block of code: .option(“table”,”sensor_data.sensor_table”).save().
The code can be executed from your text editor. You can run the code by executing the Scala object (in this case RedpandaSpark).

In the above image, the code was executed using Intellij IDEA, you can use the same IDE or another of your preference to run your application.
When the code is run, the streaming starts and the output is consolidated to BigQuery. You can also run the code from your terminal. You can go to the directory of the build.sbt file from your terminal and run the command sbt run.

As you can see from the previous and following image, this command runs the code from your terminal using the Scala build tool.

Once all the necessary configurations have been made, executing the code will stream the data to BigQuery.
Navigate to the BigQuery console and you’ll see the output of your stream in the table you created earlier. You can output the results by running a SQL query in the BigQuery editor.
The SQL code will be in the following form: SELECT * FROM ‘project_name.dataset_name.table_name’ LIMIT 100
This is demonstrated in the image below.

In the image shown above, the table name was obtained. You also used LIMIT 100 to limit the output to just one hundred records.
You’ll see that all the records of the stream were successfully transferred to BigQuery. You can now run SQL queries on the data from the BigQuery dashboard. As more data streams come in, the data is automatically parsed to Redpanda and transferred to BigQuery.
You can now use the setup and actions you learned in this tutorial to inform future projects where you want to implement an engine of record.
As a reminder, all resources and code needed for this tutorial are avialable in this repo.
Take Redpanda for a test drive here. Check out our documentation to understand the nuts and bolts of how the platform works, or read our blogs to see the plethora of ways to integrate with Redpanda. To ask our Solution Architects and Core Engineers questions and interact with other Redpanda users, join the Redpanda Community on Slack.
Subscribe to our VIP (very important panda) mailing list to pounce on the latest blogs, surprise announcements, and community events!
Opt out anytime.