Real-time analytics with MongoDB and Redpanda Connect
Create a real-time analytics pipeline with Redpanda Serverless via Redpanda Connect
As companies increasingly rely on real-time data to drive business decisions, they face a growing need for seamless integrations between databases and streaming platforms. Integrating a robust NoSQL database like MongoDB with a high-performance streaming platform like Redpanda enables low-latency streaming and real-time data processing.
Redpanda Connect simplifies this integration with a user-friendly connector framework, allowing you to easily bridge components to enable real-time data streaming without the complexity of traditional streaming platforms.
Integrating MongoDB and Redpanda Connect can benefit many real-world scenarios, including:
- AdTech: Streaming user activity data in real time to create dynamic user segments and deliver personalized advertisements.
- SaaS: Capturing user interactions in SaaS applications to provide personalized features, improve user experience, or analyze usage patterns.
- AI: Feeding real-time data from MongoDB into AI models to provide dynamic predictions, such as real-time recommendations or fraud detection.
- Game analytics: Collecting and processing real-time game performance metrics, player interactions, and in-game events to optimize gameplay, provide real-time leaderboards, and enhance player engagement.
In this tutorial, you’ll learn how to create a real-time analytics pipeline by integrating MongoDB with Redpanda Serverless using Redpanda Connect.
Integrating MongoDB with Redpanda Connect
Imagine you work for a gaming company that uses gamer analytics to improve its games. The company has a popular game called “PandaCatch,” a first-person adventure game where you try to catch little red pandas.
The company wants to collect data about player actions, like when they press the directional buttons to jump or navigate to the right or left. It plans to use this information to optimize the game’s challenge level depending on the player.
You decide to use Redpanda as the event backbone for implementing this solution. However, since the company uses MongoDB as its database, efficient integration is crucial. Here, Redpanda Connect offers a native solution to bridge the two seamlessly.
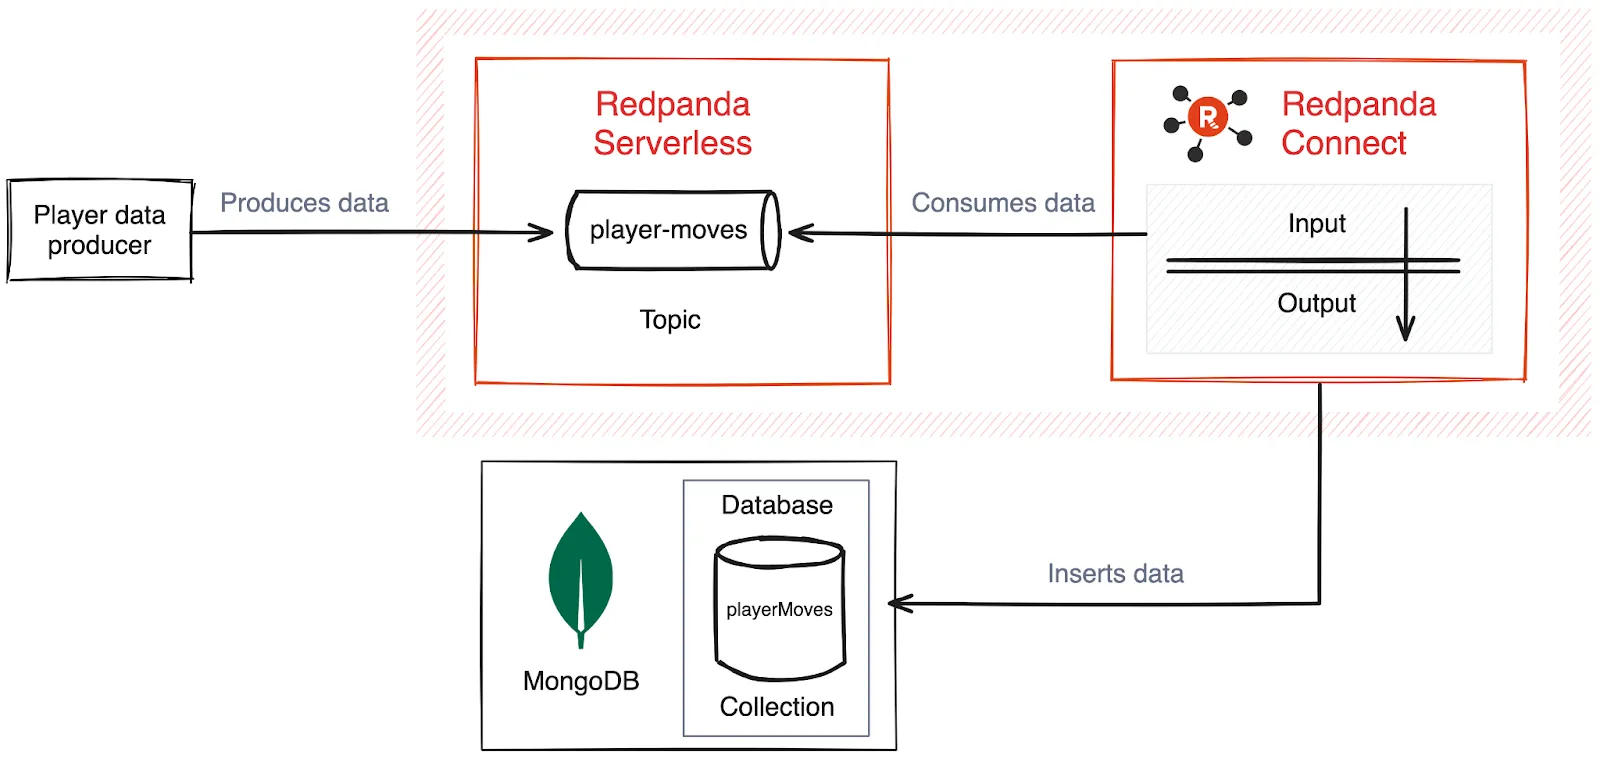
Here’s a rough architecture diagram for the scenario requirements:
Prerequisites
You’ll need the following to complete this tutorial:
- Docker or a similar container technology
- A Redpanda account and a Redpanda cluster on Redpanda Serverless
- The Git CLI
- The
rpkCLI
1. Set up Redpanda Serverless
To access Redpanda for your application, you need two things: a topic created for the data and access to the Redpanda Cloud secure cluster.
You can use the Redpanda Serverless web UI or the rpk CLI to create a Redpanda topic on the Redpanda Serverless platform. For this tutorial, you’ll use the rpk CLI to log in to your Redpanda Serverless account and create the required topic.
Log in to your Redpanda Serverless account using the following command:
rpk cloud loginThis should redirect you to your browser and require you to log in. Once you do so, you should see a message that says you’re successfully logged in and a prompt to select your cluster:
...output omitted...
Successfully logged into cloud organization "YOUR_ORGANIZATION" (********) via sso.
...output omitted...
? Which cloud resource-group/cluster would you like to talk to?  [Use arrows to move, type to filter]
> YOUR_CLUSTER_NAME_HERE
Press the Enter key to select and access your Redpanda Serverless cluster via the command line.
Next, create the required topic for the game. Run the following command to create a topic called player-moves on your cluster:
rpk topic create player-movesYou should see the following output if your creation is successful:
TOPIC        STATUS
player-moves  OK
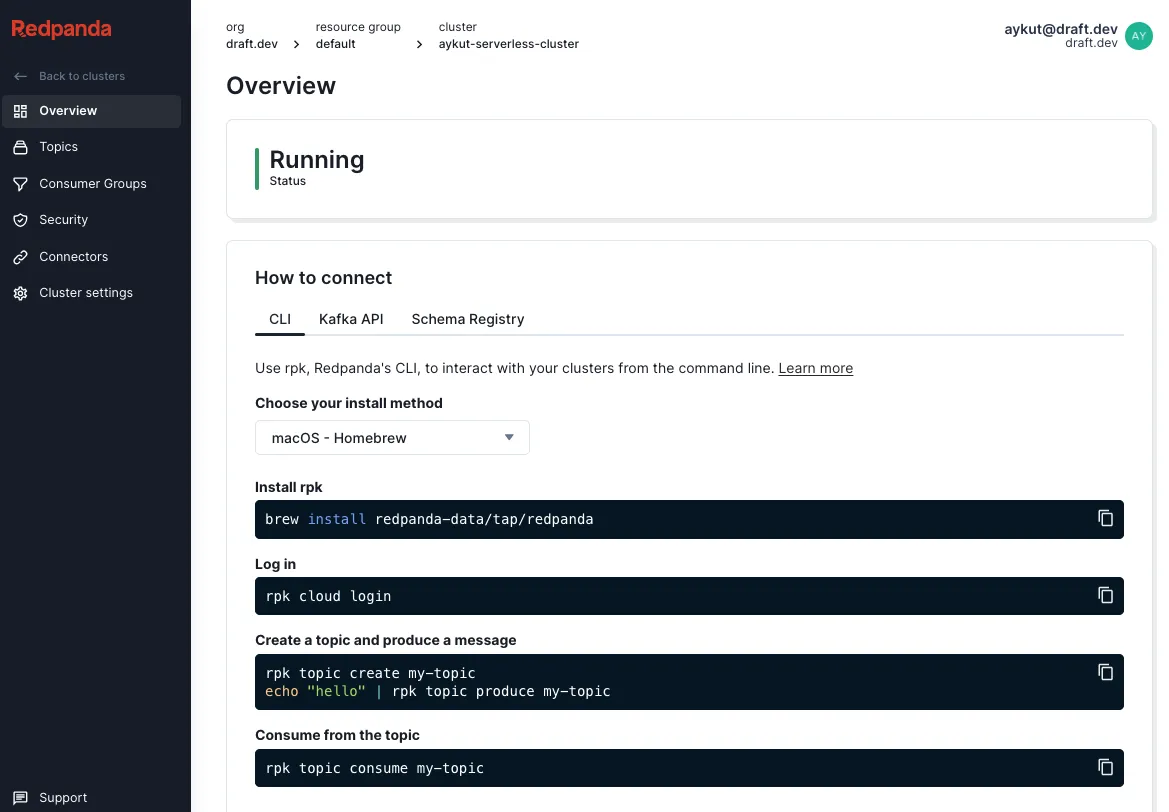
Once your topic is ready, the next step is to ensure you can securely connect to your cluster and access your topic. Go to your browser and navigate to the main page of your cluster, where you should see information about your cluster and how to connect it:
On the left-hand menu, click the Security menu item, which should open the “Access control” page for the cluster. Select the Users tab if it’s not selected, then click Create user:
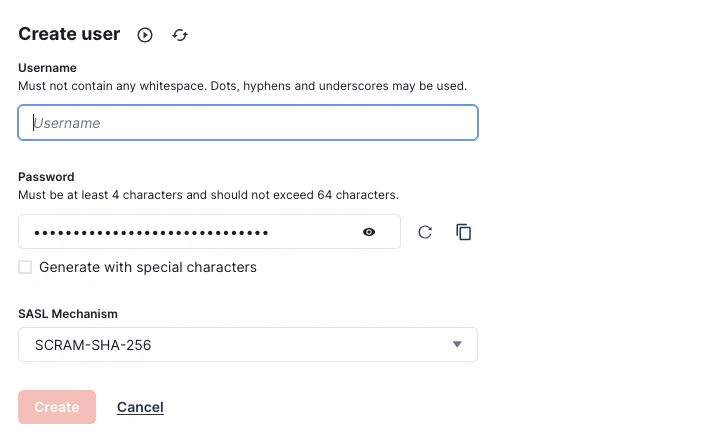
On the opened page, enter a username of your choice and set a password for it. Select SCRAM-SHA-512 as the SASL mechanism since it’s more secure than the 256 option. You can check out the documentation for more information on Kafka security.
Once you click the Create button, you should see a screen confirming that the user is created successfully. After this, click Create ACLs to open a new page for setting ACL rules for the user. Click your username on the opened page to open a pop-up for editing the access control list (ACL) of your new user:
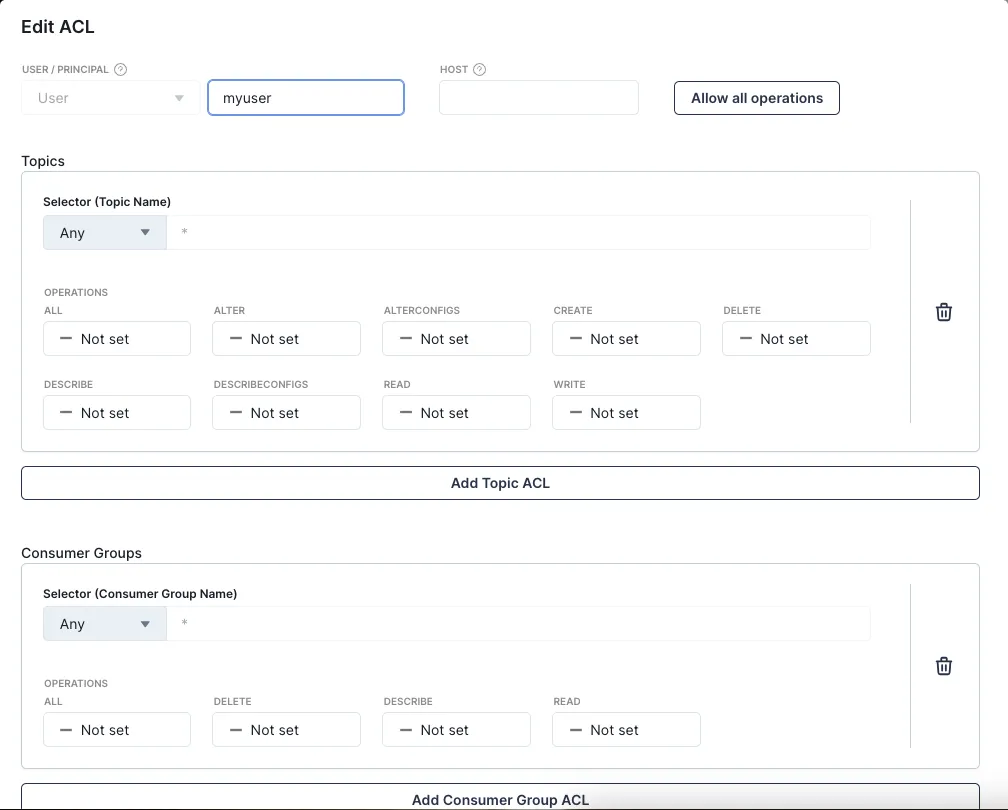
Click the Allow all operations button, which is at the top right of the pop-up window. Scroll down and click OK to save your user’s ACL configuration.
Important: Normally, for better security, you should create a different user with different credentials for specific topics for each use case. However, for demo purposes, you’ve given the user full access to all operations for all topics.
2. Run MongoDB and set up the collection
Before you can save the player moves, you need a database and collection in MongoDB. In your terminal window, execute the following command to run a new instance of MongoDB as a Docker container:
docker network create demo_network & \
docker run --name mongodb --network demo_network -p 27017:27017 -d mongodb/mongodb-community-server:latest
To verify that your MongoDB instance is running, run a docker ps command in your terminal. You should get an output similar to the following if your instance is running successfully:
CONTAINER ID   IMAGE                                     COMMAND    CREATED         STATUS         PORTS       NAMES
e14df1d90063   mongodb/mongodb-community-server:latest   "mongod"   3 seconds ago   Up 2 seconds   27017/tcp   mongodb
Next, create a collection to save your game player data. To do that, navigate into the mongodb container terminal using the following command:
docker exec -it mongodb bashIn the opened container bash, run the mongosh command. You should see an output similar to the following:
Current Mongosh Log ID: 671f6c0b8d116bfb56fe6910
Connecting to:  mongodb://127.0.0.1:27017/?directConnection=true&serverSelectionTimeoutMS=2000&appName=mongosh+2.3.2
Using MongoDB:  8.0.3
Using Mongosh:  2.3.2

For mongosh info see: https://www.mongodb.com/docs/mongodb-shell/


To help improve our products, anonymous usage data is collected and sent to MongoDB periodically (https://www.mongodb.com/legal/privacy-policy).
You can opt-out by running the disableTelemetry() command.
...output omitted...
In the opened MongoDB shell, run the following to see if there are any collections created already:
db.getCollectionNames()This should return an empty array ([]), as there’s no collection created yet. In the same MongoDB shell, run the following command to create one with the name playerMoves:
db.createCollection("playerMoves",{})
This command should return { ok: 1 }, which means the creation is successful. When you run the db.getCollectionNames() command again, you should see your collection listed:
[ 'playerMoves' ]You now have your Redpanda topic and MongoDB collection set up. In the next step, you’ll integrate them by configuring and running Redpanda Connect.
3. Configure and run Redpanda Connect
To configure and integrate Redpanda and MongoDB, you should define Redpanda as a source (input) and MongoDB as the sink (output) of the Redpanda Connect system.
To configure the input and output, create a YAML file called connect.yaml in a directory of your choice on your computer and add the following as a template input:
input:
  kafka:
    addresses: [] # No default (required)
    topics: [] # No default (required)
    consumer_group: ""
To enter the information needed, open a terminal window and run the rpk cluster info command to get your Redpanda bootstrap server address. When you run the command, you should get an output similar to the following:
CLUSTER
=======
redpanda.xxx

BROKERS
=======
ID    HOST                                                           PORT
4*    xxx-4.1.us-east-1.mpx.prd.cloud.redpanda.com  9092
5     xxx-5.0.us-east-1.mpx.prd.cloud.redpanda.com  9092
6     xxx-6.2.us-east-1.mpx.prd.cloud.redpanda.com  9092

TOPICS
======
NAME          PARTITIONS  REPLICAS
player-moves  1           3
Add your Redpanda broker address and topic in the configuration. You can define consumer_group as player-move-consumer-group. The input configuration in the YAML file should be similar to the following:
input:
  kafka:
    addresses: ["xxx-4.1.us-east-1.mpx.prd.cloud.redpanda.com:9092"] # No default (required)
    topics: ["player-moves"] # No default (required)
    consumer_group: "player-move-consumer-group"
While this should be enough for a local cluster, accessing your cloud-based Redpanda cluster that’s hosted on Redpanda Serverless requires additional security configuration.
You might remember that you already created a user and an ACL with full access. To allow this user to access the Redpanda topic, you should add an sasl section to provide credentials:
   sasl:
      mechanism: none
      user: ""
      password: ""
sasl.mechanism should be set to SCRAM-SHA-512. Use the username and password that you created when setting up your user account.
The full configuration for the input should be as follows:
input:
  kafka:
    addresses: ["xxx-4.1.us-east-1.mpx.prd.cloud.redpanda.com:9092"]
    topics: ["player-moves"]
    consumer_group: "player-move-consumer-group"
    sasl:
      mechanism: SCRAM-SHA-512
      user: "[YOUR_SASL_USERNAME]"
      password: "[YOUR_SASL_PASSWORD]"
Finally, since this is a SASL connection with SSL, you should provide the tls configuration. The YAML that includes the input configuration with TLS enabled is as follows:
input:
  kafka:
    addresses: ["xxx-4.1.us-east-1.mpx.prd.cloud.redpanda.com:9092"]
    topics: ["player-moves"]
    consumer_group: "player-move-consumer-group"
    tls:
      enabled: true
      skip_cert_verify: true
    sasl:
      mechanism: SCRAM-SHA-512
      user: "[YOUR_SASL_USERNAME]"
      password: "[YOUR_SASL_PASSWORD]"
To configure the output for MongoDB, you can use the following template:
output:
  mongodb:
    url:  "" # No default (required)
    database: "" # No default (required)
    collection: "" # No default (required)
    filter_map: ""
    document_map: ""
Update the template as follows:
- Change the value of
urltomongodb://mongodb:27017 - Set
databasetotest(this is the default) - Set
collectiontoplayerMoves(the collection you created when setting up the MongoDB instance)
You should also configure write_concern by setting w as majority, as you’ll be performing an insert-one operation. Make sure that the document mapping via document_map exactly matches the data sent, unless you want to drop a field and not send it to MongoDB.
The final output should look as follows:
output:
  mongodb:
    url: mongodb://mongodb:27017
    database: "test"
    collection: "playerMoves"
    operation: insert-one
    write_concern:
      w: "majority"
      j: false
      w_timeout: ""
    document_map: |-
      root.player_id = this.player_id
      root.move = this.move
      root.timestamp = this.timestamp
You haven’t changed the MongoDB database and created the playerMoves collection within that database, as this is just for demo purposes.
The final Redpanda Connect configuration should be similar to the following:
	input:
  kafka:
    addresses: ["xxx-4.1.us-east-1.mpx.prd.cloud.redpanda.com:9092"]
    topics: ["player-moves"]
    consumer_group: "player-move-consumer-group"
    tls:
      enabled: true
      skip_cert_verify: true
    sasl:
      mechanism: "SCRAM-SHA-512"
      user: "[YOUR_SASL_USERNAME]"
      password: "[YOUR_SASL_PASSWORD]"

output:
  mongodb:
    url: mongodb://mongodb:27017
    database: "test"
    collection: "playerMoves"
    operation: insert-one
    write_concern:
      w: "majority"
      j: false
      w_timeout: ""
    document_map: |-
      root.player_id = this.player_id
      root.move = this.move
      root.timestamp = this.timestamp
To run the configuration, execute the following command in a new terminal window:
docker run --rm -it --name=redpanda-connect \
--network demo_network \
-v $(pwd)/connect.yaml:/connect.yaml \
docker.redpanda.com/redpandadata/redpanda \
connect run
The output should look like this if the integration is successful:
+ '[' '' = true ']'
+ exec /usr/bin/rpk connect run
Downloading latest Redpanda Connect
INFO Running main config from file found in a default path  @service=redpanda-connect benthos_version=4.38.0 path=connect.yaml
INFO Listening for HTTP requests at: http://0.0.0.0:4195  @service=redpanda-connect
INFO Launching a Redpanda Connect instance, use CTRL+C to close  @service=redpanda-connect
INFO Output type mongodb is now active             @service=redpanda-connect label="" path=root.output
INFO Input type kafka is now active                @service=redpanda-connect label="" path=root.input
4. Verify the integration
To verify the integration, run the following command to produce real-time player data to your player-moves Redpanda topic:
docker run \
-e DEMO_BOOTSTRAP_SERVER=[YOUR_REDPANDA_SERVERLESS_BROKER_ADDRESS] \
-e DEMO_SASL_USERNAME=[YOUR_REDPANDA_SASL_USERNAME] \
-e DEMO_SASL_PASSWORD=[YOUR_REDPANDA_SASL_PASSWORD] \
quay.io/systemcraftsman/rp-connect-mongodb-demo-producer-app
Replace the values with the ones that you obtained before using the Redpanda Cloud UI. For the server, provide only the URL, omitting the port, as it defaults to 9092 in the producer application.
Once you run the command, you should see an output similar to the following:
---> Running application from Python script (app.py) ...
Message delivered to player-moves [0]
Message delivered to player-moves [0]
Message delivered to player-moves [0]
Message delivered to player-moves [0]
Message delivered to player-moves [0]
Message delivered to player-moves [0]
Message delivered to player-moves [0]
Message delivered to player-moves [0]
Message delivered to player-moves [0]
Message delivered to player-moves [0]
Message delivered to player-moves [0]
Message delivered to player-moves [0]
Message delivered to player-moves [0]
Message delivered to player-moves [0]
Message delivered to player-moves [0]
Message delivered to player-moves [0]
Message delivered to player-moves [0]
Message delivered to player-moves [0]
...output omitted...
The producer application sends 100,000 dummy player records to the related Redpanda topic, and this data should also appear in the playerMoves collection in MongoDB.
To verify that the records have been created in MongoDB, reopen your MongoDB shell using the command you used previously, then run the following command:
db.getCollection("playerMoves").find()This should return a result similar to the following:
[
  {
    _id: ObjectId('6722bc1f368a8c7d66e72f1d'),
    move: 'Left',
    player_id: 834,
    timestamp: '2024-01-09T17:19:24Z'
  },
  {
    _id: ObjectId('6722bc1f368a8c7d66e72f23'),
    move: 'Right',
    player_id: 662,
    timestamp: '2024-06-05T15:23:56Z'
  },
  {
    _id: ObjectId('6722bc1f368a8c7d66e72f1f'),
    move: 'Right',
    player_id: 234,
    timestamp: '2023-04-25T05:06:37Z'
  },
  {
    _id: ObjectId('6722bc1f368a8c7d66e72f20'),
    move: 'Right',
    player_id: 864,
    timestamp: '2024-03-19T03:48:05Z'
  },
  {
    _id: ObjectId('6722bc1f368a8c7d66e72f25'),
    move: 'Right',
    player_id: 746,
    timestamp: '2024-01-02T01:34:39Z'
  },
  {
    _id: ObjectId('6722bc1f368a8c7d66e72f26'),
    move: 'Left',
    player_id: 898,
    timestamp: '2024-01-22T20:31:26Z'
  },
  ...output omitted...
Congratulations! You’ve verified that your integration works successfully and you're all set.
Conclusion
In this tutorial, you explored how to integrate MongoDB with Redpanda Connect to create a real-time data streaming pipeline. You learned how to set up MongoDB, configure Redpanda Serverless, and implement a basic pipeline to stream data from MongoDB to Redpanda for real-time processing.
Using Redpanda Connect, you bypass the complexity often associated with Kafka Connect while benefiting from a more efficient, streamlined approach to data streaming. Whether you’re working in AdTech, SaaS, or AI, this integration offers a simpler, high-performance solution for real-time data ingestion and processing.
You can find the demo resources and the producer application code in this GitHub repository.
To start streaming data in seconds with Redpanda Serverless, sign up for a free trial. If you have questions, join the Redpanda Community on Slack and ask away!
Let's keep in touch
Subscribe and never miss another blog post, announcement, or community event. We hate spam and will never sell your contact information.


.png)

