Bridge Queries in Redpanda SQL
Have your real-time cake and eat your analytics too
Learn how to consume data from Redpanda then use Dremio for sales data analysis


To configure Redpanda Connect for an S3 bucket, you need to define the input from a Redpanda topic, a pipeline to define processors for mapping data for the output, and the output, which holds the configuration for saving the data to S3 in a specific format. You also need to update some placeholder text in the configuration snippet with your information, such as the bucket name, region, access key ID, and client secret.
Redpanda Connect, previously known as Benthos, can be used to consume messages from a Redpanda topic and send them to S3. It requires a YAML configuration file to define the input from a Redpanda topic, a pipeline to define processors for mapping data for the output, and the output, which holds the configuration for saving the data to S3 in a specific format.
You can use Docker to run Redpanda and Redpanda Connect. First, run your Redpanda instance within a Docker network. Then, use the terminal window to execute a command in the resources directory and run Redpanda Connect. You should use the same Docker network to access your Redpanda instance as defined in the Connect configuration file.
Dremio's integrations with many source and sink tools increase the number of possible use cases. Its versatility makes it ideal for AI/ML projects, retail analytics, SaaS applications, and real-time data processing. For instance, you can use a streaming tool like Apache Kafka or Redpanda to feed one of Dremio's supported data stores, consume messages from Redpanda, produce them to an Amazon S3 bucket, integrate S3 with Dremio, and query the inserted data in real time.
Dremio is a robust data platform and a universal data lakehouse. It's designed to ingest data from any supported resources, such as databases like MongoDB and PostgreSQL, search engines like Elasticsearch, meta stores like Apache Hive, and cloud storage services like Amazon S3 and Google Cloud Storage. This makes it easy to warehouse, query, or analyze data. Dremio's integration features also make it useful for data science purposes.
It's inevitable to see data in the middle of everything in modern enterprises' business processes. Companies that are fond of data-driven innovation can leverage data platforms by positioning them as a central hub and letting them manage the data lifecycle, starting from ingestion to processing and analysis.
Dremio, as a robust data platform, is a universal data lakehouse designed to ingest data from any supported resources, such as databases like MongoDB and PostgreSQL, search engines such as Elasticsearch, meta stores such as Apache Hive, and cloud storage services such as Amazon S3 and Google Cloud Storage. This ingestion makes it easy to put the data in a data warehouse, query the data, or use it for data analysis purposes. Moreover, you can use the data for data science purposes with the help of Dremio's integration features.
In this post, you'll learn about connecting your Redpanda to Amazon S3 by using the brand-new Redpanda Connect, integrating your S3 bucket with Dremio, and querying the inserted data in real time by using Dremio's fancy query interface.
Dremio's integrations with many source and sink tools increase the number of possible use cases that you can implement by using Dremio. Dremio's versatility makes it ideal for AI/ML projects, retail analytics, SaaS applications, and real-time data processing:
Dremio's integration capabilities create more possibilities to implement the above use cases. You can use a streaming tool such as Apache Kafka or Redpanda to feed one of Dremio's supported data stores. For example, you can consume messages from Redpanda and produce them to an Amazon S3 bucket. You can then easily integrate S3 with Dremio and query the inserted data in real time.
Suppose you work for a retail company that's developing an application to analyze inventory changes in real time.
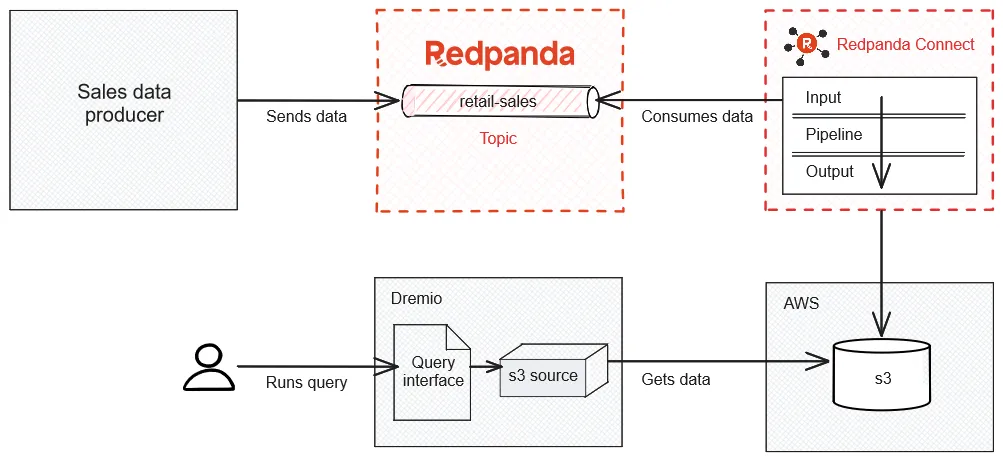
Your job is to implement a system that ingests the retail sales data (including information such as store, product, price, and quantity) from Redpanda, saves the data to Amazon S3, then uses Dremio for sales data analysis by querying the S3 source.
The following is a rough architecture diagram of the required solution:
You'll need the following to complete this tutorial:
You'll use Amazon S3 object storage to store the data and make it queryable via Dremio. Log in to your account, type "S3" into the search bar, and click the returned result to access the S3 page. There, click Create bucket to create a new bucket from scratch:
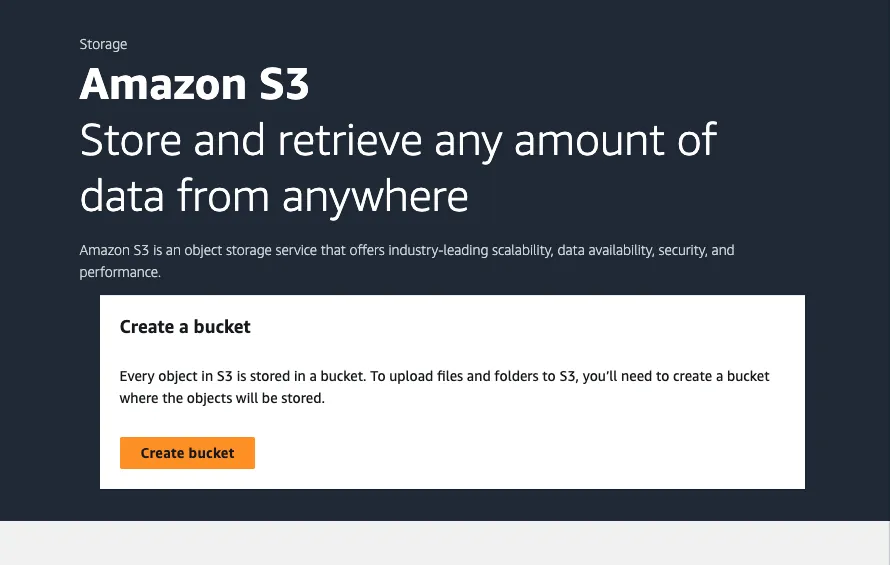
Your bucket must have a unique name. You can pick a name such as retail-sales-[YOUR_USERNAME]. Other than the name, keep the defaults as they are. Your bucket should look as follows:

You'll use Redpanda Connect (previously Benthos) to consume the messages from a Redpanda topic and send them to S3.
Redpanda Connect requires a YAML configuration file to define the input from a Redpanda topic, a pipeline to define processors for mapping data for the output, and the output, which holds the configuration for saving the data to S3 in a specific format. Before diving into the details of Redpanda Connect and its configuration, let's set up the demo environment.
In your home directory or wherever you prefer, run the following command to clone the repository base for this tutorial:
git clone https://github.com/redpanda-data-blog/real-time-analytics-retail-dremioWhen you navigate into the real-time-analytics-retail-dremio directory, you should see two main directories, apps and resources. The apps directory includes the application that you'll use in the tutorial, and the resources directory includes the required configuration resource for Redpanda Connect.
Open the connect-s3.yaml file with an editor of your choice. You should see that it's empty. Copy and paste the following configuration snippet to define the input for Redpanda:
input:
  kafka:
    addresses:
      - redpanda:9092
    topics:
      - retail-sales
    consumer_group: sales-consumer-group
Important: Be careful with the indentations while copying the YAML data.
Then, define the pipeline and a processor to map the retail sales data to the root of the output from the Redpanda input:
pipeline:
  processors:
    - sleep:
        duration: 50ms
    - mapping: |
        root.transaction_id = this.transaction_id
        root.store_id = this.store_id
        root.product_id = this.product_id
        root.quantity = this.quantity
        root.price = this.price
        root.timestamp = this.timestamp
The mapping part should give you an idea of the data structure you'll be using throughout the tutorial.
The last part of the Connect configuration is the output, where you should add the configuration for writing the data to S3. Add the following snippet to your connect-s3.yaml file:
output:
  label: ""
  aws_s3:
    bucket: "retail-sales-[YOUR_USERNAME]"
    path: sales${!count("files")}
    tags: {}
    content_type: application/json
    metadata:
      exclude_prefixes: []
    region: "[YOUR_AWS_BUCKETS_REGION]"
    credentials:
      id: "[YOUR_AWS_ACCESS_KEY_ID]"
      secret: "[YOUR_AWS_CLIENT_SECRET]"
      from_ec2_role: false
    batching:
      count: 100
      processors:
        - archive:
            format: json_array
As you can see, you'll need to update some placeholder text in this snippet with your information. Change the bucket name to the one you created in the first step and set the right region. If you're not familiar with AWS, you can check out the S3 documentation for more information.
You must also define your own access key ID and client secret so you can view and add data to your S3 bucket. For more information on getting or managing your ID and secret credentials, you can visit the "Managing access keys for IAM users" documentation page.
Above, output defines the path, content_type, and batching. The path stands for the name of the object created. In this case, it has a sales prefix and a dynamic variable representing the file count. So, the first file will be named sales1, and a new file will be created every 100 data entries, incrementing the number in the file name (for example, sales2, sales3, salesN, and so on). The batching setting in your YAML file configures this feature. The objects will be created as JSON files because the content_type is application/json, which is a supported, queryable format by Dremio.
Once you've copied everything, your final connect-s3.yaml file should look as follows:
input:
  kafka:
    addresses:
      - redpanda:9092
    topics:
      - retail-sales
    consumer_group: sales-consumer-group
pipeline:
  processors:
    - sleep:
        duration: 50ms
    - mapping: |
        root.transaction_id = this.transaction_id
        root.store_id = this.store_id
        root.product_id = this.product_id
        root.quantity = this.quantity
        root.price = this.price
        root.timestamp = this.timestamp
output:
  label: ""
  aws_s3:
    bucket: "retail-sales-[YOUR_USERNAME]"
    path: sales${!count("files")}
    tags: {}
    content_type: application/json
    metadata:
      exclude_prefixes: []
    region: "[YOUR_AWS_BUCKETS_REGION]"
    credentials:
      id: "[YOUR_AWS_ACCESS_KEY_ID]"
      secret: "[YOUR_AWS_CLIENT_SECRET]"
      from_ec2_role: false
    batching:
      count: 100
      processors:
        - archive:
format: json_arrayIn this tutorial, you'll use Docker to run Redpanda and Redpanda Connect. Open a terminal window and execute the following command to run your Redpanda instance within a Docker network called demo-network:
docker run -d --name=redpanda --rm \
    --network demo-network \
    -p 9092:9092 \
    -p 9644:9644 \
    docker.redpanda.com/redpandadata/redpanda \
    redpanda start \
    --advertise-kafka-addr redpanda \
    --overprovisioned \
    --smp 1  \
    --memory 1G \
    --reserve-memory 500M \
    --node-id 0 \
    --check=false
Note: Alternatively, you can run Redpanda directly on your local machine or use Redpanda Cloud or Redpanda Serverless specifically. If you use another alternative, your configurations need to be updated in order to access the Redpanda cluster.
Once you have your Redpanda instance up and running, use the terminal window you opened previously to execute the following command in the resources directory and run Redpanda Connect:
docker run --rm -it --name=redpanda-connect \
--network demo-network \
-v $(pwd)/connect-s3.yaml:/connect-s3.yaml \
docker.redpanda.com/redpandadata/redpanda \
connect run connect-s3.yaml
As you can see, you use the same Docker network in order to access your Redpanda instance named redpanda, as defined in the Connect configuration file. The output for the above execution should be as follows:
+ '[' '' = true ']'
+ exec /usr/bin/rpk connect run connect-s3.yaml
INFO Running main config from specified file       @service=benthos benthos_version=4.30.1 path=connect-s3.yaml
INFO Listening for HTTP requests at: http://0.0.0.0:4195  @service=benthos
INFO Launching a Redpanda Connect instance, use CTRL+C to close  @service=benthos
INFO Output type aws_s3 is now active              @service=benthos label="" path=root.output
INFO Input type kafka is now active                @service=benthos label="" path=root.input
Notice that the input and output are both active according to the log. This means that when you send data to the retail-sales Redpanda topic, Redpanda Connect should save it as an S3 object in the format configured in the Connect configuration YAML file.
Leave the terminal window open to keep the Redpanda Connect instance running.
With your Redpanda instance and the data connection to S3 set up via Redpanda Connect, you're ready to send data to the relevant Redpanda topic and create S3 objects. To do this, open a new terminal window and run the following command to execute the prebuilt producer application:
docker run quay.io/systemcraftsman/redpanda-dremio-demo-producer-appYou should see the messages being delivered to the topic:
Message delivered to retail-sales [0]
Message delivered to retail-sales [0]
Message delivered to retail-sales [0]
Message delivered to retail-sales [0]
Message delivered to retail-sales [0]
Message delivered to retail-sales [0]
Message delivered to retail-sales [0]
Message delivered to retail-sales [0]
Message delivered to retail-sales [0]
...Note: You can find the source code of this application in the apps/producer_app directory of your cloned project base.
To verify the data is being created on the S3 end, navigate back to your browser and to the S3 bucket you've created. When you click the bucket name, you should see something like this:
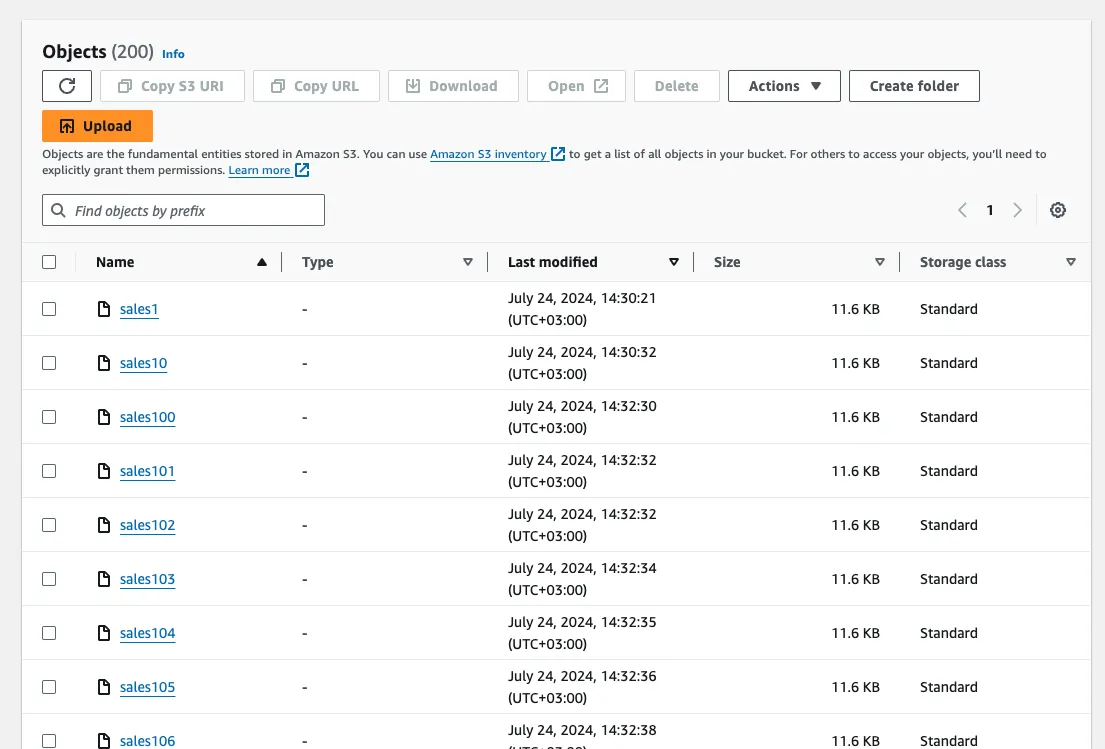
The producer application generates 20,000 sales data entries, so you should have 200 JSON objects with 100 data entries in each. Before you can query this data with Dremio, you'll first need to integrate it with your S3 bucket.
To run Dremio locally, run the following command so that you have a Dremio instance that runs on Docker:
docker run --rm -d \
  --name dremio \
  -p 9047:9047 \
  -p 31010:31010 \
  -p 31011:31011 \
  -p 45678:45678 \
  dremio/dremio-oss
Wait a few minutes for Dremio to start up. Then, in your browser window, navigate to http://localhost:9047/. You should see a page prompting you to create an admin account:

Enter your information to be taken to the Dremio home page, where you can add your new data source for S3. Click Add source under Sources and select Amazon S3 from the list. You should see a pop-up window appear:

Enter Retail Sales in the Name field. In the Authentication section, you should use the access ID and secret you obtained before. Enter your ID and secret and click Save to save your configuration. Keep everything else as is; you don't need to change them.
On the main page, click the name of your source (Retail Sales). You should see the S3 bucket imported as a folder. If you click the folder, you should see the same S3 objects created in AWS.
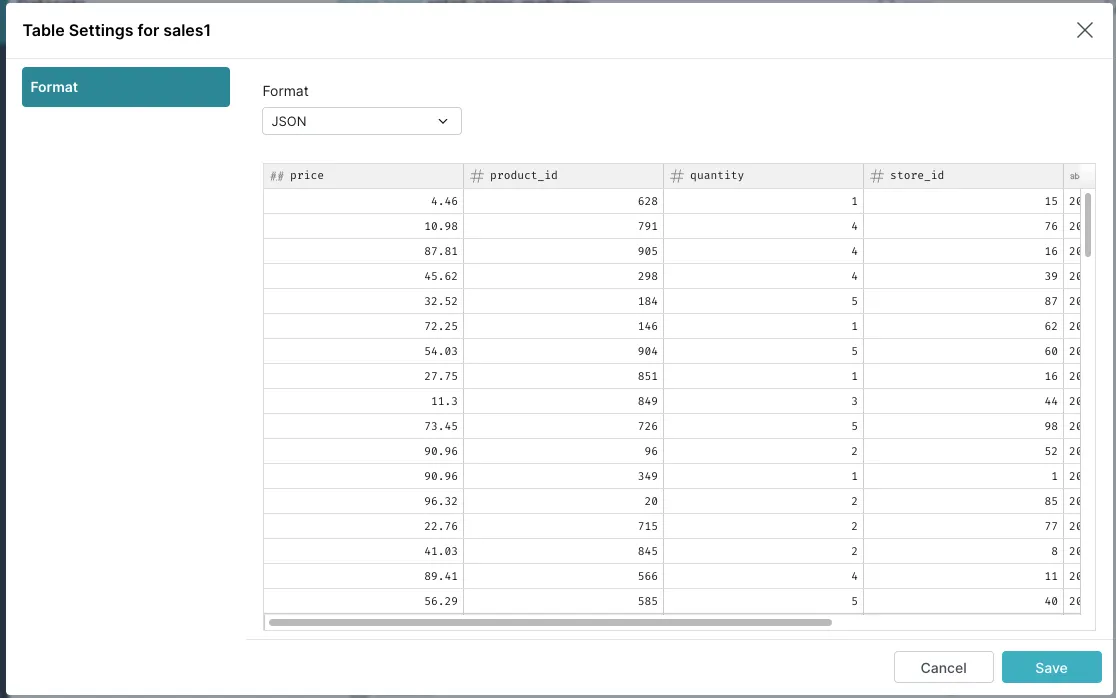
To prepare data for querying, you need to define it as a known format (such as JSON). Although your data is already saved in JSON format, the file objects are saved without a file extension due to your Redpanda Connect configuration. Therefore, Dremio requires that you define the object type.
Note: This setup is for education purposes within this demo. You can configure your S3 object files to be set with an extension by changing thepathin theoutputpart in your Connect configuration YAML file.
To change the format, click one of the objects (such as sales1) and change the format to JSON in the pop-up window. You should see that Dremio immediately previews the data:
When you save the configuration, you should be immediately redirected to the query page:
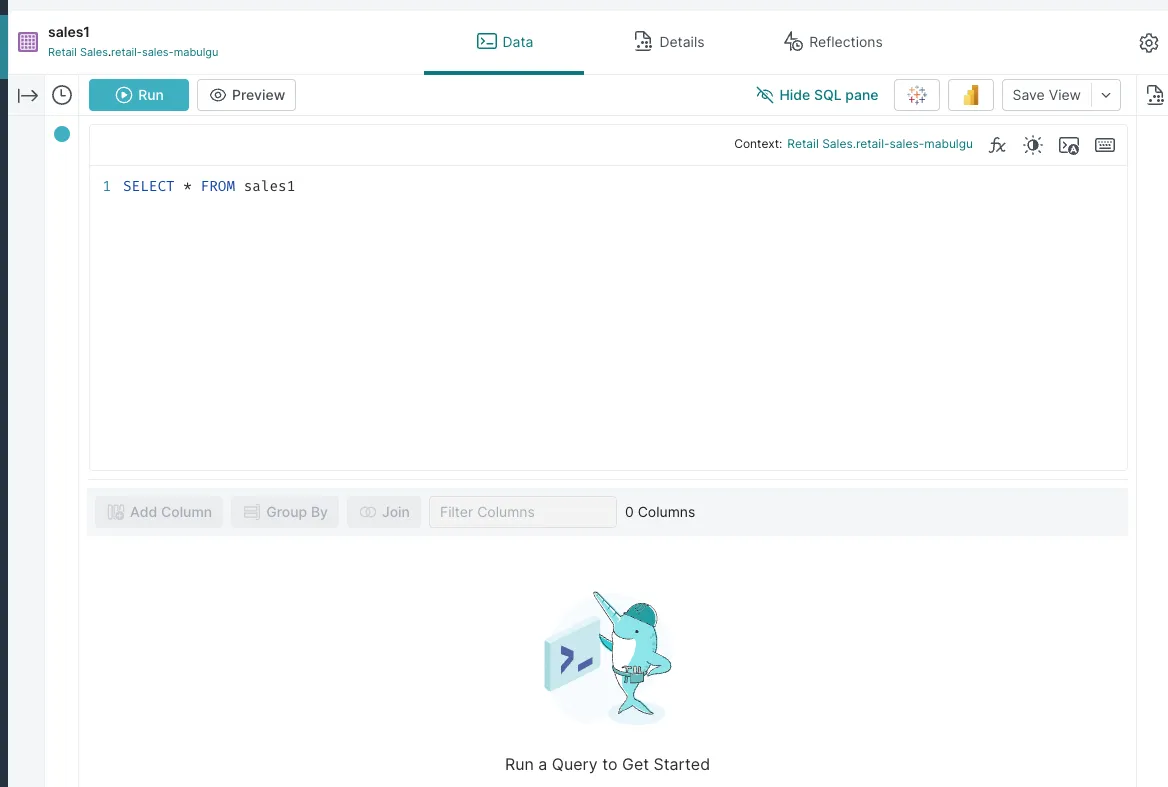
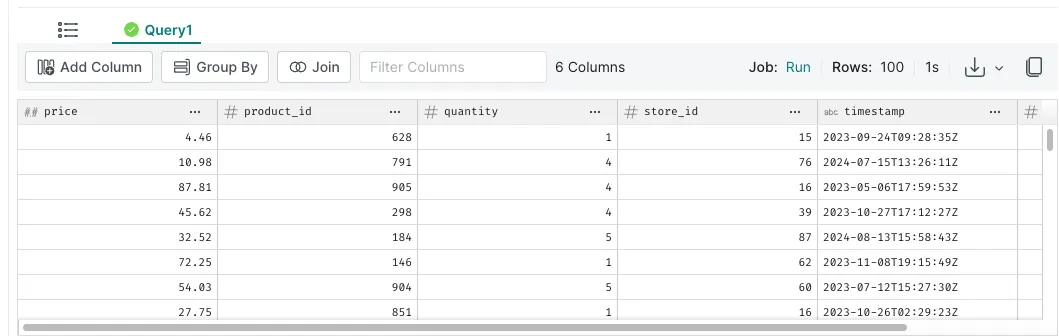
Click Run to try out the proposed query sentence. When the query finishes running, you should be able to see the results at the bottom:
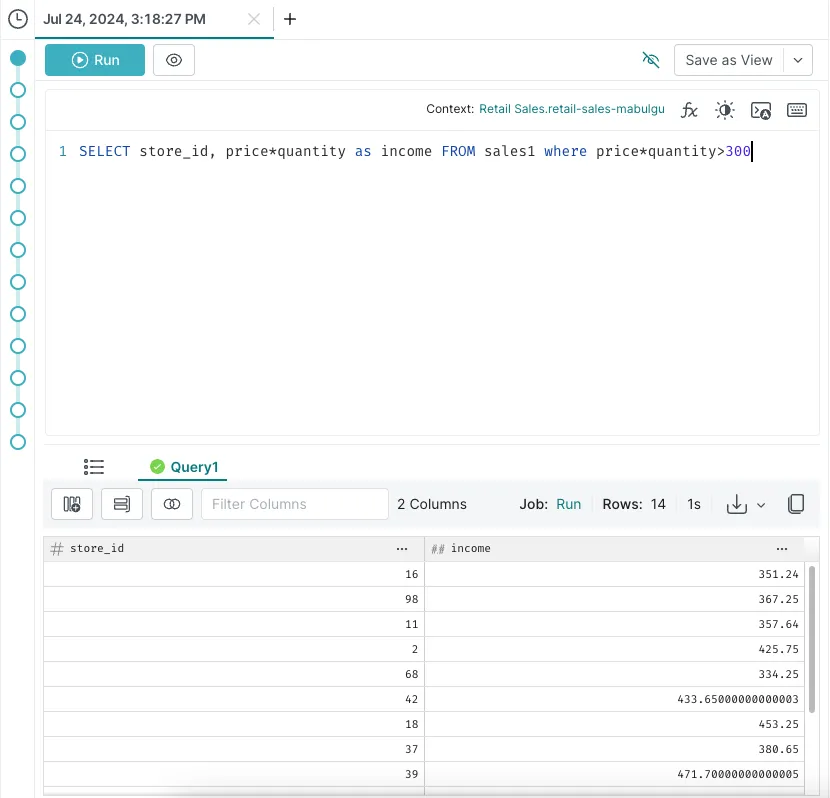
You can try out more complex queries, like finding the retail store IDs with an income of more than $300. Here's an example query for that:
In this post, you learned about Dremio and its importance in the data warehousing industry. Through a real-time data analytics scenario for the retail industry, you consumed data from Redpanda using Redpanda Connect and analyzed it using Dremio. You can find the complete code and resources in this GitHub repository.
To explore Redpanda, check the documentation and browse Redpanda University for free courses. If you have questions or want to chat with the team, drop into the Redpanda Community on Slack.
Subscribe to our VIP (very important panda) mailing list to pounce on the latest blogs, surprise announcements, and community events!
Opt out anytime.