What is Kafka Connect—A complete guide
What is Kafka Connect?
Kafka Connect is a framework and toolset for building and running data pipelines between Apache Kafka® and other data systems. It provides a scalable and reliable way to move data in and out of Kafka. It has reusable connector plugins that you can use to stream data between Kafka and various external systems conveniently.
This article provides a detailed overview of Kafka's architecture and its constituent components. We share several configuration options, code examples, and scenarios. We also discuss some limitations and best practices.
Summary of key Kafka Connect components
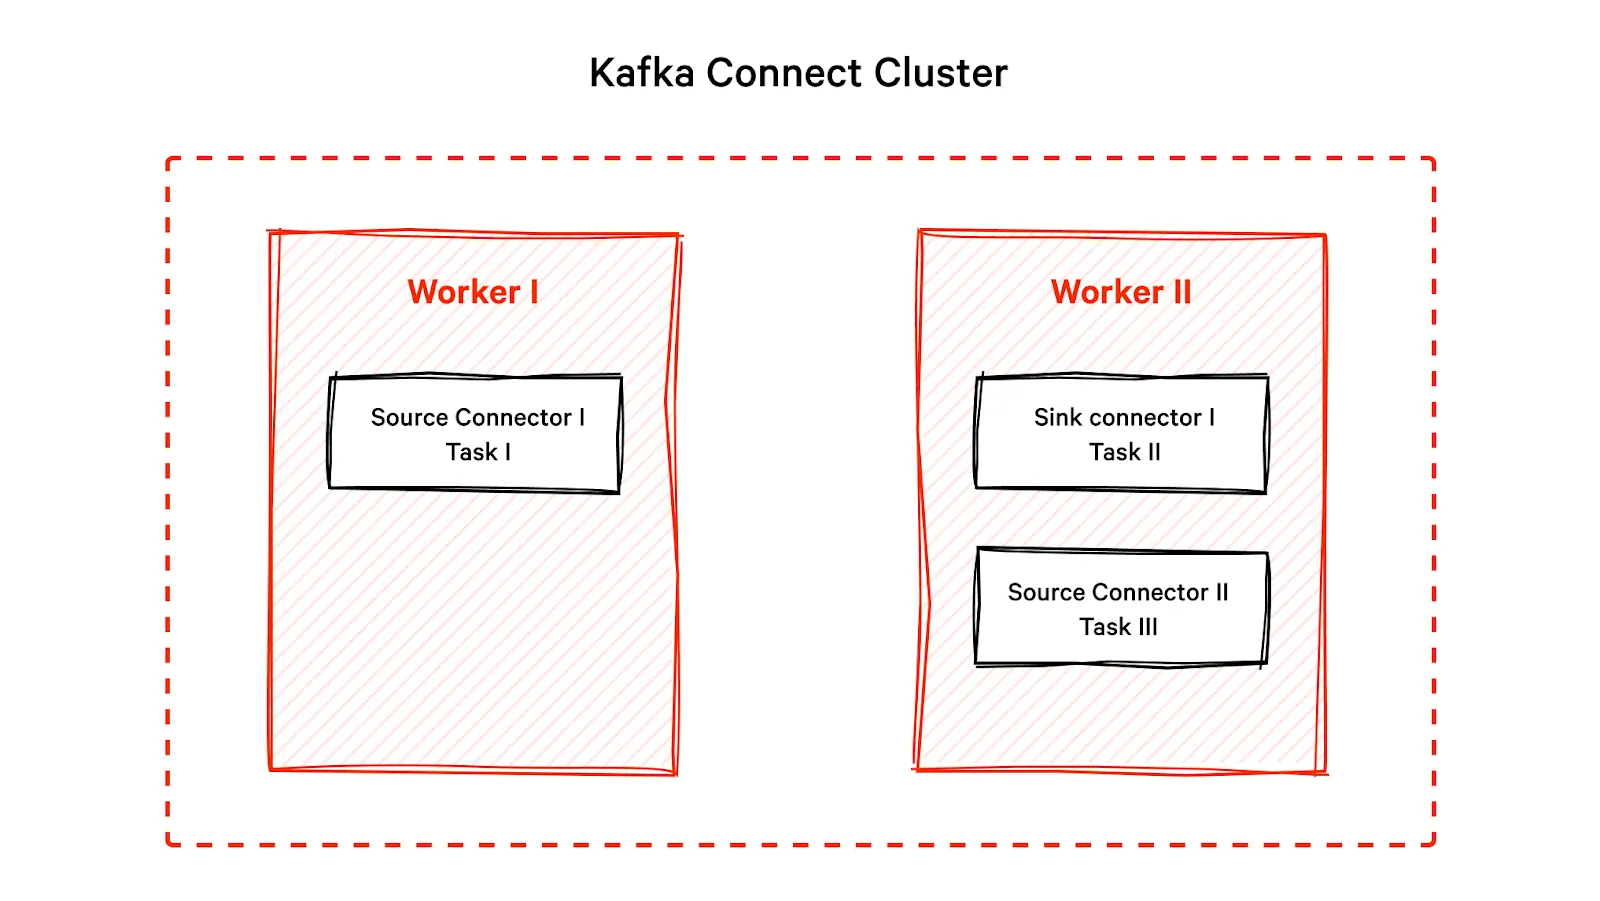
Kafka Connect workers
You can configure Kafka Connect as a standalone system with a single worker (server) or a distributed system with multiple workers. Each worker has a unique identifier and a list of connectors and tasks it is responsible for running.
In a distributed setup, workers coordinate task divisions and share metadata and configuration information. If a worker fails, another worker takes over the failed worker's tasks, provides fault tolerance, and ensures data processing is not disrupted.
Code example to start new workers
To start a worker, create a properties file - e.g., connect-worker-mysql.properties Each worker should have a unique group.id, and rest.port configuration. These are the mandatory attributes required to set up a worker.
# connect-worker-mysql.properties
bootstrap.servers=localhost:9092
group.id=connect-worker-1
rest.port=8083
key.converter = org.apache.kafka.connect.json.JsonConverter
value.converter = org.apache.kafka.connect.json.JsonConverter
offset.storage.topic=connect-offsets
config.storage.topic=connect-configs
status.storage.topic=connect-status
plugin.path=/bin/mysql-connector-j-8.0.32.jar # connector JAR
Start running a worker from the Installation binary folder of Kafka as follows
$ bin/connect-distributed.sh config/connect-worker-mysql.propertiesThis command starts a Kafka Connect worker in distributed mode and specifies the configuration file for the worker. Each worker coordinates with other workers in the cluster to distribute the load of the connectors and tasks. Make sure Kafka and ZooKeeper services are running as shown.
$ bin/zookeeper-server-start.sh config/zookeeper.properties
$ bin/kafka-server-start.sh config/server.properties
[CTA_MODULE]
Kafka connectors
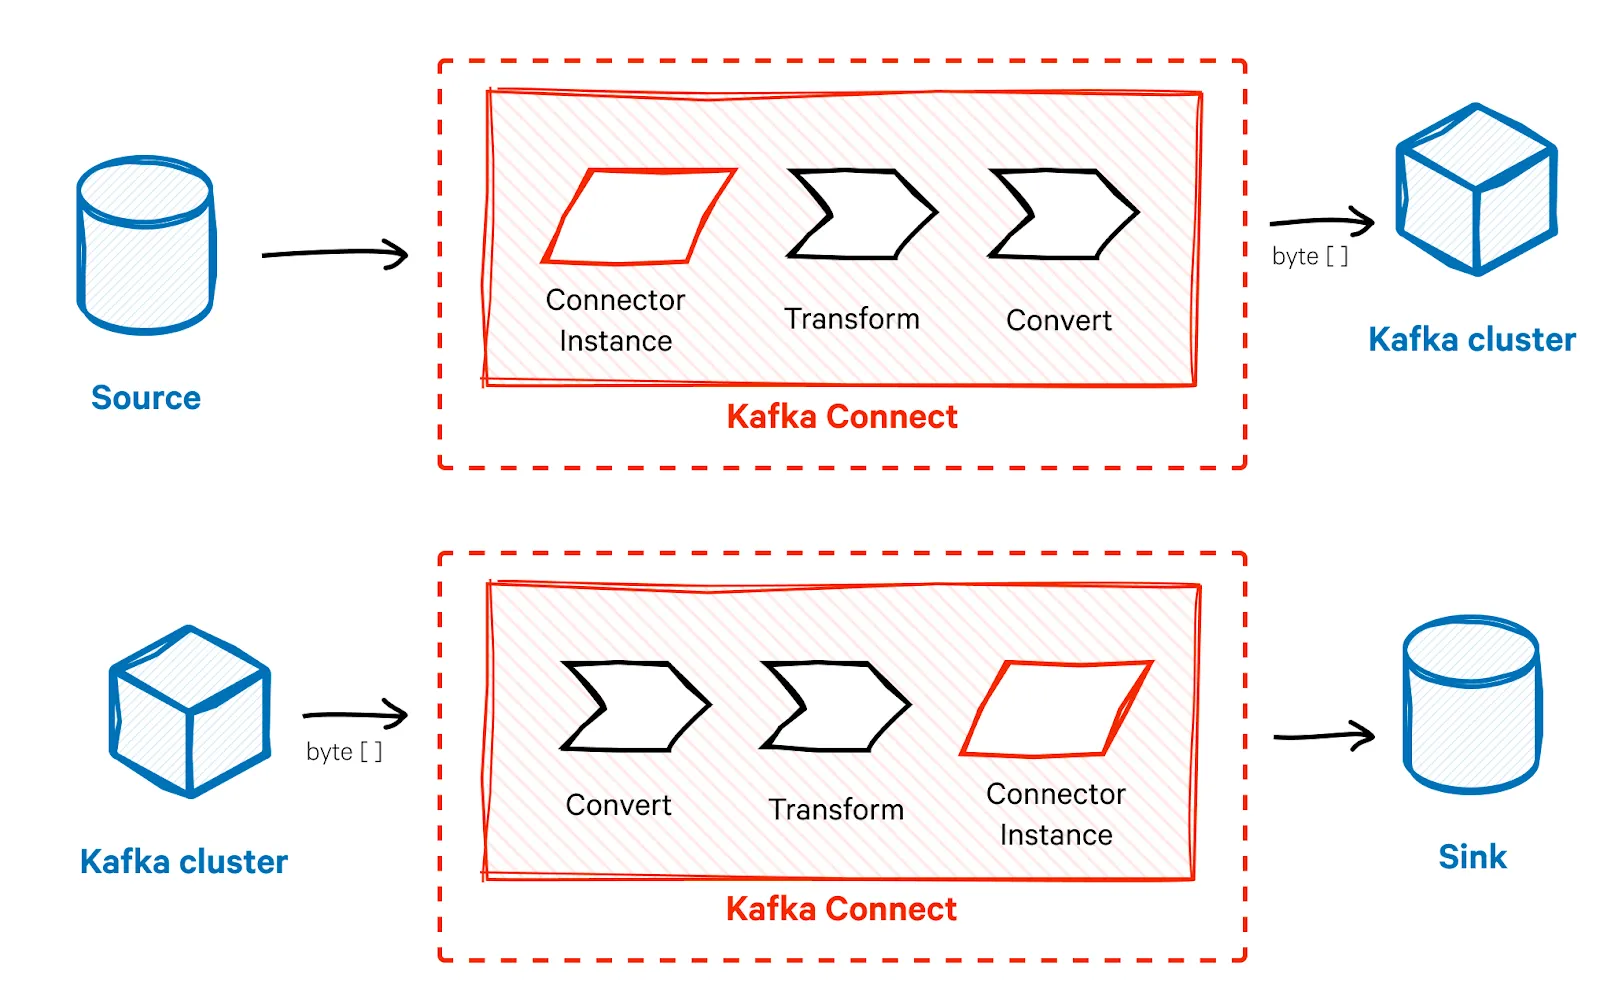
Connectors provide an abstraction layer that simplifies integrating with external systems. They are plugins responsible for establishing connections to external data sources. You can configure each connector to retrieve or push data in a particular way so that it defines the format in which you ingest or emit data.
Types of connectors
Kafka Connect provides two types of connectors.
Source connectors
Source Connectors poll data from external sources such as databases, message queues, or other applications. For instance, a Source Connector for a MySQL database reads changes in the database table and converts them into Connect Records, which are then sent to the Kafka cluster.
Sink connectors
Sink Connectors save data to the destination or sink, such as Hadoop Distributed File System (HDFS), Amazon Simple Storage Service (S3), or Elasticsearch. For example, a Sink Connector for Elasticsearch takes Connect Records from Kafka and writes them into Elasticsearch in the required format.
Code example to set up a new connector
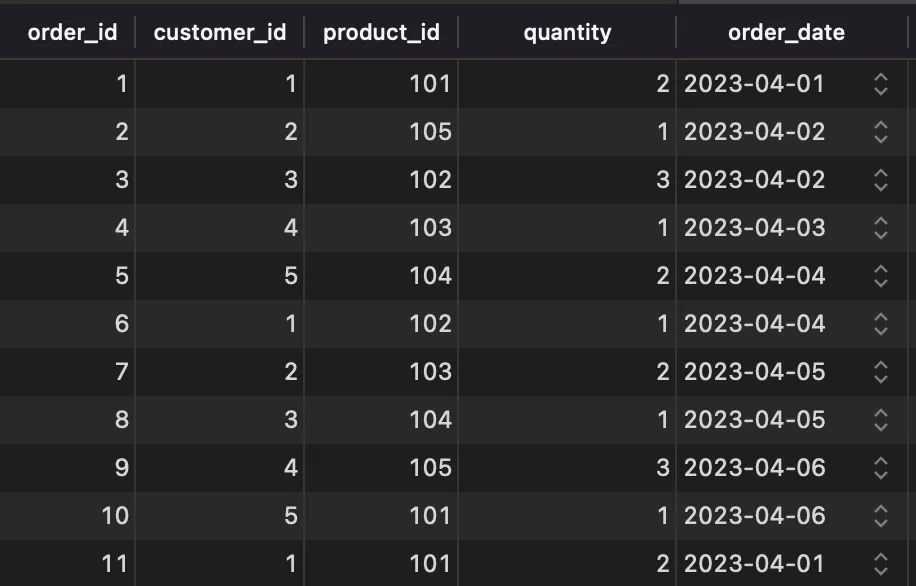
Consider we have an Orders table for an eCommerce company, with 5 columns as shown.

Say we want to set up a MySQL JDBC source connector so that when you add a new row to the orders table, the connector captures the change and produces a message. The message contains the new row data serialized as the below JSON object.
{
 "order_id": 12,
 "customer_id": 93,
 "product_id": 105,
 "quantity" : 2
 "order_date": "2023-04-11"
}
A connector file mysql-order-connector.json looks something like below.
{
  "name": "jdbc-source-connector",
  "config": {
	"Connector.class": "io.confluent.connect.jdbc.JdbcSourceConnector",
	"connection.url": "jdbc:mysql://localhost:3306/ecommerce",
	"connection.user": "root",
	"connection.password": "admin",
	"mode": "incrementing",
	"tasks.max": 3, // Maximum number of tasks the connector can create
	"topic.prefix": "topic-", // Prefix to add to topic created by the connector
	"table.whitelist": "orders", // Whitelist of tables to include in the connector's scope
	"key.converter": "org.apache.kafka.connect.json.JsonConverter",
	// Converter class for the key serialization - format of key data be converted
	"value.converter": "org.apache.kafka.connect.json.JsonConverter"
	// Converter class for the value serialization - format of value data be converted
	}
 }
You can pass the connector to the worker we created in the previous section about Kafka workers. The worker is running on REST port 8083.
$ curl -X POST -H "Content-Type: application/json" --data @mysql-order-connector.json http://localhost:8083/connectorsThe connector also creates a topic called topic-orders. You can run the below code to check your topics.
$ bin/kafka-topics.sh --bootstrap-server localhost:9092 --listNow, you can use the consumer client to listen to the messages under topic-orders
$ bin/kafka-console-consumer.sh --bootstrap-server localhost:9092 --topic topic-orders --from-beginningKafka Connect tasks
Tasks are independent units of work that process specific data partitions. When you start a connector, it gets divided into multiple tasks. Each task is responsible for a subset of the connector's data. This approach allows you to process data in parallel, improving throughput.
When a task is created, Kafka Connect assigns it a subset of the partitions for the Orders table. The number of partitions for the table depends on how you configure it in the MySQL database. If, for example, you partition the table by a date column, each task may be assigned a subset of the partitions based on the date range of the data. If the table is not partitioned, Kafka Connect assigns the partitions round-robin.

Code example to configure tasks
In this example, we define a JDBC source connector that reads data from the orders table in a MySQL database. We set the tasks.max configuration property to 3 so that Kafka Connect creates three tasks to read data from the table.
public class JdbcSourceTask extends SourceTask {
 @Override
 public void start(Map\<String, String\> props) {
 // Initialize the task with configuration properties
}
@Override
public List\<SourceRecord\> poll() throws InterruptedException {
List\<SourceRecord\> records \= new ArrayList\<\>();
// retrieve data from the JDBC source connector
List\<Map\<String, Object\>\> data \= retrieveDataFromJdbcSource();
// convert data to SourceRecords
for (Map\<String, Object\> record : data) {
	SourceRecord sourceRecord \= new SourceRecord(null,null,"topic-orders",null,null,null,record);
	records.add(sourceRecord);
}
return records;
}
}
Kafka Connect transformations
Transforms allow for run-time data manipulation as messages move through Kafka Connect. You can use transforms for filtering, modifying, or enriching messages before they reach their destination. You can specify transformations at the connector or task level so that they process data in a specific order. For example, you can set them to filter before modifying or modify before filtering.
Kafka Connect provides several built-in transformations, such as RenameField, ExtractField, and TimestampConverter. You can also develop custom transformations to fit specific data requirements.
Code example for adding a transformation
Let’s say you want to remove PII information such as phone and email from the SourceRecord. You can write your custom PIIRemoveTransformation class and initialize it, as shown below.
@Override
public void start(Map<String, String> props) {
// Initialize the transformation
transformation = new PIIRemoveTransformation<>();
// Configure the transformation with any necessary properties
Map<String, String> transformationProps = new HashMap<>();
transformationProps.put("drop.fields", "phone,email");
transformation.configure(transformationProps);
}
[CTA_MODULE]
Kafka Connect converters
The converter is responsible for serializing and deserializing the message data. The converter ensures the data format in Kafka is compatible with the external system's expected format and vice versa. It converts the message into a format that you can send to the Kafka cluster as byte arrays and vice versa.
Kafka Connect provides pre-built converters for common data formats such as JSON and Avro, but you can also develop custom converters. You can specify the converter at the connector or task levels, allowing different connectors or tasks to use different data formats.

Code example to initialize converters
Here is how we can initialize the converter.
public class JdbcSourceTask extends SourceTask {
@Override
public void start(Map<String, String> props) {
// Initialize the JSON converter for use
converter = new JsonConverter();
converter.configure(props, false);
}
}
We can implement transform and converter to convert the record into JSON format on each of the records as shown below
public class JdbcSourceTask extends SourceTask {
@Override
public void start(Map<String, String> props) {
}
@Override
public List<SourceRecord> poll() throws InterruptedException {
List<SourceRecord> records = new ArrayList<>();
// retrieve data from the JDBC source connector
List<Map<String, Object>> data = retrieveDataFromJdbcSource();
// Apply the transformation to the data
List<Map<String, Object>> transformedData = new ArrayList<>();
 for (Map<String, Object> record : data) {
	transformedData.add(transformation.apply(new SourceRecord(null, null, "topic-orders", null, null, null, record))); }
// Convert the transformed data to JSON
List<byte[]> jsonRecords = converter.fromConnectData("topic-orders", Schema.STRING_SCHEMA, transformedData);
// Convert the JSON records to SourceRecords
for (byte[] jsonRecord : jsonRecords) {
   SourceRecord sourceRecord = new SourceRecord(null,null,"topic-orders",null,null,null,jsonRecord);
records.add(sourceRecord);
}
return records;
}n this example, the data is first retrieved from the JDBC source as a list of maps (List<Map<String, Object>> data), then transformed using a transformation object. The transformed data is then converted to JSON using a converter object.
However, since Kafka Connect expects data to be SourceRecord objects, the JSON records are re-converted to SourceRecord objects before they can be sent to the Kafka broker.
Note: if you've already specified the converter in your connector configuration file (mysql-order-connector.json), you don't need to specify it again in your task code. When you start the Kafka Connect worker and deploy the connector, the worker automatically initiates the converter specified in the connector configuration and passes it to the task.
Kafka Connect dead-letter queues
Dead-letter queues (DLQs) act as a fail-safe mechanism for critical messages that were not processed successfully. When a message fails to process successfully, it is moved to the DLQ, preventing message loss and enabling developers to detect and resolve the underlying cause of processing failures. You can configure DLQs at the connector or task level to ensure that important messages are not lost.
Code example to configure DLQs
Here is an example of how we can configure a DLQ if some of the Order table records fail to process.
@Override
public void start(Map<String, String> props) {
   // Initialize the DLQ transformation
   dlqTransformation = new DeadLetterQueueTransformation<>();
   // Configure DLQ transformation with DLQ topic & maximum retries
   Map<String, String> transformationProps = new HashMap<>();
   transformationProps.put("deadletterqueue.topic.name", "orders-dlq");
   transformationProps.put("deadletterqueue.max.retries", "3");
   dlqTransformation.configure(transformationProps);
   // Get the maximum number of retries from the configuration
   maxRetries = Integer.parseInt(props.get("max.retries"));
}
@Override
public List<SourceRecord> poll() throws InterruptedException {
   List<SourceRecord> sourceRecords = new ArrayList<>();
   List<Map<String, Object>> data = retrieveDataFromMySql();
   // Process each record
 for (Map<String, Object> record : data) {
	try {
		sourceRecords.add(new SourceRecord(null, null, "topic-orders", null, null, null, record));
       } catch (DataException e) {
           // DataException indicates a non-retriable error
	     log.error("Failed to create SourceRecord from data: {}", e.getMessage());
           // Move the failed record to the DLQ
           dlqTransformation.apply(new SourceRecord(null, null, "topic-orders", null, null, null, record));
       } catch (RetriableException e) {
           // Retry logic here
   }
   }
   return sourceRecords;
}
Limitations of Kafka Connect
Although Kafka Connect is a powerful tool for creating scalable data pipelines, it does have certain limitations.
Limited options
There are fewer than 20 different types of connectors in Kafka Connect. If a generic connector is unsuitable, you must develop a custom one. Similarly, Kafka Connect only provides a basic set of transformations, and you may also have to write your custom transformations. This can increase the time and effort required for implementation.
Configuration complexity
Kafka Connect configurations quickly become complex, especially when dealing with multiple connectors, tasks, and transformations. This can make managing, maintaining, and troubleshooting the system difficult. It is also challenging to integrate Kafka Connect with other tools that your organization may already be using. This creates a barrier to adoption and slows down the implementation process.
Limited support for built-in error handling
Kafka’s primary focus is on data streaming which results in limited built-in error-handling capabilities. The distributed nature and potential interdependencies between various components of Kafka increase complexity, making it difficult to figure out the root cause of the error. You may have to implement custom error-handling mechanisms which can be time-consuming and may not always be as reliable as built-in capabilities provided by other data integration and ETL tools.
Recovering gracefully from complex errors is also challenging in Kafka, as there may not be a clear path to resume data processing after an error occurs. This can lead to inefficiencies and require further manual intervention to restore normal operations.
Performance issues
Most applications require high-speed data pipelines for real-time use cases. However, depending on the connector type and data volume, Kafka Connect may introduce some latency into your system. This may not be suitable if your application cannot tolerate delays.
However, based on these limitations, it would be incorrect to assert that Kafka Connect is not a good choice; it has numerous benefits that far outweigh its limitations.
Best practices for Kafka Connect
Kafka Connect is a powerful tool for building scalable data pipelines, but ensuring a successful implementation and operational adoption requires following best practices. Here are some tips and advice to avoid mistakes and achieve success with Kafka Connect
Plan your pipeline
Before starting the implementation process, determine the sources and destinations of your data, and ensure that your pipeline is scalable and can handle increasing data volumes. Also, be sure to provision infrastructure accordingly. Kafka Connect requires a scalable and reliable infrastructure for optimal performance. Use cluster-based architecture with sufficient resources to handle the data pipeline load and ensure your infrastructure is highly available.
Use a schema registry
Utilizing a schema registry in Kafka Connect can be beneficial as it allows for centralized storage and management of schemas. This helps maintain schema consistency across systems, reduces the likelihood of data corruption, and streamlines schema evolution.
Configure for performance
It is important to design and configure your Kafka connect for future scale and performance. For example, you can implement a suitable partitioning strategy to distribute your data evenly across partitions. This will help your Kafka Connect cluster manage a high data volume effectively. Similarly, you can use an efficient serialization format such as Avro or Protobuf to transfer it faster in the network.
Monitoring
Monitoring is critical for ensuring the smooth functioning of your data pipeline. Use monitoring tools to track the performance of your Kafka Connect deployment and quickly identify and address any issues. You can also consider implementing a Dead Letter Queue (DLQ) as a safety net for capturing and handling any messages that repeatedly fail during retries, ensuring they don't get lost.
[CTA_MODULE]
Conclusion
Kafka Connect is a useful tool for building flexible, large-scale, real-time data pipelines with Apache Kafka. It uses connectors to make moving data between Kafka and other systems easier, providing a scalable and adaptable solution. Kafka Connect components, including workers, tasks, converters, and transformations, allow you to move data between several different source and target systems, convert data from one form to another, and transform your data for analytics. You can also set up dead letter queues for error handling. While Kafka Connect has some limitations, you can follow best practices for successful adoption.
[CTA_MODULE]


.png)


